
Related Manuals for DeerValley DV-1S1059-V1


Summary of Contents for DeerValley DV-1S1059-V1
- Page 1 Installation and Owner’s Manual Smart Toilet (DV-1S1059-V1) NOTE: Drawings may not exactly define contour of the product. www.deervalleybath.com | (+1) 312-626-9466 | service@ deervalleybath.com...
- Page 2 (+1) 312-626-9466 service@deervalleybath.com...
-
Page 3: Table Of Contents
Safety Precautions Component List Specification Function Table Parts Names Product Drawing Power and Water Connection Installation Precaution Product Installation Side Control Using Instructions Other Functions Instruction Cleaning & Maintenance How to do Troubleshooting Maintenance Service Sheet... -
Page 4: Safety Precautions
Could result in serious injury or death. The following symbols are used to indicate important safety precautions when using the product. Prohibited. Pay close attention; caution. NOTE: Specialized tools may be necessary to install DeerValley Smart Toilet, plumbing not included. (+1) 312-626-9466 www.deervalleybath.com... - Page 5 Installation and Owner’s Manual WARNING It is not allowed to continue using if the product has some breakdown: Product heat abnormally; Product is smoking; Product has abnormal sound and smell; Product is leaking, broken or damaged; Toilet pan is blocked, etc. When the breakdown happens, if it do not handle in time and continue using, it might trigger the problems like electric shock, injury, firing or water penetration inside the room, etc.
- Page 6 Installation and Owner’s Manual WARNING When using in shower room, please install air exchange equipment to ensure the air in the shower room not too moist. This product is electric products, it is not allowed to install it in the place that is easy high wet, easy split by water, otherwise it might trigger electric shock or fire.
-
Page 7: Component List
Installation and Owner’s Manual Component List SMART TOILET SEALING RING TEFLON TAPE 15/16-14UNS ADAPTER USER MANUAL INLET VALVE NPT1/2″ G3/4″ USER MANUAL NOTE: Drawings may not exactly define contour of the product. (+1) 312-626-9466 www.deervalleybath.com... -
Page 8: Specification
Installation and Owner’s Manual Specifications Rated voltage 120V~ 60Hz Power cord length About 1.2m (49 in) Surface temperature 4 levels adjustable, room temperature about 107°F Seat Safety device Thermal fuse Flush consumption 1.28Gpf/4.8Lpf Toilet Flushing mode Siphon jet Rough-in 305mm (12.0 in) Rated power Maximum power Waterproof level... -
Page 9: Function Table
Installation and Owner’s Manual Function Table Category Function Seat heating ● Seat ring temperature adjustment Comfort ● Soft close seat & lip ● Night light ● Foot sensor control flush ● Automatic flush ● Human care Flush with power failure ●... -
Page 10: Parts Names
Installation and Owner’s Manual Parts Names Seat Type-C interface Ceramic toilet Foot sensor NOTE: Drawings may not exactly define contour of the product. NOTE: Drawings may not exactly define contour of the product. (+1) 312-626-9466 www.deervalleybath.com... -
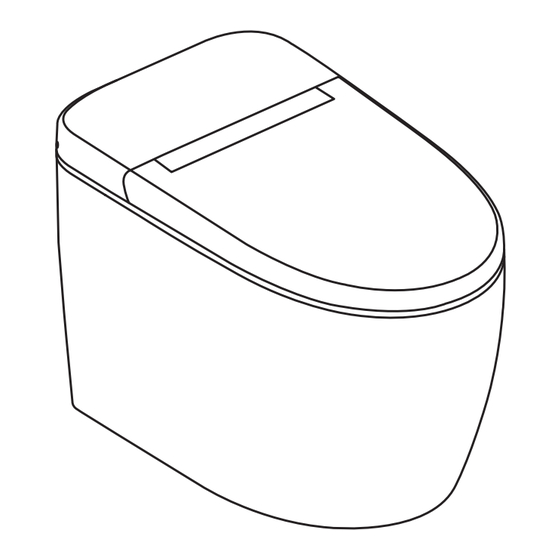
Page 11: Product Drawing
Installation and Owner’s Manual Product Drawings About 680mm( 26.8 in ) Power and Water Supply Connection Connect to grounded outlet Caution electric shock! GFCI outlet ● If the power cord is not long enough, please use extension line which is made by certificated manufacturers. -
Page 12: Installation Precaution
Installation and Owner’s Manual Installation Precaution We reserve the right to change, update, modify, alter, redesign this manual and product without prior notice. We shall not be liable for any injuries or property damages in connection with improper installation or use of the product. Installation Tools Hammer Drill Caulking Gun... -
Page 13: Product Installation
Installation and Owner’s Manual Product Installation 1. Install the inlet valve Clean and dry the ground before installation. Mark the draining outlet central lines and install the inlet valve on the wall. Connect to grounded outlet Caution electric shock! GFCI outlet 3 0 5 ( 1 2 . - Page 14 Installation and Owner’s Manual Product Installation 3. Toilet installation(Method 1) ① Sealing ring installation Gently tilt the toilet sideways. Install the sealing ring evenly along the outlet, make sure the small end of the sealing ring face the toilet. Glue the edge of toilet bottom with silicone sealant, place the toilet along the marked outline.
- Page 15 Installation and Owner’s Manual Product Installation 4. Toilet installation(Method 2) ① Remove the bidet seat Remove the fixing screws, disconnect the hoses, then separate the bidet seat from the toilet. Decoration panel Screw Washer Fixed hole ② Sealing ring installation Place the sealing ring onto the flange.
- Page 16 Installation and Owner’s Manual Product Installation ③ Toilet(ceramic) installation Glue the edge of toilet bottom with silicone sealant Align the toilet with the flange and screws. Place the toilet along the outline and secure the flange bolts. Glue the edge of toilet bottom with silicone sealant. ④...
- Page 17 Installation and Owner’s Manual Product Installation 5. Connect the water inlet valve and filter As shown in the following figures. NOTE: Do not use the smart toilet immediately after installation, use it after 48 hours. G3/4 1. Install the part A water inlet valve. 2.
-
Page 18: Side Control Using Instructions
Installation and Owner’s Manual Side Control Using Instructions Photosensitive Sensor Power Indicator Seat Temp Control Button USB TPYE-C Flush Button Seat temp adjustment The seat temperature can be adjusted by shortly pressing the "+" or "-" of the seat temp control button. -
Page 19: Cleaning & Maintenance
Installation and Owner’s Manual Maintenance and Cleaning Maintenance and cleaning of toilet lid and seat 1. Turn off the power, close the water outlet valve. 2. Use soft cloth to clean the lid and seat. Be careful not to allow water to get inside or leave detergent in the gap between the top unit and the bowl unit. -
Page 20: How To Do
Installation and Owner’s Manual How to Do? USB TYPE-C Interface 1. When the toilet can not flush automatically due to power outage. Connect the smart toilet with power bank through the TPYE-C interface. 2. When the toilet can not flush automatically due to water outage. ①... -
Page 21: Troubleshooting
Reach out for assistance by contacting professional maintenance personnel, dealers, or the DeerValley after-sale service team promptly. Please be aware that discrepancies may exist between the contents of this manual and the actual product, and in such cases, the details of the actual product should take precedence. -
Page 22: Maintenance Service Sheet
Installation and Owner’s Manual Maintenance Service Sheet Product Product code The selling store Purchase date Province City Dealer (signature): Maintenance content Free Maintenance Regulation: 1. We warrant our products to be free from defects in materials and workmanship during normal use when properly installed and serviced, for a period of one (1) year from date of purchase. - Page 23 This war- uct shipping/delivery charges may apply and are in DeerVal- ranty is void if the DeerValley is subject to alteration, or if re- ley sole discretion. pairs are attempted by anyone other than an authorized agent of DeerValley.
Need help?
Do you have a question about the DV-1S1059-V1 and is the answer not in the manual?
Questions and answers