Victrola VSC-550BT - Bluetooth Turntable Manual
- User manual (21 pages) ,
- Operating manual (18 pages)
Advertisement
HOW TO INSTALL / REMOVE POWER ADAPTOR PLUG

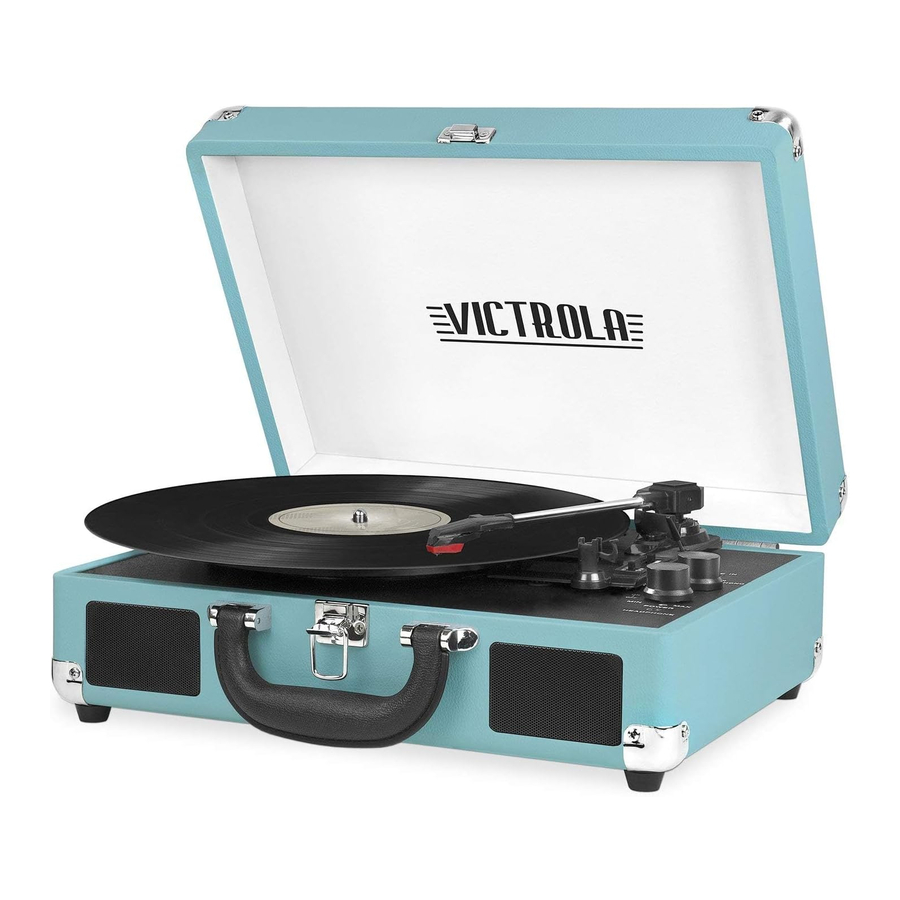
TURNTABLE LAYOUT

- TURNTABLE PLATTER
- TURNTABLE SHAFT
- 45 RPM ADAPTOR
- LIFT LEVER
- TONE ARM CLIP
- LINE-IN JACK
- SPEED SELECTION SWITCH
- FUNCTION (BT (BLUETOOTH), LINE-IN, PHONO) KNOB
- AUTO AND MANUAL STOP SELECTION SWITCH
- TONE ARM
- POWER ON/OFF AND VOLUME CONTROL KNOB
- POWER/BLUETOOTH LIGHT INDICATOR
- STYLUS CARTRIDGE
- HEADPHONE JACK
- BUCKLE
- HANDLE
- SPEAKERS
- RCA OUTPUT JACK
- POWER ADAPTOR JACK
TURNTABLE OPERATION
POWER SUPPLY
Insert the adaptor plug into the DC IN jack on the rear of the unit, then connect the AC/DC adaptor (5V/1A AC 100-240V, 50-60Hz) to a AC/DC wall outlet.
BASIC OPERATION
- Lift the BUCKLE on the front of the turntable and open the lid.
- Turn the FUNCTION KNOB to the PHONO position. Power ON the unit by turning the VOLUME CONTROL KNOB clockwise. The red LED will light to show that the turntable is turned ON.
- Place a record on the TURNTABLE PLATTER and select the desi
red speed (33 1/3 / 45 / 78) by sliding the SPEED SELECTION SWITCH according to the record. NOTE: When playing a 45 RPM record, use the included 45 RPM ADAPTOR located in the holder near the tone arm. - Open the TONE ARM CLIP to release the TONE ARM. Push the LIFT LEVER backwards to raise the arm. Gently move the tone arm to the desired position over the record. The turntable will begin to spin when the arm is moved toward the record. Push the lift lever forward and lower the arm slowly onto the desired position on the record to begin playing.
Please Note: The record will begin to spin only when the tone arm is moved over the record if the Auto Stop is turned ON. - If the AUTO AND MANUAL STOP SELECTION SWITCH is turned ON, the record will stop automatically when finished. If this switch is OFF the record will NOT stop automatically when finished.
- To select the volume level, turn the VOLUME CONTROL KNOB to adjust the volume.
HOW TO REPLACE THE TURNTABLE NEEDLE (Replacement Needle # ITNP-Y1)
Removing the Stylus from the Cartridge

- Set a screwdriver at the tip of the stylus and push down to the direction "A".
![]()
When applying force to stylus, too much may damage or break the stylus. - Pull the stylus out toward the direction "B".

Installing the Stylus

- Hold the tip of the stylus and insert the other edge by pressing toward direction "C".
- Push the stylus up toward direction "D" until it locks at the tip.

- Do not remove or bend the stylus needle.
- Do not touch the needle to avoid injury to your hand.
- Turn off the unit's power before you replace the stylus.
- Keep out of reach of children.
Please note: The stylus should last about 50 hours under normal use. It is recommended that the stylus be replaced as soon as you notice a change in sound quality.
BLUETOOTH OPERATION
An external device with Bluetooth Connectivity can be wirelessly connected to this turntable using the Bluetooth function.
- Power ON the unit by turning the VOLUME CONTROL KNOB clockwise.
- Turn the FUNCTION KNOB to the BT (Bluetooth) position, the blue LED light will begin to flash.
- Turn your external device's Bluetooth Setting ON. Wait a moment, then look for the Bluetooth pairing name "Vintage Turntable".
- Select the Bluetooth pairing name, to connect the unit. Once connected, the blue LED light will stop flashing.
- You are now connected to your external device via Bluetooth!
- Rotate the VOLUME CONTROL KNOB to adjust the sound level.
AUX-IN OPERATION
An external (auxiliary) audio source (i.e. personal CD/MP3 Player/Mobile phone or computer) can be connected to this apparatus via the LINE-IN JACK.
- Plug a detachable Aux Cable (not provi
ded) into the LINE-IN socket on the function panel of the apparatus. - Turn the FUNCTION KNOB to the LINE-IN position, the LED will turn purple.
- Plug the other end of the Aux Cable into the Headphone or Line Out socket of your External Source.
- Power ON the unit by turning the VOLUME CONTROL KNOB clockwise.
- Rotate the VOLUME CONTROL KNOB to adjust the sound level.
EARPHONE OPERATION
Plug the earphone jack into the earphone port on the function panel to listen to the record. The built-in speaker will stop playing once the earphones are plugged in.
NOTE: For best performance and product maintenance, unplug the turntable when not in use.
SAFETY INSTRUCTIONS
- Read these instructions - All the safety and operating instructions should be read before this product is operated.
- Keep these instructions - The safety and operating instructions should be retained for future reference.
- Heed all warnings - All warnings on the appliance and in the operating instructions should be adhered to.
- Follow all instructions - All operating and use instructions should be followed.
- Do not use this apparatus near water - The appliance should not be used near water or moisture - for example, in a wet basement, near a swimming pool, or near other wet areas.
- Clean only with a dry cloth.
- Do not block any ventilation openings. Keep at least 5 cm around the apparatus for sufficient ventilations. Install in accordance with the manufacturer's instructions.
- Do not install near any heat sources such as radiators, heat registers, stoves, or other apparatus (including amplifiers) that produce heat.
- Do not defeat the safety purpose of the polarized or grounding plug. A polarized plug has two blades with one wider than the other. A grounding plug has two blades and a third grounding prong. The wide blade or the third prong is provided for your safety. If the provided plug does not fit into your outlet, consult an electrician for replacement of the obsolete outlet.
- Protect the power cord from being walked on or pinched parti
cularly at the plugs, convenience receptacles, and at the point where they exit from the apparatus. - Only use attachments/accessories specified by the manufacturer.
- Use only with the cart, stand, tripod, bracket, or table specified by the manufacturer, or sold with the apparatus. When a cart or rack is used, use caution when moving the cart/apparatus combination to avoid injury from tip-over.
![]()
- Unplug the apparatus during lightning storms or when unused for long periods of time.
- Refer all servicing to qualified personnel. Servicing is required when the apparatus has been damaged in any way, such as power supply cord or plug is damaged, liquid has been spilled or objects have fallen into the apparatus, the apparatus has been exposed to rain or moisture, does not operate normally, or has been dropped.
- Please keep the unit in a well ventilated environment.
- Only use attachments/accessories specified or provided by the manufacturer
- To reduce the risk of fire or electric shock, do not expose this apparatus to rain or moisture. The apparatus shall not be exposed to dripping or splashing and no objects filled with l
iquids, such as vases, shall not be placed on apparatus. - The main plug is used as disconnect device, the disconnected device shall remain readily operable.
- This product is not intended for commercial use. Household Use Only.
- This equipment is a Class II or double insulated electrical appliance. been designed in such a way that it does not require a safety to electrical earth.
![]()
![shock hazard]() The lightning flash with arrowhead within an equilateral triangle is intended to alert the user to the presence of uninsulated "dangerous voltage" within the product's enclosure that may be of sufficient magnitude to constitute a risk of electric shock.
The lightning flash with arrowhead within an equilateral triangle is intended to alert the user to the presence of uninsulated "dangerous voltage" within the product's enclosure that may be of sufficient magnitude to constitute a risk of electric shock.
![]()
![]()
TO PREVENT RISK OF ELECTRIC SHOCK, DO NOT REMOVE COVER (OR BACK). NO USER-SERVICEABLE PARTS INSIDE. REFER SERVICING TO QUALIFIED SERVICE PROFESSIONAL
![caution]() The exclamation point within an equilateral triangle is intended to alert the user to the presence of important operating and maintenance (servicing) instructions in the literature accompanying the appliance.
The exclamation point within an equilateral triangle is intended to alert the user to the presence of important operating and maintenance (servicing) instructions in the literature accompanying the appliance.


 The lightning flash with arrowhead within an equilateral triangle is intended to alert the user to the presence of uninsulated "dangerous voltage" within the product's enclosure that may be of sufficient magnitude to constitute a risk of electric shock.

 The exclamation point within an equilateral triangle is intended to alert the user to the presence of important operating and maintenance (servicing) instructions in the literature accompanying the appliance.
To reduce the risk of fire or electrical shock, do not exposed the apparatus to rain or moisture. No naked flame sources such as candles shall be placed on top of the apparatus.
Changes or modifications not expressly approved by the manufacturer could void the user's authority to operate this device. Usage of controls or adjustments or performance of procedures other than those specified herein may result in hazardous exposure.
SPECIFICATIONS
| Power Supply: | AC Adaptor: 100-240, 50-60Hz DC-5V/1A |
| Speaker Impedance: | 40hm, 3W |
| Max Power Consumption: | 6W |
| Included: | Turntable, Instruction Manual, Turntable Operation Sheet, 5V/1A switching power supply with 2 plugs, and 45 RPM adaptor |
Design and specification are subject to change without notice.
Documents / ResourcesDownload manual
Here you can download full pdf version of manual, it may contain additional safety instructions, warranty information, FCC rules, etc.
Advertisement


Need help?
Do you have a question about the VSC-550BT and is the answer not in the manual?
Questions and answers