Advertisement
Quick Links
Advertisement

Related Manuals for Mercia Garden Products 02DTSHOA0705LFD3WBF-V2-PEFC


Summary of Contents for Mercia Garden Products 02DTSHOA0705LFD3WBF-V2-PEFC
- Page 1 2mm Drill bit 12mm CSK...
-
Page 2: Any Questions
50kg PLEASE SCAN HERE: ANY QUESTIONS? Scan code contact us via our customer portal. - Page 3 ACCESSING VIDEO GUIDES... ACCESSING VIDEO GUIDES... 3. Scan QR code... Some steps within this set of instructions come with an added video guide for your convenience. These can be accessed via the QR code and used to aid you in constructing that step.
-
Page 4: Product Codes
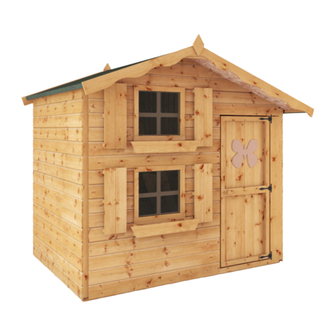
Take a look at the di erent playhouse options below which refers to the product code combinations used to create each playhouse. Model Product Codes 7x5 Playhouse 02DTSHOA0705LFD3WBF-V2-PEFC (Playhouse) SI-002-001-0015 7x6 Playhouse With Veranda 02DTSHOA0705LFD3WBF-V2-PEFC (Playhouse) 02DTOAVP0701-V1-PEFC (Veranda Pack) SI-002-001-0107... - Page 5 Depth = 1456mm Height = 2042mm Bunk Floor Support Bar - 44x44x1316mm QTY 1 7x5 Contents: F4444-1316mm End View 02DTSHOA0705LFD3WBF-V2-PEFC Roof Support Bar - 27x70x1419mm QTY 1 F2770-1419mm End View Bunk Floor Block A - 28x28x1419mm QTY 1 FS2828-1419mm End View...
- Page 6 End View 7x6 Playhouse With Veranda 02DTSHOA0705LFD3WBF-V2-PEFC Fascia - 12x95x1435mm QTY 2 02DTOAVP0701-V1-PEFC FAS1295-G-1435mm Wooden Door Handle QTY 1 End View PI-04-0024 Overall Dimensions: Fascia - 12x95x1041mm QTY 2 Width = 2327mm Depth = 1824mm FAS1295-G-1041mm End View Height = 2042mm...
- Page 7 Step 1 Pre Assembly PLEASE SCAN HERE: Parts needed - & & 2 & Before assembling remove the transportation blocks from the bottom of each Pre drill Fix the Window Blocks (No. 39) to the Windows (No. 12) as shown with 1x30mm screw. hole panel.
- Page 8 Step 3 Step 2 Parts needed - & & Parts needed - & & Pre drill Pre drill hole hole Keep the assembled Door and Back Panels Place the Door Panel (No.2) and Back Panel (No.2 & 3) on a at level surface. (No.3) on a at level surface, with the framing facing up.
- Page 9 Step 4 Step 5 Parts needed - & 1 & & Parts needed - Pre drill Pre drill hole hole Flip the assembled Door Panel (No. Place the Floor (No.1) on a rm and level PLEASE SCAN HERE: 2 & 8) over so the boards are facing base, ensure the base has suitable upwards and place the Door (No.
- Page 10 Step 9 Step 7 Parts needed - Parts needed - & Pre drill Pre drill hole hole Locate the Bunk Floor Support Bar Place the assembled Door Panel (No.2) (No.13) onto the Door Panel (No.2) at a and the Window Panel (No.4) on top of height of 1010mm from the top of the oor, ensuring the panels are oor to the underside of the Support...
- Page 11 Step 11 Step 13 Parts needed - 6 & Parts needed - Pre drill Pre drill hole hole Locate two Bunk Floor Block C’s (No.17) Place the Bunk Floor (No. 9) on top of ush to the Door panel framing. Ensure the the Bunk Floor Support Bar (No.13) 50kg top of block C is 28mm from the top of the...
- Page 12 Step 14 Step 16 Parts needed - Parts needed - Pre drill Pre drill hole hole Locate the Safety Rail (No.10) on top of Place Roof 1 (No.6) onto the shorter the bunk oor, ensure the safety rail is ush side of the building, ensuring the roof 50kg 50kg...
- Page 13 Step 19 Step 18 Parts needed - & & & Pre drill Pre drill hole Once the roof is tted and the building hole Fix Gable Cover Trim B (No. 22) to the is square, secure the building to the Left hand side of the Front Gable Top Floor, using 50mm screws in alignment (No.8) with 3x30mm screws per Trim.
- Page 14 Step 20 Parts needed - Pre drill hole Cut the felt (No. 40) into 3 sheets measuring: 1900mm (L) X 1000mm (W) aand lay onto roof. Start at the bottom of the roof and work your way up so that rain pours over the top of the laps and not under them.
- Page 15 Step 21 Step 22 Parts needed - & & Parts needed - & Pre drill Pre drill hole hole Fix the Fascias (No. 25 & 26) to the Locate a Window Box (No.31) below front and back of the building each window on the Door Panel.
- Page 16 Step 23 Step 24 Parts needed - & & & Pre drill Once constructed, apply a preserving hole Place a Window Frame Cross treatment and a waterproo ng treatment (No. 37) against the inside of each to your garden building as soon as window.
- Page 17 7x1 Veranda add on Pack B steps: Step 22a Parts needed - & Pre drill hole Step 20a Position Support Rail B (No. 46) on Parts needed - top of the Veranda Floor (No. 42) Pre drill and ush to the Left Side Rail (No. hole Place the Veranda Floor (No.
- Page 18 Step 25a Step 24a Parts needed - Parts needed - Pre drill Pre drill hole hole Cut felt (No. 40) into 3 sheets Position Support Rail A (No. 45) on top of measuring: the Veranda Floor (No. 42, and ush to 1900mm (L) X 1000mm (W) the Front Rail (No.
- Page 19 Step 26a Step 27a Parts needed - & & Parts needed - & Pre drill Pre drill hole hole Fix the Fascias (No. 25 & 26) to the Locate a Window Box (No.31) onto front and back of the building the Front Rail (No.43) of the Veranda.
- Page 20 Step 28a Step 29a Parts needed - & & & Pre drill Once constructed, apply a preserving hole Place a Window Frame Cross treatment and a waterproo ng treatment (No. 37) against the inside of each to your garden building as soon as window.
- Page 21 PLEASE SCAN HERE: ANY QUESTIONS? Scan code contact us via our customer portal.
Need help?
Do you have a question about the 02DTSHOA0705LFD3WBF-V2-PEFC and is the answer not in the manual?
Questions and answers