
Related Manuals for Digiever MN-2100 UHD Series


Summary of Contents for Digiever MN-2100 UHD Series
- Page 1 Network Video Recorder Quick Installation Guide MN-2100 UHD Series 1.2.0.8 Information in this document is subject to change without notice. © Copyright 2024, DIGIEVER Corporation. All rights reserved.
-
Page 2: Table Of Contents
Hardware Description ................5 Hard Disk Installation .................. 6 Power Connection ..................7 Connection to DIGIEVER Mobile NVR ............9 Quick Configuration ................. 12 Connect with Monitor via HDMI/VGA ............ 13 Appendix......................14 Vehicle Power Management Setup ..........14 LED Indicators .................. -
Page 3: Pre-Installation Notice
Quick Installation Guide Thank you for choosing DIGIEVER Mobile NVR Network Video Recorder. The following quick guide will lead you to complete the installation and configuration of the NVR. Please read the following description carefully. Pre-installation Notice Please make sure the following items are prepared for installing DIGIEVER Mobile NVR MN-2100 UHD Series. - Page 4 Network Minimum 10/100/1000 Ethernet (Gigabit Ethernet is recommended) Note: It is suggested to connect cameras and NVR with Gigabit switch. Memory 16G or above Graphics Adapter AGP or PCI-Express, minimum 1024 × 768, 16bit colors, 1G memory or above Note: It is highly recommended to use a graphics adaptor which provides higher than resolutions 1024 x 768 in order to experience...
-
Page 5: Package Contents
Package Contents NVR (Network Video Recorder) RJ45 Network Cable Screws for 2.5” HDD Product CD GPS Antenna Power Adapter (Optional Purchase) Power Cord (Optional Purchase) GPIO cable (Optional Purchase) -
Page 6: Hardware Description
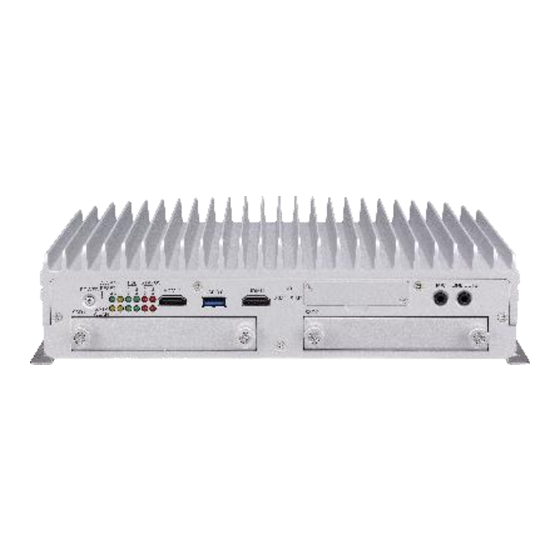
Hardware Description Front View Rear View (Dimensions with stand) Power button LED indicators HMDI 2 (HDMI 1.4b) USB 3.2 Gen1x1 HDMI 1 (HDMI 1.4b) SD card, SIM1/2 socket (with cover) MIC (reserved) Line out (reserved) 2 x 2.5” removable HDD Tray Line out (reserved) 2 x USB 2.0 1 x Gigabit Ethernet... -
Page 7: Hard Disk Installation
Hard Disk Installation Please follow the steps as illustrated below to install the hard disk: ① Loosen the screws to the left. ② Slightly press the disk tray inward and then pull it out. ③ Mount the hard disk to the disk tray. Place the hard disk into the disk tray, making sure that the mounting holes on the sides of the hard disk and disk tray are aligned. -
Page 8: Power Connection
④ Push the disk tray back into place and tighten the screws to the right. Power Connection ① Connect the device with power cable ② Connect the power cord to power connector A. Indoor:... - Page 9 B. Vehicle: Important note: Professional technicians are required for power connections to prevent damage to the device from incorrect installation. Press the power button to turn on the server. After power on, the power LED ③ will be in blue.
-
Page 10: Connection To Digiever Mobile Nvr
Connection to DIGIEVER Mobile NVR Please insert the product CD-ROM on a PC to install NVR Search. Finally, you can start Quick Configuration on a web page. Install NVR Search for finding NVR in the network ① Connect to the configured NVR, download and install NVR- ②... - Page 11 IP address or change it in this page. However, it’s recommended setting different IP address of DIGIEVER NVR if there is more than one DIGIEVER NVR in the same LAN.
- Page 12 2. Enter a user name and password Log in the NVR with the default administrator account (user name: admin, password: admin). 3. Download and install NVR-Client.exe, a software application, to execute liveview monitoring and video playback.
-
Page 13: Quick Configuration
Alternatively, you can click “Web Liveview Settings” to customize your preference. (Local UI) (Remote UI) For further details of Quick Configuration, please refer to the user manual. When the live view is displayed, you have successfully installed the DIGIEVER Mobile NVR. Congratulations! -
Page 14: Connect With Monitor Via Hdmi/Vga
Connect with Monitor via HDMI/VGA To connect your monitor, please use either the HDMI or VGA port. If connecting the NVR and monitor using VGA, please ensure the VGA cable is connected to both devices before NVR powering on, or please reboot the NVR to detect the device again. -
Page 15: Appendix
Appendix Vehicle Power Management Setup A. Enter to BIOS mode: Connect device with USB keyboard and monitor ① Power on the device ② Immediately press delete key during power on process ③ Operating instructions: please follow the instructions at the bottom right corner of the of the screen. - Page 16 Startup and Shutdown Voltage Setting Go to “Power Management Configuration” > Select “Startup, Shutdown” > Press enter key Set the startup voltage to 11.5V or 23V and the shutdown voltage to 10.5V or 21V If the input voltage is 12V: the startup voltage to 11.5V and the shutdown voltage to 10.5V If the input voltage is 24V:...
- Page 17 C. Enable Power-on Delay System default is in disable mode, please change it to “Enable” and setup power-on delay time. Delay time can be set at 10 /30 sec, 1/5/10/15/30 min, 1 hour. D. Enable Power-off Delay System default is in disable mode, please change it to “Enable” and setup power-off delay time.
-
Page 18: Led Indicators
LED Indicators LED Color & Indicate Status Power off Power Blue Power on Hardware Failure, please contact supplier LAN Link is not established Green blinking LAN is being accessed 4G/5G network is not established WWAN Yellow 4G/5G network is ready Wi-Fi network is not established WLAN Yellow... -
Page 19: Reset To Factory Default
Reset to Factory Default In case that users forgetting their username and password, users can reset NVR to default by pressing the power button for 3 seconds on NVR login page. Follow the instructions to reset NVR to default: NVR will beep after pressing the power button for 3 seconds on login page. Click “Cancel”... -
Page 20: Recommended Hdd/Ssd Types (Sata3.0) For Diverse Operating
Recommended HDD/SSD Types (SATA3.0) for Diverse Operating Environments Recommended HDD/SSD Type (15mm Height) Environment Standard SSD Industrial-grade SSD Scenario 2.5” HDD (0℃ ~ +70℃) (-40℃~ +85℃) Indoor (with Air-con on) In-vehicle* Vibration/Shock* Within temperature 0℃...
Need help?
Do you have a question about the MN-2100 UHD Series and is the answer not in the manual?
Questions and answers