Table of Contents
Advertisement
Technical Support and E-Warranty Certificate www.vevor.com/support
PCP AIR COMPRESSOR
MODEL:SS-PAC02A/SS-PAC02B
We continue to be committed to provide you tools with competitive price.
"Save Half", "Half Price" or any other similar expressions used by us only represents an
estimate of savings you might benefit from buying certain tools with us compared to the major
top brands and does not necessarily mean to cover all categories of tools offered by us. You
are kindly reminded to verify carefully when you are placing an order with us if you are
actually saving half in comparison with the top major brands.
Advertisement
Table of Contents

Related Manuals for VEVOR SS-PAC02A


Summary of Contents for VEVOR SS-PAC02A
- Page 1 Technical Support and E-Warranty Certificate www.vevor.com/support PCP AIR COMPRESSOR MODEL:SS-PAC02A/SS-PAC02B We continue to be committed to provide you tools with competitive price. "Save Half", "Half Price" or any other similar expressions used by us only represents an estimate of savings you might benefit from buying certain tools with us compared to the major top brands and does not necessarily mean to cover all categories of tools offered by us.
- Page 2 This is the original instruction, please read all manual instructions carefully before operating. VEVOR reserves a clear interpretation of our user manual. The appearance of the product shall be subject to the product you received. Please forgive us that we won't inform you again if there are any technology or software updates on our product.
-
Page 3: Correct Disposal
Warning-To reduce the risk of injury, user must read instructions manual carefully. CORRECT DISPOSAL This product is subject to the provision of European Directive 2012/19/EC. The symbol showing a wheelie bin crossed through indicates that the product requires separate refuse collection in the European Union. -
Page 4: Fcc Information
●It is recommended that you observe the position of the needle on the 5s pressure gauge of the PCP airgun and the unit pressure gauge at the same time during charging. Ensure that the position does not exceed 300BAR(4500psi/30MPa). Stop blowing air when it reaches 280BAR(3750psi/28MPa) ●... -
Page 5: Product Parameters
· Connect the product to an outlet on a circuit different from that to which the receiver is connected. · Consult the dealer or an experienced radio/TV technician for assistance. Product parameters Model SS-PAC02A/SS-PAC02B Voltage: DC 12V for car battery or AC 120V/230V Power 300W... -
Page 6: Main Operating Parts
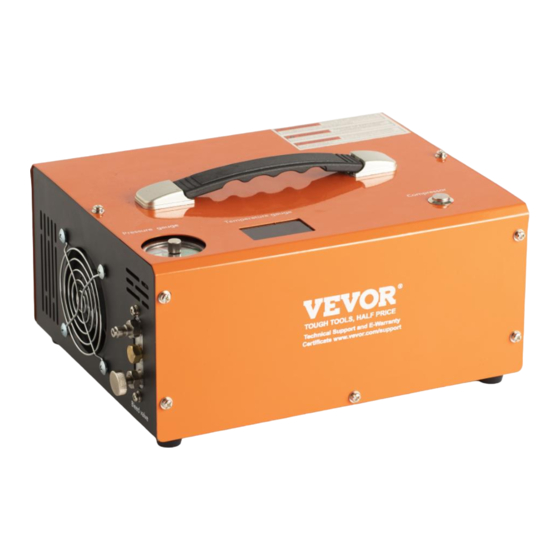
MAIN OPERATING PARTS Power Switch Temperature Foster-type Display quick-fit air line Pressure gauge Protection Valve Air line (hose assembly) bleed screw DC(12V Vehicle power) cable socket AC Power Socket Filter System - 5 -... - Page 7 Assembly Instructions 1.First of all, you have to inspect the working voltage by checking the button on the bottom of the compressor. 2.Connect the quick female coupler to your Airgun cylinder,Air Bottle or Airsoft products. 3)Connect another end foster to the output on the front of compressor via a male fitting.
- Page 8 5.Manually rotate the needle of the automatic shut- off system to the pressure you want. WARNING! NEVER overfill the maximum pressure of your cylinder and airgun. The maximum pressure for this compressor is 300bar (30Mpa/4500PSI). 6.Press the Compressor button on the top of the compressor to start the cooling fan.
-
Page 9: Routine Maintenance
Using DC 12V Car Battery Power 9.Insure the car engine is running.Connect the supplied DC power cable to the right side of the 12v socket. Connect the red clip at the other end of this cable to the positive (+) terminal of the car’s12-volt battery.Then connect the black clip to the battery’s negative (-) - Page 10 1. Loosen all 12 pieces screw on the cabinet. (5 pieces on front, 5 pieces on rear and 2 pieces on top ). Pick up the whole metal cabinet carefully and slowly. Be careful the internal wires. 2.Loosen the temperature sensor wire screw on the cylinder.
- Page 11 5.Loosen the 2 pieces screws of condensation tube. 6.Loosen the 4 pieces motor screws on the bottom of compressor. 7) You will have the whole motor and cylinder after above operation. Then loosen the 2 pieces screws of condensation tube on the cylinder. - 10 -...
- Page 12 8. Same as STEP 5, need to loosen the smaller screw near the outside, NOT the bigger one. 9.Loosen the 2 pieces black screws by using a hex screwdriver on end of piston rod. 10.Loosen the 4 pieces screws on the cylinder top.You will have the whole cylinder part.
- Page 13 12.Take off the column metal part, clean all dirt and evenly apply some silicone oil or engine oil on inside. 13) Separating the piston and square metal part. Clean all dirt and check if any o-rings damaged. It is normal if you find the light gray O-ring disconnected.
- Page 14 15.Loosen the screw of one-way metal sheet. Cleaning dirt, put back the sheet and tighten the screw. IMPORTANT: don't over-tighten the screw, air needs to come out from inside. 16) Loosen the one-way screw, you will find a one-way valve inside. Cleaning up the dirt and check if any damages on spring and valve.
- Page 15 18) Check if any damages on piston o-rings. You can evenly apply some silicone oil or engine oil on 2 smaller o-rings. Above is all the maintenance content! In order to assemble it back smoothly, we suggest that you can browse the video while operating Video via Youtube -https://youtu.be/jeKo7dqSfnM Assembly...
- Page 16 2) Setting the round shape part into the column metal part. 3. Setting the square part into another end of round part. Make sure there are no gaps between each parts. 4.Using a tool to move the piston back and forth and rotate to make the internal oil evenly spread.3-4 times will be fine.
- Page 17 6.Install the cylinder and the motor together, tighten 4 black screws. Be attention to the direction of the 3 screws of the red arrow. 7.Tighten the 2 black screws on piston rod and motor rod. Note:you can adjust the position by gently rotating the motor screw with a hexagonal screwdriver;...
- Page 18 9.Setting back the motor and cylinder. Tighten 4 black screws with motor on the bottom of compressor. 10) Install another condensation tube. 11.Setting back the motor wire into display. Red to OUT+ and black to OUT - - 17 -...
-
Page 19: Troubleshooting
12) Setting back temperature sensor wire on the cylinder. 13) Setting back the display. Troubleshooting E0- The temperature sensor is faulty. E1- Automatically stops when the temperature exceeds 85 ° C. E2- voltage is lower than 9.8V. E3- The pressure button is faulty. E4-Working time limit and pressure reach automatic stop. - Page 20 Technical Support and E-Warranty Certificate www.vevor.com/support Made In China...
Need help?
Do you have a question about the SS-PAC02A and is the answer not in the manual?
Questions and answers