
Subscribe to Our Youtube Channel
Related Manuals for ZEROXCLUB BS7


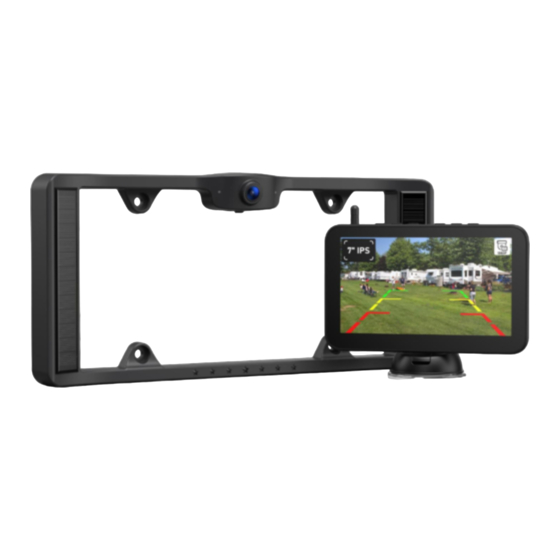
Summary of Contents for ZEROXCLUB BS7
- Page 1 ZEROXCLUB Instructions Manual Wired Backup Camera System Any questions or suggestions please send an email to customer service via sales@uszeroxclub.com...
-
Page 2: Table Of Contents
ZEROXCLUB Instructions Manual TABLE OF CONTENTS TABLE OF CONTENTS ............... 1 BEFORE USING .................2 WAHT IS IN THE BOX ............... 2 CHARGE THE BATTERY .............3 TEST THE SYSTEM ..............4 SPECIFICATIONS ..............5 INSTALLATION ................6 Installation of the Camera ........... 6 Installation of the Monitor .......... -
Page 3: Before Using
USB Charging Cable WARRANTY ZEROXCLUB offers a full 18 months warranty and replacement policy. We also provide lifetime technical support to ensure that you enjoy your modern backup camera for many years to come. To obtain warranty support, or if you... -
Page 4: Charge The Battery
ZEROXCLUB Instructions Manual CHARGE THE BATTERY Use your existing USB charging port to initially charge your device before you install it on your vehicle and charge it when needed. 1. Connect the included USB cable to the Micro USB port of the camera. -
Page 5: Test The System
ZEROXCLUB Instructions Manual TEST THE SYSTEM To ensure that all components are working properly, please test the system before installation. 1. When the monitor is powered, the screen will light up to indicate that the monitor is on and ready to work. -
Page 6: Specifications
ZEROXCLUB Instructions Manual 8) In normal use, the camera pack will remain charged while exposed to sunlight. When the backup camera is working, a battery status indicator will appear on the monitor. If the vehicle is parked in the garage for more than a month, or the camera is not regularly exposed to the sun, you may need to charge it through the micro USB charging port before using. -
Page 7: Installation
Make sure you place the screws in a safe place so you don’t NOTICE lose them. 2. Align the mounting holes for fixing the license plate. Secure the BS7 Wireless Backup Camera and license plate with original screws back onto the vehicle and tighten the screws. NOTICE... -
Page 8: Installation Of The Monitor
ZEROXCLUB Instructions Manual • Some states or local governments may have regulations or laws that restrict the use of anything that might impair the clear view of a license plate. Check local laws for compliance. • This backup camera fits a standard license plate hole for US. If you choose not to mount it on your license plate, locate a good place to mount the camera. -
Page 9: Operating Instruction
ZEROXCLUB Instructions Manual OPERATING INSTRUCTION Main Screen Interface Signal Strength: It means the strength of the signal between the camera and the monitor. Solar Charging : This sign will be displayed in red at the top right of the screen while solar powered. -
Page 10: Parking Guidelines Button
ZEROXCLUB Instructions Manual Parking Guidelines button: Turn on/off or adjust the parking guidelines Decrease button Increase button Menu button: Settings for Pairing / Brightness & Contrast & Hue / Mir-flip / Screen off time / Parking Guidelines Confirm button Power button:... -
Page 11: Settings Operation
ZEROXCLUB Instructions Manual Settings Operation PAIRING Operation The Wireless Backup Camera is pre-paired with the Monitor, and it is set as rear camera as default. You should see the screen that shows the rear view if the Monitor is powered and the Wireless Backup Camera is fully charged. - Page 12 ZEROXCLUB Instructions Manual after several attempts, please contact our technical support to assist in troubleshooting. NOTICE If the camera fails to pair with the monitor, please check and make sure the monitor and camera are powered on (please check the green light on the camera, if the lights are come on, it means the camera is powered).
- Page 13 ZEROXCLUB Instructions Manual MIR-FLIP Operation You can flip the image to front view, mirror view or inverted view according to your needs. There are four options to flip the image on the monitor: NORMAL: Normal Image for front view ...
-
Page 14: Troubleshooting
ZEROXCLUB Instructions Manual TROUBLESHOOTING 1. Check to make sure the power source is active (if your cigarette lighter is switched with vehicle ignition, your monitor will only work when the vehicle is running or the key in the ON position). - Page 15 ZEROXCLUB Instructions Manual 1. The battery in the camera may be depleted and require recharging. 2. In the process of use, there is wireless interference from outside. so if you can’t turn on the product over 15 Camera stop seconds after press the power button,...
- Page 16 ZEROXCLUB Instructions Manual shake when the vehicle the vehicle and re-tighten if needed. is moving The red light of the Please change to another power indicator keeps flashing adapter which reaches to 5V/2A when in charge Warm tips: Any problems please contact us in time at sales@uszeroxclub.com, we are...
- Page 17 ZEROXCLUB Instructions Manual USB wall charger is included with the unit. Please charge it before you use it the first time. What are the dimensions of It can hold a standard license license plate holder? plate/tags of any US State.
- Page 18 Otherwise, it might result in damaged or non-functional parts. ● Do not disassemble or attempt to repair any part of the camera system. ● There are no user-serviceable parts inside the ZEROXCLUB camera system. Contact ZEROXCLUB customer service at sales@uszeroxclub.com if the part is ever compromised.
- Page 19 ZEROXCLUB Instructions Manual ● To avoid an electrical shock hazard, relevant actions should be performed by qualified and certified professionals. Disconnect all sources of power to the camera before installing. ● To reduce the risk of fire, NEVER test when smoking. Never use a flame.
Need help?
Do you have a question about the BS7 and is the answer not in the manual?
Questions and answers