Table of Contents
Advertisement
Quick Links
Advertisement
Table of Contents

Related Manuals for Electrolux EB SL60


Summary of Contents for Electrolux EB SL60
- Page 1 Oven EB SL60...
-
Page 2: Table Of Contents
2 electrolux Electrolux. Thinking of you. Share more of our thinking at www.electrolux.com Contents Operating Instructions......3 Cleaning and Care......... 23 Safety instructions........3 What to do if …........28 Description of the Appliance ....4 Disposal ..........29 Before Using for the first time ....8 Installation Instructions ...... -
Page 3: Operating Instructions
3 Operating Instructions Safety instructions Electrical safety Information on acrylamides • This appliance must be only connected According to the latest scientific knowl- by a registered electrician. edge, intensive browning of food, espe- • In the event of a fault or damage to the... -
Page 4: Description Of The Appliance
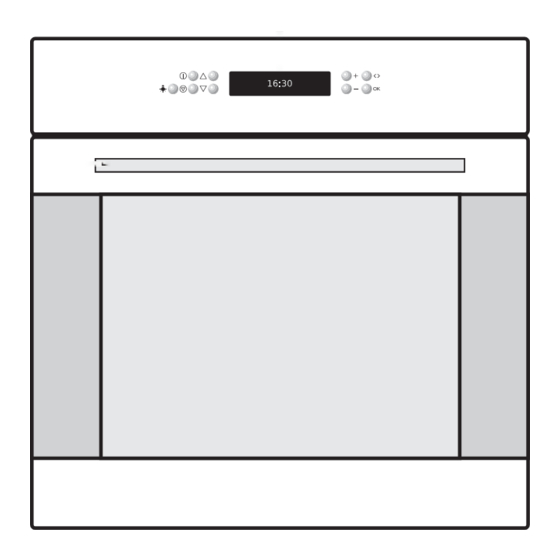
4 electrolux Description of the Appliance General Overview Oven displays and Touch Control sensor fields Oven door Door handle The oven switches off after 2 minutes, if no function is selected and is changed at the oven nothing. - Page 5 5 The electronic oven controls Indicators Menu option symbol Clock Heat indicator (with oven shelf level) Time functions Temperature Weight Meat core temperature Symbols Certain symbols are displayed in the dis- played according to the function set. Display Symbol...
- Page 6 6 electrolux Touch Control sensor fields The appliance is operated using Touch Con- trol sensor fields. You control the functions by touching the sensor fields. When you are using the controls make sure that you only touch one sensor field. If your finger is applied too flat, a neighbouring sen- sor field could be touched as well.
- Page 7 7 Oven Features All interior oven walls are coated with a special enamel (catalytic coating). Top heat and heating elements Rotary spit drive Fat trap Oven lighting Shelf positions Meat probe socket Oven lighting Fan heating element Aluminium base plate...
-
Page 8: Before Using For The First Time
8 electrolux Turnspit with support For roasting larger joints of meat and poultry. Before Using for the first time Setting the clock If you would like to change one of these base settings at a later date, please refer After you have set the contrast and the to the Basic Settings section. -
Page 9: Using The Oven
9 Using the Oven The menus in overview Main menu Submenu Assisted Cooking Pork/Veal Beef/Game/Lamb Poultry Fish Cake Pizza/Pie/Bread Casseroles/Gratins Convenience Specials Heating Functions Fan Cooking Conventional Cooking Pizza Setting Turbo Grill Turbo Grill + Spit Roast Economy Grill... - Page 10 10 electrolux Main menu Submenu Basic Settings Set Time of Day Time Indication Set+Go Heat+Hold Time Extension Display Contrast Display Brightness Set language Buzzer Volume Key Tones Alarm/Error Tones Service Factory Settings Operation of the menus The oven adapts itself to the habits of...
- Page 11 11 Until the set temperature is reached, a stiped Inserting the oven shelf: bar goes from left to right in the heat indicator. Residual heat indicator After switching off the oven, the residual heat is displayed. Insert the oven shelf so that the feet point downwards.
- Page 12 12 electrolux Rotary Spit Place the groove in front of the handle on the notch provided on the rotary spit Attaching the food to be grilled support. Remove the handle. 1. Place a fork on the rotary spit. 2. Then position the food to be grilled and Set the oven function and temperature a second fork.
- Page 13 13 The menu Assisted Cooking The Assisted Cooking in overview The dishes in the Kitchen Assistant (except for Specials) are prepared with automatic systems. The automatic systems offer the optimum settings (oven functions, temperature, cook time) for the respective dish.
- Page 14 14 electrolux Category Dish Cake Lemon cake Ring cake Swedish cake Savarin cake Sponge base Brownies Cheesecake Muffins Fruit cake Tart (sweet) Streusel cake Carrot cake Butter plait Almond cake Yeast cake Fruit tart Pizza/Pie/Bread Tray pizza Quark turnovers Onion tart...
- Page 15 15 Operation of the Assisted Cooking Using select Meatprobe Auto- matic. Assisted Cooking with Weight Automatic The roasting time is automatically deter- mined by inputting the weight. Example 1. Using select the menu option Confirm with Assisted Cooking, the desired category Message appears telling you to insert the and the dish.
- Page 16 16 electrolux 4. Confirm with Example Using select the menu option Assisted Cooking, the desired category and the dish. Confirm each one with Using select Manual. The automatic programme is started. As soon as the automatic programme has finished, an audible signal sounds.
- Page 17 17 Operating the oven functions Confirm with or wait 5 seconds. The oven starts to heat up. Example When the temperature set is reached, an 1. Switch the appliance on with acoustic signal sounds. 2. Using select the menu option oven function.
- Page 18 18 electrolux The next letter flashes and can be changed, Calling up a programme and so on. Switch the appliance on with 8. Confirm with when you have written Using the arrow keys select the your programme name. menu option My Programmes.
- Page 19 19 Setting Display Description Set language – Deutsch Select and set language in the display. – ..Buzzer Volume 1 ..10 Set volume of key beeps and signals in steps. Key Tones – Key beeps confirm each time a key is pressed with a beep.
- Page 20 20 electrolux Condition for Heat+Hold: The rest of the procedure is the same as • Fixed temperatur is above 80°C a normal oven function. The Time Exten- • Fixed switch-Duration sion can be set repeatedly. To switch on Heat+Hold Additional functions 1.
- Page 21 21 Duration or End Time Duration and End Time combined Duration Duration and End Time can be For setting how long the oven is to operate. used simultaneously, if the oven is to be switched on and off automatically at a End Time later time.
- Page 22 22 electrolux To switch off Key Lock Setting Meatprobe core temperature 1. Press the key. Switch the appliance on with 2. Confirm with Push the tip of the Meatprobe right into the meat so that the tip is in the centre The Key Lock does not protect the ap- of the meat.
-
Page 23: Cleaning And Care
23 8. Press any key to switch off the signal. Removing the Meatprobe The Meatprobe can also be set, if an Warning: The Meatprobe is very hot. oven function has already been selected. There is a risk of being burned when re-... - Page 24 24 electrolux Accessories Fitting the shelf support rails Wash all slide-in units (shelf unit, baking tray, shelf support rails etc.) after each use and dry well. Soak briefly to make them easier to clean. Aluminium base plate Never use cleaning materials, cleaning agents or steel wool that scratch or scour.
- Page 25 25 Fat trap Reassembly in reverse order. Make sure the heating element has a good fit in the The fat trap is almost maintenance free. connecting socket when inserting. However, certain residues may occur due to the frequent preparation of very fatty foods.
- Page 26 26 electrolux 2. Remove the glass cover with the aid of Undo the clamping levers (A) on both a narrow, blunt implement (e. g., tea- door hinges fully. spoon) and clean it. 3. If necessary, exchange the halogen oven lamp.
- Page 27 27 Hanging the oven door back on its hinges Fold up the clamping levers (A) on both door hinges back into their original 1. From the handle side take hold of the positions. oven door with a hand on each side and hold at an angle of approx.
-
Page 28: What To Do If
28 electrolux What to do if … Problem Possible cause Remedy The oven is not heating up The oven has not been switched on Switch oven on The required settings have not been Check the settings made The house wiring fuse (in the fuse... -
Page 29: Disposal
29 Disposal Packaging material The packaging materials are environ- mentally friendly and can be recycled. The plastic components are identified by markings, e.g. >PE<, >PS<, etc. Please dispose of the packaging materials in the appropriate container at the com- munity waste disposal facilities. -
Page 30: Installation Instructions
30 electrolux Installation Instructions Installing the oven Installing the oven in the base unit When installing into combustible materi- al, NIN 2005, chapter 4.2.2 and the fire When installing into combustible materi- protection guidelines and their provi- al, NIN 2005, chapter 4.2.2 and the fire... - Page 31 31 2. Secure the cooker on both sides in the oven area with two screws (Detail A). When installing next to wood furnaces, for safety reasons, a heat-resistant and heat-insulating insulation plate is to be installed on site to the same height as the appliance and a minimum of 30 cm deep.
- Page 32 32 electrolux Garantie/Kundendienst, Garantie/service-clientèle, Garanzia/Servizio clienti, Guarantee/Customer Service Centres Servicestellen Points de Service Servizio dopo vendita Point of Service 5506 Mägenwil/Zürich Industriestrasse 10 9000 St. Gallen Zürcherstrasse 204 e 4052 Basel St. Jakob-Turm Birsstrasse 320B 6020 Emmenbrücke Seetalstrasse 11 7000 Chur...
-
Page 33: Service
33 Service In the event of technical faults, please first check whether you can remedy the problem yourself with the help of the operating in- structions (section “What to do if…”). If you were not able to remedy the problem yourself, please contact the Customer Care Department or one of our service partners. - Page 36 892 9371 57-A-070909-01...
Need help?
Do you have a question about the EB SL60 and is the answer not in the manual?
Questions and answers