
Related Manuals for HOMCOM 824-050V90


Summary of Contents for HOMCOM 824-050V90
- Page 1 IN221002014V02_FR 824-050 V90 220-240V~50-60Hz 45W IMPORTANT, RETAIN FOR FUTURE REFERENCE: READ CAREFULLY ASSEMBLY & INSTRUC TION MANUAL...
-
Page 2: Important Safety Information
READ CAREFULLY BEFORE ATTEMPTING TO ASSEMBLE, INSTALL, OPERATE OR MAINTAIN THE PRODUCT DESCRIBED. PROTECT YOURSELF AND.OTHER BY OBSERVING ALL SAFETY INFORMATION. FAILURE TO COMPLY WITH INSTRUCTIONS COULD RESULT IN PERSONAL INJURY AND/OR PROPERTY DAMAGE! IMPORTANT SAFETY INFORMATION 1. Read all instructions carefully before using the FAN. 2. - Page 3 water container. 12. Do not use FAN outdoors. 13. Disconnect the fan from the mains power when not in use, and before servicing or performing any maintenance. WARNING The Main Power Switch and the On/Off switch should not be used as the sole means of disconnecting power.
-
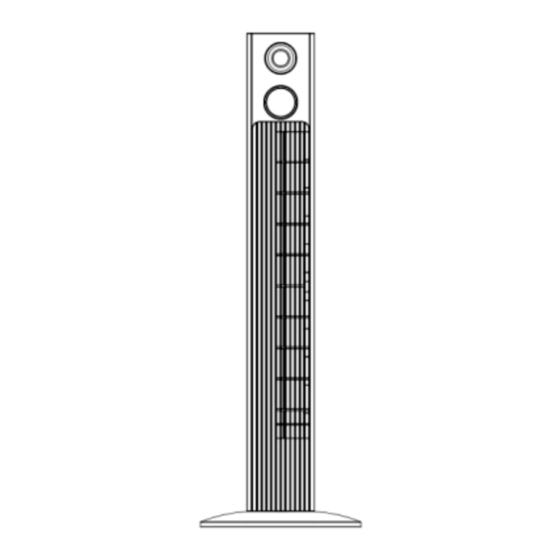
Page 4: Parts Name
To avoid danger of electric shock, unplug WARNING : from outlet when not in use and before cleaning. If the supply cord is damaged, it or it’s must be replaced by the manufactory service agent or a similarity qualified person in order to avoid a hazard. PARTS NAME ASSEMBLY The base of the tower fan comes in two parts, which fit around the oscillation... -
Page 5: Remote Control
(Fig 1 ) REMOTE CONTROL 1.Included a button cell battery (the type of battery CR2025). 2.The Remote Control Power button is labeled as such. All the functions performed with the Remote Control work identically to the Manual Controls.( Fig 2) -
Page 6: Operation
( Fig 2) ( Fig 3) OPERATION The FAN may be operated by the manual controls located on the FAN (as shown in Fig 3) or by your remote control (shown in Fig 2) . 1. Place the FAN on a stable flat surface. Plug the cord set into a 220-240V~ electrical outlet.Plug on the FAN, existing room temperature will be displayed at display panel. - Page 7 - NATURAL Mode :Fan will start work at low speed(5s)→medium speed(5s)→high speed(5s)→medium speed(5s), it works as per this recycle. - SLEEP Mode : 1) If you set the mode at high speed, fan will work at high speed at 30 mins, then transfer to medium speed at 30 mins and transfer to low speed until fan stop working.
-
Page 8: Maintenance
7. Display : Can be switched off temporarily by press the LED button on the remote or by pressing and holding the SPEED button on the control panel for more than 3 seconds, the display will light up again once any control button is activated. -
Page 9: Consignes De Sécurité Importants
LIRE ATTENTIVEMENT AVANT D'ESSAYER D'ASSEMBLER, D'INSTALLER, DE FAIRE FONCTIONNER LE PRODUIT DÉCRIT. PROTÉGEZ-VOUS ETPROTÉGEZ LES AUTRES EN RESPECTANT TOUTES LES CONSIGNES DESÉCURITÉ. LE NON-RESPECT DES INSTRUCTIONS PEUT ENTRAÎNER DES BLESSURES CORPORELLES ET/OU DES DOMMAGES MATÉRIELS ! CONSIGNES DE SÉCURITÉ IMPORTANTS 1.Lisez attentivement toutes les instructions avant d'utiliser le ventilateur. - Page 10 11. Ce VENTILATEUR n'est pas destiné à être utilisé dans des endroits humides ou mouillés. Ne placez jamais un VENTILATEUR à un endroit où il pourrait tomber dans une baignoire ou un autre récipient d'eau. 12. N'utilisez pas VENTILATEUR à l'extérieur. 13.
-
Page 11: Nom Des Pièces
AVERTISSEMENT : Pour éviter tout risque de choc électrique, débranchez la prise lorsqu'elle n'est pas utilisée et avant le nettoyage. Si le cordon d'alimentation est endommagé, il doit être remplacé par le fabricant, son agent de service ou une personne qualifiée en la matière afin d'éviter tout danger. NOM DES PIÈCES Panneau de commande Panneau d’affichage LED... - Page 12 (Fig 1 ) TÉLÉCOMMANDE 1. Inclus une pile bouton (type de pile CR2025). 2. Le bouton d’alimentation de la télécommande est identique comme illustré à la figure. Toutes les fonctions de la télécommande fonctionnent sont identiques aux commandes manuelles. (Fig 2).
-
Page 13: Opération
( Fig 2) ( Fig 3) OPÉRATION Le VENTILATEUR peut être actionné par les commandes manuelles situées sur le VENTILATEUR (comme illustré la Fig.3) ou par votre télécommande (comme illustré à la Fig.2). 1. Placez le VENTILATEUR sur une surface plane stable. Branchez le cordon dans une prise électrique 220 à... - Page 14 - NATURAL Mode :Le VENTILATEUR commence à fonctionner à faible vitesse (5s)→ vitesse moyenne (5s)→ vitesse élevée (5s)→ vitesse moyenne (5s), il fonctionne selon ce cycle. - SLEEP Mode :1) Si vous réglez le mode sur vitesse élevée, le ventilateur fonctionnera à vitesse élevée pendant 30 minutes, puis passera à vitesse moyenne pendant 30 minutes et à...
-
Page 15: Entretien
7. Display :peut être éteint temporairement en appuyant sur le bouton LED sur la télécommande ou en appuyant sur le bouton SPEED du panneau de commande pendant plus de 3 secondes, le panneau d’affichage s'allumera à nouveau une fois qu'un bouton de commande est activé. - Page 16 Si vous avez la moindre question, veuillez contacter notre centre d'assistance à la clientèle. Nos coordonnées sont les suivantes: 0033-1-84166106 aosom@mhfrance.fr Importé par: MH France 2, rue Maurice Hartmann 92130 Issy-les-Moulineaux France Fabriqué en Chine...
- Page 17 If you have any questions, please contact our customer care center. Our contact details are below: 0044-800-240-4004 enquiries@mhstar.co.uk IMPORTER ADDRESS: MH STAR UK LTD Unit 27, Perivale Park, Horsenden lane South Perivale, UB6 7RH MADE IN CHINA...
Need help?
Do you have a question about the 824-050V90 and is the answer not in the manual?
Questions and answers