Table of Contents
Advertisement
Quick Links
Advertisement
Table of Contents

Related Manuals for Rinnai RH-C1159-PBW


Summary of Contents for Rinnai RH-C1159-PBW
- Page 1 RH-C1159-PBW Extractor Hood Instruction / Installation Manual...
-
Page 3: Table Of Contents
Installation Instructions Page 14 To register your product warranty, please paste the serial numbers stickers enclosed with the packaging on your warranty card. Please contact your local Rinnai After Sales Service Center should you require further assistance. Version 2023. 12... -
Page 4: Intended Use
Intended Use Please read this user manual thoroughly before attempting to use this appliance for the first time. This manual contains important information on safe installation, use and care of the appliance. Keep these instructions for reference and pass them on to future user. This appliance can only be used safely if it is correctly installed according to the safety instructions. -
Page 5: Safety Information
personnel’s only. If the appliance is defective, unplug the appliance from the mains or switch off the circuit breaker in the fuse box. Contact your local Rinnai After Sales Service Center for assistance. It is dangerous to modify any part of this appliance. Tampering with electrical connections or ... - Page 6 A defective appliance may cause electric shock. Never switch on a defective appliance. Unplug the appliance from the mains or switch off the circuit breaker in the fuse box. Contact your local Rinnai After Sales Service Center for assistance. Incorrect repairs are dangerous. Any repairs and replacements of damaged power cable or ...
-
Page 7: Environmental Protection
Environmental Protection Energy Saving During cooking ensure that there is a sufficient supply of air to enable the extractor hood to work efficiently and with a low level of operating noise. Adjust the fan speed to the amount of cooking vapor produced during cooking. Only use ... -
Page 8: Operating Instructions
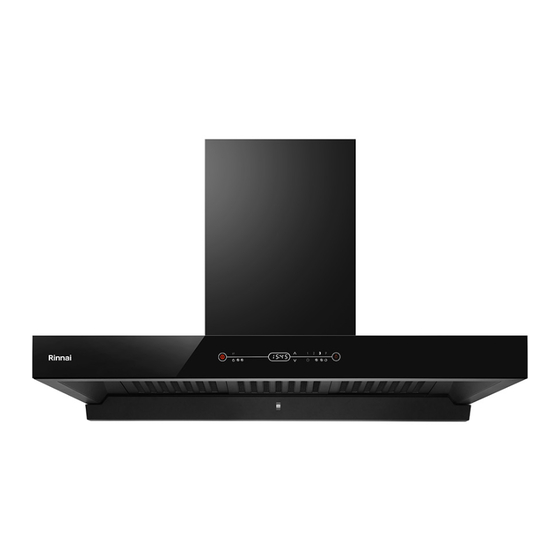
Operating Instructions Operating the Extractor Hood Touch the sensor buttons gently to operate this appliance. To achieve better air extraction, it is advisable to switch on the extractor hood a few minutes before starting to cook and leave it on for approximately 15 minutes after cooking (or at least all cooking smell is completely removed). - Page 9 FAN SPEED INCREASE/DECREASE To select fan speed,press the corresponding speed button briefly to switch between fan speeds. To set to Booster Mode, after approximately 10 minutes it will automatically switch back to fan setting 3. If you want to disable the booster function before the preset time touch on the fan setting decrease symbol. Note: When using booster function the delay timer cannot be use at the same time.
- Page 10 CLEAN and FRESH FUNCTION There are 2 methods to set up the CLEAN & FRESH function. To set up clean and fresh function when you are done cooking, press on the timer switch symbol and hold for approximately 3 seconds. The “ON/OFF” switch's white ring symbol will blink. Press the ON/OFF switch symbol or delay timer function off will start the clean and fresh function.
-
Page 11: Care And Maintenance
Care and Maintenance Warning: Before carrying out any cleaning or maintenance activities, ensure that the appliance is disconnected from the main power supply. Components inside the appliance may have sharp edges. Wear protective gloves. Cleaning Agents To ensure that the different surfaces are not damaged by using the wrong cleaning product, follow the instructions in the table. - Page 12 Metal Grease Filter Warning: It is important to regularly clean and/or replace the metal grease filters at appropriate intervals as grease deposits build-up increases the risk of fire. Do not operate the extractor hood without any grease filter installed. Components inside the appliance may have sharp edges. It is advisable that you wear protective gloves.
- Page 13 Installing the Metal Grease Filter Insert back the metal grease filter and lock it in place, at the same time take hold of the metal grease filter from underneath using your other hand to insert into the grease filter holder, make sure the metal grease filter is positioned correctly.
- Page 14 LED Lights Defective LED lights can only be replaced by the manufacturer, their customer service or their authorized after sales service agents only. Charcoal Filter (where applicable) (Fig. 4 & Fig. 4. 1 & Fig. 4. 2) Fig. 4. 1 Fig.
-
Page 15: Trouble Shooting
Incorrect repairs are dangerous. Repairs should be attempted by our qualified technical personnel’s only. If the appliance is defective, unplug the appliance from the mains or switch off the circuit breaker in the fuse box. Contact your local Rinnai After Sales Service Center for assistance. -
Page 16: Specification And Component List
Specification Model: RH-C1159-PBW Power Rating: 253W Voltage: 220-240V~ Power Frequency: 50/60Hz 1 X 3W LED strip light Power of Lamps: Length of the cable: 1.5m Appliance 895 x 504 x 567 - 1045mm Dimensions: (W x D x H) *The manufacturer reserves the right to effect any technological improvement or modification without prior notice. -
Page 17: Installation Instructions
Installation Instructions Safety and General Information Read these instructions carefully. Check the appliance for damage after unpacking it. • The appliance can only be used safely if it is correctly installed according to the safety • instructions. The installer is responsible for ensuring that the appliance works correctly at its installation location. - Page 18 Warning Components inside the appliance may have sharp edges. Wear protective gloves. The extractor hood may fall down if it has not been properly fastened in place. All fastening components must be fixed firmly and securely. The extractor hood is heavy. To move the appliance 2 people are required. Use only ...
- Page 19 Preparing the Installation Ensure that there are no electrical wires, gas pipes or water pipes in the area where holes are to be drilled. Step 1 (Fig. 7 & Fig. 7. 1) Determine where the extractor hood should be positioned and lightly mark where the lower edge of the appliance should be on the wall.
- Page 20 Attaching the Flue Ducts Step 4 (Fig. 9, Fig. 9. 1, Fig. 9. 2) Secure the mounting bracket onto the screws firmly 1 & 2 and place the outer flue duct onto the appliances. (Fig. 9). Slide the outer flue duct section ...
- Page 24 2805 電話 傳真 ...
Need help?
Do you have a question about the RH-C1159-PBW and is the answer not in the manual?
Questions and answers