Table of Contents
Advertisement
Quick Links
Advertisement
Table of Contents

Subscribe to Our Youtube Channel
Related Manuals for Vitus Audio REFERENCE LINESTAGE RL-102


Summary of Contents for Vitus Audio REFERENCE LINESTAGE RL-102
- Page 1 REFERENCE SERIES RL–102 REFERENCE LINESTAGE OWNER’S MANUAL...
-
Page 2: Table Of Contents
CONTENTS From the creator 4. Operation and service Foreword Maintenance Mains supply voltage Mains fuse Introduction Fuse type About this manual Replacing a blown fuse 24-25 Introduction to the Masterpiece Series 7 Firmware updating 26-27 1. Getting started 5. Warranty Unpacking the box, and how Warranty to correctly unpack it... -
Page 3: From The Creator
As a result of the above, our amplifiers do not “focus” on any specific frequencies - i.e. no extension of top or bass, At Vitus Audio everything works until proven not to. This way we which of course results in high clarity of the midrange since always try to push the limits and explore the unexplored. -
Page 4: Introduction
Introduction to the Reference Series This is your RL-102 owner’s manual. The following pages will, Reference Series is your entry point to the world of Vitus Audio. as clearly as possible, describe how to get your RL-102 operating The components in this series are cost-optimised versions of the quickly and easily. -
Page 5: Getting Started
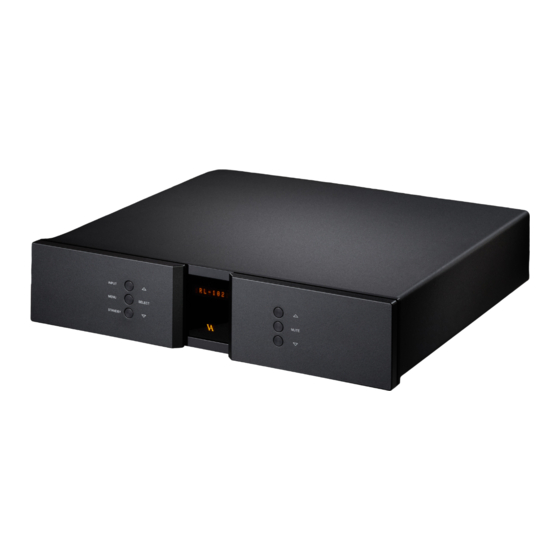
1. GETTING STARTED 1. GETTING STARTED What’s in the box, and how RL-102 device overview to correctly unpack it Gently cut open the tape on the top of the box, making sure not Box contents let the knife protrude too much. Open the box and remove the Foam top 1 foam top with all the included accessories. -
Page 6: The Topology Of The Volume Control
1. GETTING STARTED 2. CONNECTING The topology of the volume control Turning the RL-102 on and off The topology of the volume control used in the RL-102 is very To prevent pop in the output, we have chosen to first add the new Always turn on the products beginning from the source: different compared to the “standard”. -
Page 7: Connecting The Rl-102
2. CONNECTING 2. CONNECTING Connecting the RL-102 The rear panel Place the RL-102 on its shelf. Connect all the sources to the inputs of the RL-102 labelled INPUT 1 to 5 on the rear panel. Connect the output of the RL-102. -
Page 8: Operation
3. OPERATION 3. OPERATION Operation modes Operation modes The RL-102 has 3 operation modes 1. NORMAL This is the mode you use when listening to music. 2. MENU In this mode you can alter the settings of the RL-102 3. STANDBY In this mode the controls of the RL-102 are deactivated. -
Page 9: Functions - Left Front Panel
3. OPERATION 3. OPERATION Functions Functions – left front panel – right front panel INPUT INPUT MUTE MUTE MENU SELECT MENU SELECT STANDBY STANDBY Normal mode Menu mode Normal mode Menu mode In normal mode there are 3 basic functions/buttons available You enter menu mode, by pushing the “MENU”... -
Page 10: The Elements In The Menu
3. OPERATION 3. OPERATION The elements in the menu The elements in the menu You can modify the settings of your SL-102 by entering the menu and selecting the options you require. Refer to the menu structure diagram on page 21 for specific information. - Page 11 3. OPERATION 3. OPERATION The RL-102 menu structure MENU LEAVE SETUP BACK EXIT XLR OUT / RCA OUT OUTPUT 1 REMOTE BACK EXIT ENA REM REMOTE ID DATA AutoStb o – 360 (min) RESET RESET NO / RESET YES V.INIT -80 dB / +12dB LOGO ON / OFF...
-
Page 12: Operation And Service
Mains fuse Fuse type: Vitus Audio products are designed to run for many years without Any unit may be set for operation in 100V, 115V or 230V/240V AC. The mains fuse is accessible from the outside of the amplifier. You Physical size - 20 x 5mm the need for regular maintenance. -
Page 13: Replacing A Blown Fuse
4. OPERATION AND SERVICE 4. OPERATION AND SERVICE Replacing a blown fuse Replacing a blown fuse REMOVE THE POWER CABLE The fuse carrier is placed on the back under the power Take a small flat bladed screwdriver and place it over Push the spare fuse out using a pointy object. -
Page 14: Firmware Updating
4. Plug the power chord into the RL-102. You can contact your local Vitus Audio dealer if you are uncertain 5. The display will show “new FW detected” while updating (this takes about 5 seconds). -
Page 15: Warranty
RCA analogue Options Audio or an authorised Vitus Audio repair center by the customer damage to chassis parts. (See 6) at his or her sole expense. Vitus Audio will pay return freight of Available 3 (L+R) 2 (L+R) Custamisable at order 2. -
Page 16: Examples Operation
7. EXAMPLES OF OPERATION 7. EXAMPLES OF OPERATION Changing output INPUT MENU SELECT MUTE STANDBY EXAMPLE 1 Changing output The RL-102 can be set to output either to the XLR or RCA connectors, according to your preference. Press the “MENU”... -
Page 17: Changing Input Sensitivity
7. EXAMPLES OF OPERATION 7. EXAMPLES OF OPERATION Changing input sensitivity Changing offset volume for inputs INPUT INPUT MUTE MUTE MENU SELECT MENU SELECT STANDBY STANDBY EXAMPLE 2 EXAMPLE 3 Changing input sensitivity Changing offset volume for inputs The input sensitivy of the RL-102 can be set on each individual input, A specific volume offset on the RL-102 can be set on each individual... -
Page 18: Changing Display Brightness
7. EXAMPLES OF OPERATION 7. EXAMPLES OF OPERATION Changing display brightness Changing initial volume step INPUT INPUT MUTE MUTE MENU SELECT MENU SELECT STANDBY STANDBY EXAMPLE 4 EXAMPLE 5 Changing display brightness Changing initial volume step The input sensitivy of the RL-102 can be set on each individual input, to accomodate for different output levels of different sources. -
Page 19: Disabling Inputs
7. EXAMPLES OF OPERATION 7. EXAMPLES OF OPERATION Disabling inputs Changing input names INPUT INPUT MUTE MUTE MENU SELECT MENU SELECT STANDBY STANDBY EXAMPLE 6 EXAMPLE 7 Disabling inputs Changing input names Each individual input on the RL-102 can be disabled in the menu. -
Page 20: Setting Fixed Volume For Inputs
7. EXAMPLES OF OPERATION 7. EXAMPLES OF OPERATION Setting fixed volume for inputs Configuring auto standby INPUT INPUT MUTE MUTE MENU SELECT MENU SELECT STANDBY STANDBY EXAMPLE 6 EXAMPLE 7 Setting fixed volume for inputs Configuring auto standby Each individual input on the RL-102 can be set to a fixed volume The RL-102 can be configured to automatically go into standby... -
Page 21: Restore Factory Settings
7. EXAMPLES OF OPERATION 7. EXAMPLES OF OPERATION Restore factory settings INPUT MUTE MENU SELECT STANDBY EXAMPLE 6 Restore factory settings The RL-102 can be restored to it’s factory settings if needed. Press the “MENU” button to enter menu mode. YOU PRESS YOU SEE Use the function buttons on the front of the unit to navigate... -
Page 22: Rl-102 Owner's Manual
HANDCRAFTED IN DENMARK AVA Group A/S (Vitus Audio) Hammershusvej 3H DK-7400 Herning Denmark Phone: +45 9626 8046 e-mail: sales@avagroup.nu Web: vitusaudio.com 42 | RL-102 Owner’s manual...
Need help?
Do you have a question about the REFERENCE LINESTAGE RL-102 and is the answer not in the manual?
Questions and answers