Table of Contents
Advertisement
Advertisement
Table of Contents

Subscribe to Our Youtube Channel
Related Manuals for Vitus Audio SIA-030


Summary of Contents for Vitus Audio SIA-030
- Page 1 SIA-030 Owner’s Manual...
-
Page 2: Table Of Contents
Turning the SIA-030 on and off . . . . 11 SIA-030 rear panel . . . . . . . . . . . 12 Connecting the SIA-030 . - Page 3 The menu structure . . . . . . . . . . 53 SIA-030 Front . . . . . . . . . . . . . . 69 Changing display brightness .
-
Page 4: On A Personal Note
Certificate Model: SIA-030 Product ID/Serial __________________________________ Product Build Date __________________________________ Signed __________________________________ All product details, specifications and measurements are recorded for your SIA-030 and kept by Vitus Audio . SIA-030 | Version 1... -
Page 5: From The Creator
. of this, many of the solutions a drawback of many high When purchasing a Vitus Audio we use today are considered end amplifiers . Our real product, you are guaranteed a to be “impossible to ever... -
Page 6: About This Manual
About this manual Introduction to the Signature Series This is your SIA-030 owner’s The Vitus Audio Signature manual . The following pages Series is a true high-end series will describe, as clearly as of products, which build on possible, how to get you... -
Page 7: Heavy Lifting - Warning
. You might damage both your back and the amplifier if extra care is not applied . Vitus Audio A/S can’t be held responsible for any damage that is a consequence of uncareful handling of the unit . -
Page 8: Getting Started
Power Cable corners and put it directly onto Foam Corners the floor . Store the empty box and protective foam for later use . SIA-030 What’s in the box SIA-030 Foam Corners RC-010 Remote Bottom RC-010 Charger Power Cable USB with Manual &... -
Page 9: Device Overview
1 . getting started Device overview The body of the SIA-030 is constructed of anodized and painted aluminium . Material: anodized/painted aluminium . Dimensions (H x W x D): 270 x 435 x 525 Weight: 63 kg 525 mm 435 mm... -
Page 10: The Topology Of
The topology of the volume To prevent pop in the output, The topology of the volume control used in the SIA-030 is we have chosen to first add control, was updated early very different compared to the the new shunt resistors, and 2019, to be implemented in the “standard”... -
Page 11: Connecting
. To power off the SIA-030, simply use the standby button . If you wish to completely power off the SIA-030, use first the standby button, follower by the power on/off button . -
Page 12: Rear Panel
SIA-030 rear panel Connecting the SIA-030 Outputs Place the SIA-030 . Connect all the sources to the Speaker Left inputs of the SIA-030, (labelled Speaker out INPUT 1 to 5 on the rear Speaker Right panel .) Speaker out Preout RCA... -
Page 13: Illustration Of Rear Panel
2 . connecting Optional Interface DAC/Streamer Optional Interface RIAA MC/MM Fuse SIA-030 Rear panel . Figure 4 SIA-030 | Version 1... -
Page 14: Operation
3 . operation Operation modes Power on/off button is located at the bottom center of the front, SIA-030 Front panel . Figure 5 SIA-030 | Version 1... -
Page 15: Operation Modes
This is the mode you use when listening to music . 2 . Menu mode In this mode you can alter the settings of the SIA-030 . 3 . Standby mode . In this mode the controls of the SIA-030 are deactivated . -
Page 16: Functions - Left Front Panel
3 . operation Functions – left front panel SIA-030 Left front panel . Figure 6 Normal mode Menu mode In normal mode there are You enter menu mode, by 3 basic functions/buttons pushing the ”MENU” button available on the left front . -
Page 17: Functions - Right Front Panel
3 . operation Functions – right front panel SIA-030 Right front panel . Figure 7 Normal mode Menu mode In normal mode there are In the text-menu it is possible 3 basic functions/buttons to change the name of the available on the right front . -
Page 18: The Elements In The Menu
3 . operation SIA-030 SETUP V . I NIT Change the settings of the SIA-030 . Change settings for the initial The elements in the volume step of the SIA-030 . menu . CLASS VOL . S TEP Select if the SIA-030 should... - Page 19 INPUT X locked to a dB step and can’t be sensitivity of each input between The SIA-030 has 5 inputs . adjusted with the volume control . ≤ 2 Vrms, ≤ 4 Vrms, ≤ 8 Vrms to The settings of each individual...
-
Page 20: Blank Page
3 . operation SIA-030 | Version 1... -
Page 21: The Menu Structure
3 . operation SIA-030 The menu structure EXIT MENU CLASS A / AB MODE CLASSIC / ROCK SETUP BACK EXIT COLOR BACK EXIT TEXT LOGO BALANCE +12 dB Left / +12 dB Right DATA RESET RESET NO / RESET YES V.INIT... -
Page 22: Operation & Service
. Should your SIA-030 fuse . Should your SIA-030 show show signs of malfunction, signs of malfunction, please then please contact your contact your dealer or Vitus dealer or Vitus Audio . -
Page 23: Mains Fuse
. For an explanation of how to In case of malfunction the replace the fuse see chapter 4 unit must be returned to Vitus “replacing a blown fuse” . Audio for repair . SIA-030 | Version 1... -
Page 24: Replacing A Blown Fuse
There is a spare fuse available Flip the fuse out using a pointy in the fuse carrier . object (a pen or screwdriver) . Take the blown fuse out of the fuse carrier . Figure 9 Replacing a blown fuse SIA-030 | Version 1... - Page 25 . carrier . Take the spare fuse out of the Click the fuse in place . fuse carrier and throw away the Push the fuse carrier back into blown fuse . the unit . SIA-030 | Version 1...
-
Page 26: Warranty
. transported, or the defect Warranty Statement is due to the product being 3 . LIMITED TO ORIGINAL (modified to fit Vitus Audio) repaired or tampered with by PURCHASER anyone other than Vitus Audio This Warranty is for the 1 . - Page 27 (3) Year Limited Warranty remaining (as measured from the date of shipment of the equipment to the Vitus Audio partner . In the event warranty service is needed under these conditions, the owner of the equipment...
- Page 28 . In the unlikely event of service required beyond the capabilities of the importer, Vitus Audio will fulfill the conditions of the warranty . Such products must be returned at the owner’s expense to the Vitus Audio...
-
Page 29: Specifications
6 . specifications SIA-030 Specifications Rated Output Power………… . .…… . .2 x 30W Class A / 2 x 200W Class AB Frequency Response………………………… ..………… ..DC to +800KHz Signal to Noise Ratio . .……………………………… ..……… . .……> 120dB THD+ Noise…………………………………... -
Page 30: Examples Operation
A amplifier Press the“MENU”button to enter Menu Mode . Navigate to the CLASS submenu, using the function buttons on the left front SIA-030 Left front panel . Figure 6 MENU 1 . Scroll Forward in the menu . EXIT 2 . -
Page 31: Disabling Inputs
SELECT Input 4 . BACK EXIT Press the“MENU”button to enter Menu Mode . USED SELECT SIA-030 Left front panel . Figure 6 USED Navigate to the INPUT sub- NOT USED menu, using the function SELECT buttons on the left front USED 1 . - Page 32 FIXED and can not be adjusted with the SELECT volume control . SET FIX SELECT SIA-030 Left front panel . Figure 6 FIX OFF The following example illustrates how to fix the FIX ON SELECT volume step of Input 1 to 0 dB .
- Page 33 FIXED another . The offset-value can OFFSET SELECT be set from -12 dB to +12 dB . SIA-030 Left front panel . Figure 6 O .O You cannot change the offset gain with FIX ON selected . The following example - 3 .O...
- Page 34 4 V rms to 8 V rms The sensitivity is set to 4 Vrms by default . MENU In this example we will change the sensitivity of input 1 from 2 SIA-030 Left front panel . Figure 6 EXIT Vrms to 8 Vrms . SETUP SELECT Press the“MENU”button to...
- Page 35 INPUT 1 to SCD-025 Press the“MENU”button to enter Menu Mode . Navigate to the TEXT MENU submenu, using the function buttons on the left front SIA-030 Left front panel . Figure 6 EXIT SETUP 1 . Scroll Forward in SELECT the menu .
- Page 36 7 . examples operation Example 7 This page has been left lank intentionaly SIA-030 | Version 1...
- Page 37 SIA-030 Press the“MENU”button to enter Menu Mode . Navigate to the “RESET” submenu, using the function buttons on the left front SIA-030 Left front panel . Figure 6 1 . Scroll Forward in the menu . MENU 2 .
- Page 38 SELECT step . This is the volume step VOL .STEP the SIA-030 start up in when it leaves standby mode . The initial volume step is as a Figure 18 Example 9 Setting initial volume step default set to -50 dB .
-
Page 39: Left Blank Intentionally
7 . examples operation Example 10 This page has been left blank intentionally SIA-030 | Version 1... -
Page 40: Changing Display Brightness
1 . In this example we will show you how to set the brightness to 2 . MENU SIA-030 Left front panel . Figure 6 Press the MENU button to EXIT enter Menu Mode . Navigate to the BRIGHT... -
Page 41: Examples Connecting Devices
7 . examples connecting devices Connecting devices Vitus Audio Products 3rd Party Products Signature Series In our examples we used the following devices SCD-025 Media Center SIA-030 Integrated Amplifier Turntable SP-103 Phonostage Figure 21 Devices used SIA-030 | Version 1... -
Page 42: Connecting Devices 2
Connecting devices 1 The Media Center is connected to the SCD-025 . The SCD-025 is used as a DAC . The Turntable is connected to the SP-103 . The SIA-030 is powering the hi-mid- and low tones . Units Speakers SIA-030 SP-103... -
Page 43: Connecting Devices 2
7 . examples connecting devices Connecting devices 2 When you have the SIA-030 DAC/Streamer and RIAA extensions, it is possible to directly connect a Media Center and Turntable . Units SIA-030 Speakers Turntable Media Center SIA-030 | Version 1... - Page 44 7 . examples connecting devices Connecting devices 3 It is possible to connect an active subwoofer to the Pre-out . Units SIA-030 SCD-025 SP-103 Speakers Active Subwoofer Media Center Turntable SIA-030 | Version 1...
-
Page 45: System Remote
The RC-010 is put into shipping mode before transport . This This is the RC-010 . The RC- means that the motion sensor 010 is the Vitus Audio System SIA-030 SIA-025 is disabled . Shipping mode Remote that comes with the is disabled by pushing any SIA-030 . - Page 46 8 . RC-010 getting started What’s included SIA-030 SIA-025 RC-010 System Remote RC-010 Charger RC-010 Charger - powercord A/AB VITUS RC-010 System Remote RC-010 Charger SIA-030 | Version 1...
-
Page 47: Getting Started
8 . RC-010 getting started RC-010 System Remote Device SIA-030 SIA-025 over view Material: Anodized Aluminium Weight :287 gr . A/AB VITUS 21 mm 55 mm SIA-030 | Version 1... -
Page 48: System Remote
8 . RC-010 operation RC-010 System Remote operation modes The RC-010 has 4 SIA-030 operation modes 1 . Normal mode . This is the mode you use when listening to music . 2 . Menu mode In this mode you can alter the settings of the RC-010 . - Page 49 8 . RC-010 operation Normal mode Normal mode Buttons Display SIA-030 In normal mode there are In normal mode the display has 11 basic functions/buttons 6 information fields . available on the left front . SCD-025 PRODUCT INPUT 2 A . VA logo...
- Page 50 8 . RC-010 operation Menu mode Menu mode Buttons Display SIA-030 You enter menu mode, by In the menu mode the screen holding button 2 down for has 2 different layouts and SCD-025 PRODUCT INPUT 2 three seconds . information fields .
- Page 51 Set hotkey 1 (button 1) sub-menu: EDIT PRODUCT . to a product that you can choose from in the Display predefined list . Scroll SIA-030 through this list with DISABLE button 1 . LEAVE MENU KEY 1 : INPUT 1...
- Page 52 Selection indicator . Indicates which item on Enter the RC 5 code the display you have that the remote has to selected . send when this button is pressed . Enable / disable this button . SIA-030 | Version 1...
-
Page 53: The Menu Structure
With OFF selected the motion and one function for press- This means that it is possible to sensor is deactivated and and-hold (press) . add 2 more products . movement will not activate the RC-010 . SIA-030 | Version 1... -
Page 54: Discription Of
8 . RC-010 operation RC-010 Discription of the e l e m e n t s i n t h e m e n u . SIA-030 LEAVE MENU KEY (1 and 3) Go back to normal mode . -
Page 55: The Menu Structure
The same KEY 3: INPUT 2 sequence INPUT 1/2/3/4/5 as key 1 *This sub-menu becomes available when you add a SCD-025 product to the predefined product list. SIA-030 SS-103 Figure 23 The RC-010 Menu strukture SIA-030 | Version 1... -
Page 56: Examples
025 and a SP-103 connected to a VITUS VITUS 1 . Press and hold button 2 for 3 2 . Navigate to the edit product SIA-030 . seconds to enter menu mode . sub-menu We will show you how to disable SIA-030 SIA-030 all the other products . -
Page 57: Setting The Hotkeys
INPUT 2 then the remote sends the VITUS VITUS volume command to the SIA-030 . 4 . Scroll to SP-103 in the list 3 . Enter the edit product We will show you how to set the under hotkey 2... -
Page 58: Setting The Hotkeys Example
030 . SCD-025 SCD-025 LE AV E MEN U SP-103 PRODUCT SIA-030 VITUS VITUS 7 . Leave the menu . 8 . Hotkey 1 is now set to SP-103 hotkey 2 is now set to SIA-030 . SIA-030 | Version 1... - Page 59 PRODUCT SL-103 VITUS VITUS VITUS 4 . Scroll to SCD-025 in the list 3 . Enter the edit product sub- 5 . Scroll to SIA-030 in the list under hotkey 1 . menu under hotkey 2 SP-103 SP-103 SP-103 ENABLE...
-
Page 60: Adding Products
8 . RC-010 examples Example 3 SIA-030 SIA-030 LEAVE ME NU Adding a product SCD-025 PRODUCT INPUT 2 In the following 7 steps we will show how you can VITUS VITUS 1 . Press and hold button 2 for 2 . Navigate to the add product add a product to the list of 3 seconds to enter menu mode . -
Page 61: Programming The Buttons (Rc5)
7 . Give a name to the action the selection square to NEXT when you press button 7 . that button 7 performs when RELEASE and pressing select . you press it . We give it the name NEXT . SIA-030 | Version 1... -
Page 62: Setting Hotkey 1 To Input 3
INPUT 3 PRODUCT INPUT 2 VITUS VITUS 5 . Set KEY 1 to INPUT 3 . The item 6 . Scroll to SIA-030 and press under hotkey 1 has now automatically select . been updated to INPUT 3 SIA-030 SIA-030... - Page 63 8 . RC-010 examples Example 6 SIA-030 SIA-030 FAB RI C Resetting the RC-010 SCD-025 PRODUCT INPUT 2 You can restore the settings of the RC-010 . In the following 5 VITUS VITUS 1 . Press and hold button 2 for 2 .
- Page 64 8 . RC-010 examples Example 7 SIA-030 SIA-030 DI SP LAY Changing the delay from 5 to 10 seconds SCD-025 PRODUCT INPUT 2 VITUS VITUS 1 . Press and hold button 2 for 2 . Navigate to the DISPLAY The delay of the display is set 3 seconds to enter menu mode .
-
Page 65: Specifications
Type……………………………… ..……FW74010/05 Switchmode Input……………………… . .…… . . .100 - 240 V~/ 50-60 Hz / 310 mA Output…………………… . . .……………………………… ..5V / 2A SIA-030 | Version 1... -
Page 66: Controls
8 . RC-010 controls The functions of the buttons for the different products . SIA-025 SIA-030 SCD-025 SIA-030 SL-103 SP-103 SS-103 SCD-025 PRODUCT INPUT 2 Button 1: Pause SCD-025 SCD-025 SL-103 SCD-025 Button 2 Product Product Product Product Product Button 3:... - Page 67 Button 7 press: Button 8: Volume down Volume down Volume down Volume down Sens down Button 9 release: Button 9 press: Button 10: Change Class Change Class Change Class Power Power Button 11: Standby Standby Standby Standby Standb SIA-030 | Version 1...
-
Page 68: Pictures Sia-030
9 . pictures SIA-030 SIA-030 Inside view Picture 1 SIA-030 Inside view SIA-030 | Version 1... -
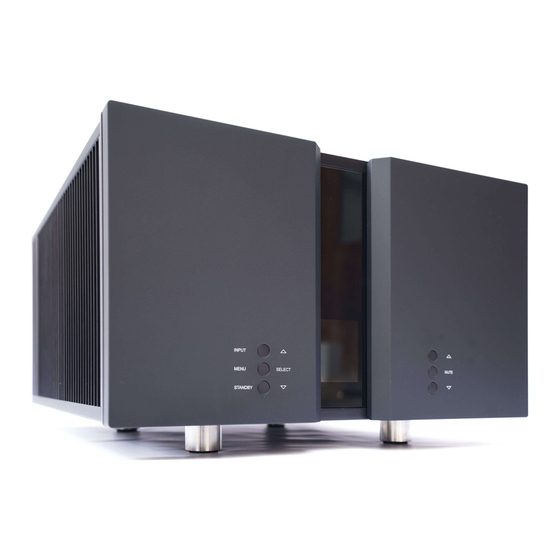
Page 69: Sia-030 Front
9 . pictures SIA-030 SIA-030 Front Picture 2 SIA-030 Front Picture 2 SIA-030 Front SIA-030 | Version 1... -
Page 70: Picture
9 . pictures RC-010 RC-010 Picture - PLEASE NOTE - ONLY BLACK FINISH IS AVAILABLE Picture 2 RC-010 Front Picture 1 RC-010 Picture SIA-030 | Version 1... - Page 71 (electronic, mechanical, photocopying, recording or otherwise) without the prior written permission of Vitus Audio . Any person who does any unauthorized act in relation to this publication may be liable to criminal prosecution and civil claims for damages .
- Page 72 Handcrafted in Denmark AVA Group A/S (Vitus Audio), Hammershusvej 3H, DK-7400 Herning, Denmark, Phone: +45 9626 8046 e-mail: sales@avagroup .nu, web site: www .vitusaudio .com...
Need help?
Do you have a question about the SIA-030 and is the answer not in the manual?
Questions and answers