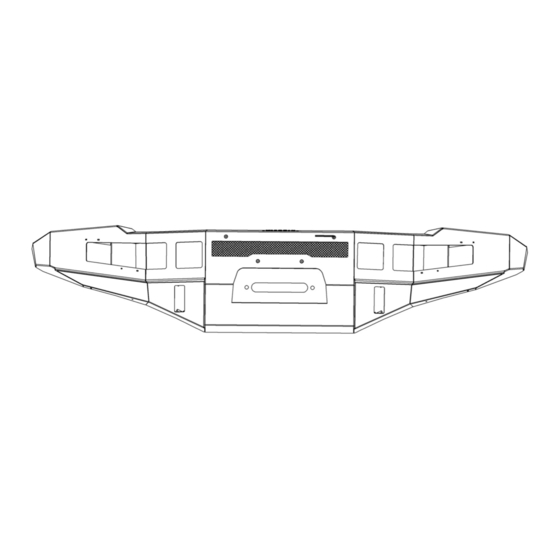
Westin PRO Series Installation Instructions Manual
Front bumper
Hide thumbs
Also See for PRO Series:
- Installation instructions manual (6 pages) ,
- Installation instructions manual (12 pages)
Advertisement
Quick Links
ITEM
QUANTITY
1
1
2
1
3
1
4
1
5
1
6
1
7
1
8
1
9
1
10
3
11
2
12
4
13
4
14
8
15
8
16
3
17
3
18
6
19
3
20
6
21
12
22
36
23
18
ANTI-SEIZE LUBRICANT MUST BE USED ON ALL STAINLESS STEEL FASTENERS TO PREVENT THREAD DAMAGE AND GALLING
1. Remove contents from box, verify if all parts listed are present and free from damage.
Carefully read and understand all instructions before attempting installation.
Failure to identify damage before installation could lead to a rejection of any claim.
Westin Automotive Products, Inc.
320 W. Covina Blvd
San Dimas, Ca. 91773
P.N.: 75-58411045-RevB
ECO #: W22-0008
INSTALLATION INSTRUCTIONS
PRO-SERIES FRONT BUMPER
APPLICATION:
2016-2022 Toyota Tacoma
PART NUMBER:
58-411045
CONTENT
DESCRIPTION
PRO SERIES FRONT BUMPER
WINCH TRAY
LED LIGHT COVER
DRIVER LED LIGHT BRACKET
PASSENGER LED LIGHT BRACKET
DRIVER SUPPORT BRACKET
PASSENGER SUPPORT BRACKET
DRIVER MAIN BRACKET
PASSENGER MAIN BRACKET
RELOCATION BRACKET
RUBBER TRIM
M6 COUNTERSUNK HEX HEAD SCREW
M6 BUTTON HEAD BOLT
M6 FLAT WASHER
M6 SERRATED FLANGE NUT
M8 HEX BUTTON HEAD BOLT
M8 LOCK WASHER
M8 FLAT WASHER
M8 SERRATED FLANGE NUT
M12 LONG HEX HEAD BOLT
M12 SHORT HEX HEAD BOLT
M12 FLAT WASHER
M12 SERRATED FLANGE NUT
PROCEDURE
1
Thank you for choosing Westin products
for additional installation assistance please call
Customer Service (800) 793-7846
www.westinautomotive.com
TOOLS NEEDED
13MM SOCKET
14MM SOCKET
RATCHET
TORQUE WRENCH
10MM SOCKET
CUTTING TOOL
RULER
MARKER
PRY TOOL
GRINDER
CUT OFF WHEEL
DATE: 06/09/2022
Advertisement

Subscribe to Our Youtube Channel
Summary of Contents for Westin PRO Series
- Page 1 Carefully read and understand all instructions before attempting installation. Failure to identify damage before installation could lead to a rejection of any claim. Westin Automotive Products, Inc. Thank you for choosing Westin products 320 W. Covina Blvd for additional installation assistance please call San Dimas, Ca.
- Page 2 Figure 2 Figure 1 Westin Automotive Products, Inc. Thank you for choosing Westin products 320 W. Covina Blvd for additional installation assistance please call San Dimas, Ca. 91773 Customer Service (800) 793-7846 www.westinautomotive.com...
- Page 3 See Figures 5 & 6 for reference. Figure 4 Figure 3 Figure 5 Figure 6 Westin Automotive Products, Inc. Thank you for choosing Westin products 320 W. Covina Blvd for additional installation assistance please call San Dimas, Ca. 91773 Customer Service (800) 793-7846 www.westinautomotive.com P.N.: 75-58411045-RevB...
- Page 4 See Figure 9 for reference. Note: When you completely detach one side, have someone hold the bumper for you to avoid damage on the other side. Figure 9 Westin Automotive Products, Inc. Thank you for choosing Westin products 320 W. Covina Blvd for additional installation assistance please call San Dimas, Ca. 91773 Customer Service (800) 793-7846 www.westinautomotive.com...
- Page 5 1 inch below the line. Mark dots at each edge. See Figures 13 & 14 for reference. Westin Automotive Products, Inc. Thank you for choosing Westin products 320 W. Covina Blvd for additional installation assistance please call San Dimas, Ca.
- Page 6 Re-install the OEM bumper assembly and fender flares after trimming is complete. See Figure 16 for an example of a trimmed bumper. Westin Automotive Products, Inc. Thank you for choosing Westin products 320 W. Covina Blvd for additional installation assistance please call San Dimas, Ca.
- Page 7 Use the provided rubber trim (Item 11) to cover the cuts you just made. Trimming procedure complete. Westin Automotive Products, Inc. Thank you for choosing Westin products 320 W. Covina Blvd for additional installation assistance please call San Dimas, Ca. 91773 Customer Service (800) 793-7846 www.westinautomotive.com...
- Page 8 Figure 20 Figure 21 20, 22, 23 Through frame Factory nuts Westin Automotive Products, Inc. Thank you for choosing Westin products 320 W. Covina Blvd for additional installation assistance please call San Dimas, Ca. 91773 Customer Service (800) 793-7846 www.westinautomotive.com P.N.: 75-58411045-RevB...
- Page 9 18. If you are not installing light bar, install the led light mesh cover using supplied M6 hardware. See Figure 24 for reference. Figure 23 Figure 24 Westin Automotive Products, Inc. Thank you for choosing Westin products 320 W. Covina Blvd for additional installation assistance please call San Dimas, Ca. 91773 Customer Service (800) 793-7846 www.westinautomotive.com...
- Page 10 20. Adjust the bumper, winch tray, and mounting brackets as necessary. Tighten and torque all hardware as specified: M6 to 5- 7 ft-lbs, M8 to 15-18 ft-lbs, M12 to 50 ft-lbs. Figure 25 Westin Automotive Products, Inc. Thank you for choosing Westin products 320 W. Covina Blvd for additional installation assistance please call San Dimas, Ca. 91773 Customer Service (800) 793-7846 www.westinautomotive.com...
-
Page 11: Installation Complete
STAINLESS STEEL PRODUCTS CAN BE CLEANED WITH MILD SOAP AND WATER. STAINLESS STEEL POLISH SHOULD BE USED TO POLISH SMALL SCRATCHES. • GLOSS BLACK FINISHES SHOULD BE CLEANED WITH MILD SOAP AND WATER. Westin Automotive Products, Inc. Thank you for choosing Westin products 320 W. Covina Blvd for additional installation assistance please call San Dimas, Ca. 91773 Customer Service (800) 793-7846 www.westinautomotive.com... - Page 12 AND SAFETY. DRILLING: Most Westin products do not require drilling for installation. If drilling is defined as required, use caution when drilling a vehicle. FAILURE TO REVIEW AN AREA TO BE DRILLED MAY RESULT IN PERSONAL INJURY AND/OR INJURY TO OTHERS AS WELL AS VEHICLE DAMAGE.


Need help?
Do you have a question about the PRO Series and is the answer not in the manual?
Questions and answers