Table of Contents
Advertisement
Quick Links
Advertisement
Table of Contents

Related Manuals for Scarlet Tech ST-11


Summary of Contents for Scarlet Tech ST-11
- Page 1 ST-11 Sound Level Meter User Guide...
- Page 2 Precaution *Please read the manual carefully before using the meter. *Don’t touch any parts of the unit only if necessary for operation. *Don’t disassemble or modify the unit. *In case of malfunction, don’t attempt to do any repairs. *The warranty doesn’t apply to damage on the meter diaphragm and other improper use.
-
Page 3: Table Of Contents
4.4 Check and change of battery 5. Calibration 5.1 Acoustic calibration 5.2 Calibration setup 5.3 Calibration history list 6. The operation of ST-11 6.1 main menu 6.1.1 DISP display interface 6.1.2 List display interface 6.2 Measurement of A-weighted sound level 6.3 Measurement of C, Z and B-weighted sound level... -
Page 4: Overview
Overview ST-11 is a digital and multifunctional sound level meter with a modular design. Its measurement solution is in accordance with IEC 61672: 2013 Class 1 standard and its sensitivity for emission in radio frequency filed is classified as group X. With features such as automatic range conversion, wide linear operating range, digital output inter- face, the meter can be easily used in telemetry. -
Page 5: Specification
≧95 dB (9) Display: 128×64 OLED (10) Output interface: AC, DC, RS-232, USB interface and Bluetooth (11) Calibration: use Model ST-11 sound level calibrator to conform specifications of IEC 60942, Class 1 for the performance. (12) Power: Battery 4×LR 6: work at least 6 hours successively. - Page 6 (14) Weight (kg): 0.4 (15) Operation environment: Air temperature: -15ºC~+50 ºC Relative humidity: 10 %~90 % Air pressure: 65 kPa~108 kPa (16) Measurement range: Measureme Peak Type nt range factor measurement (dB) Ref.10 range(dB) AWA14425 45∼140 45∼123 70∼143 27∼120 27∼103 50∼123 AWA14423 43∼138...
-
Page 7: Structure Features And Function
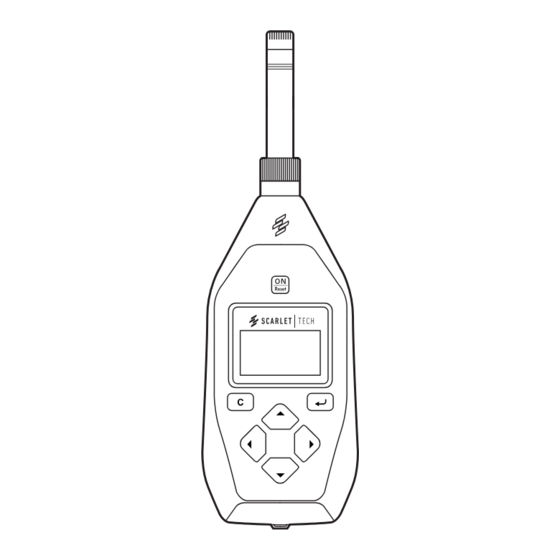
Structure features and function The outline of the Sound Level Meter is shown in figure 1. It consists of microphone, preamplifier and the main unit. During normal operation, the measuring microphone and the preamplifier are installed on the head of the main unit, connected with the main unit through knurled nut. - Page 8 Fig 3 Table 1 Keys function Table 1 Keys function Power Power on or reset the meter on/reset Enter Enter the next menu or Input the current operation Exit Exit from the current menu or keep pressing for 3s to power off the meter Right Move cursor to next position cursor...
- Page 9 AC/DC output socket, the socket is a stereo output socket, when matches with the plug, each pin plug defined as above Fig 5. AC and DC output The type of RS232 output socket is RJ45, the output of pins is defined as above RS232 port only has input and output two signals in serial, the pins are defined as follows.
-
Page 10: Before Using
Table 2 Definition of symbol Definition Symbol Battery level display Integrating measurement and statistics analysis are in progress Integrating measurement and statistics analysis are paused The measured signal surpasses the upper limit of measurement range The measured signal is under the lower limit of measurement range Before Using 4.1 Checklist... -
Page 11: Check And Change Of Battery
Fig 6. LR03 batteries Calibration Power on the ST-11 sound level meter and let it stay at “F”, “Lp” state, preheat the sound level meter for 5 seconds, and then insert the ½ inch microphone to the hole of ST-11 sound calibrator, finally, turn on the power supply of ST-11 sound calibrator. -
Page 12: Acoustic Calibration
First row: Acoustic Calibration. You can use acoustic calibrator to calibrate the sensitiv- ity of the instrument. Second row: Calibration Setup. You can set the SPL of the acoustic calibrator or the sensitivity of the microphone. Third row: Calibration History of the instrument. 5.1 Acoustic calibration Move the cursor to the first row and press key, then enter the calibration interface. -
Page 13: Calibration History List
If press key again, all of the calibration histories will be erased. The operation of ST-11 6.1 main menu After pressing “ ”, the instrument boots up and shows four submenus. -
Page 14: Disp Display Interface
6.1.1 DISP display interface Under the main menu, move the cursor to “1. Meas.”, press key, the display shown as below: Time weighting Sound pressure level Frequency weighting DISP DISP Battery level Index Range Fig 11 DISP interface The measurement result is shown at the center with frequency weighting and time weighting follow behind, the last line displays the power supply voltage, measurement index name and measurement state from left to right. -
Page 15: Measurement Of A-Weighted Sound Level
6.2 Measurement of A-weighted sound level Make the microphones directed sound sources and try to make sound waves come from the reference to the incident direction to the microphones. To reduce the effects of the human body during the measurement, people should keep a distance from the instrument, with adding extension cable, it can help reduce the effects of the human bodyand the shell. -
Page 16: Baud Rate
The first line shows the amplitude of AC output and frequency weighting. The second line shows whether the instrument will turn off automatically without operation for a long time. The third line shows the specific threshold of the indicator lamp light. The fourth line shows the baud rate of serial port. -
Page 17: Information Of The Instrument
If the user matches the serial port with the RS232 output port at the bottom of the instrument, the meter can be connected with PC for data transmission, the communi- cation protocol can be seen in ST-11 RS232 communication agreement. Move the cursor to “Baud rate ” and press key to change the rate between “9600”, “19200”,... - Page 18 Appendix A: Nominal free field response of AWA14425 type test capacitor microphone in the reference direction Appendix B...
- Page 19 Appendix C The free field response of sound level meter in different directions under no wind condition and installed with φ35×60 windscreen...
-
Page 20: Appendix E: Vocabulary Of Terms
Appendix D The frequency Response of free-field Type and Random Type microphone when directivity is 90 degrees in the free field Appendix E: vocabulary of terms The instrument shows common symbols and terms F-weighted maximum SPL (sound pressure level) in 1 second F-weighted maximum SPL in 1 second I-weighted maximum SPL in 1 second Leq,t... -
Page 21: Warranty
Safety, Handling, & Maintenance Important safety information WARNING: Failure to follow these safety instructions could result in re, electric shock, or other injuries, or damage to sound level meter or other property. Read all the safety information below before using sound level meter. - Page 22 Scarlet Tech Co., Ltd. © 2015 Scarlet Tech Co., Ltd. All rights reserved. 4F-3, No. 347 , HePing E Rd, 2nd Sec, DaAn District, Taipei City 106, Taiwan info@scarlet.com.tw www.scarlet-tech.com version 200803...
Need help?
Do you have a question about the ST-11 and is the answer not in the manual?
Questions and answers