Table of Contents
Advertisement
Quick Links
Advertisement
Table of Contents

Related Manuals for Scarlet Tech ST-109


Summary of Contents for Scarlet Tech ST-109
- Page 1 SCARLET TECH Integrating Sound Level Meter ST-109/ST-107/ST-107S User’s Manual...
-
Page 3: Table Of Contents
3. INSTRUMENT INSTRUCTIONS ................ 5 3.1. Instrument Description ................. 5 3.1.1. Controls Description ................5 3.1.2. Display Description ................. 6 3.1.3. ST-109 Microphone ................. 7 3.1.4. ST-107S Microphone ................8 3.2. Measurement Procedures ................8 3.3. Data Hold ..................... 9 3.4. - Page 4 9.2.1. Input interface ..................22 9.2.2. ANALOG AC/DC OUTPUT ..............22 9.3. The Microphone Lengthens The Test ............23 10. MAINTENANCE ....................24 10.1. General Information ................... 24 10.2. Battery Replacement ................. 24 10.3. Cleaning ....................24 10.4. End of Life ....................24 11.
-
Page 5: Safety Precautions
The instrument conforms to the CE standard 1.1. Preliminary Description ST-109 is a high performance conforms to international IEC61672 Class 1 ST-107(S )is a high performance conforms to international IEC61672 Class 2 Integrating Sound Level Meter. It may also survey: SPL(Lxyp),... -
Page 6: Preparation For Use
2. PREPARATION FOR USE 2.1. Initial The instrument has been checked mechanically and electrically prior to shipment. Take care to ensure the instrument reaches you undamaged. However, it is wise to carry out a rapid check in order to detect any possible damage that may cause during transport. -
Page 7: Instrument Instructions
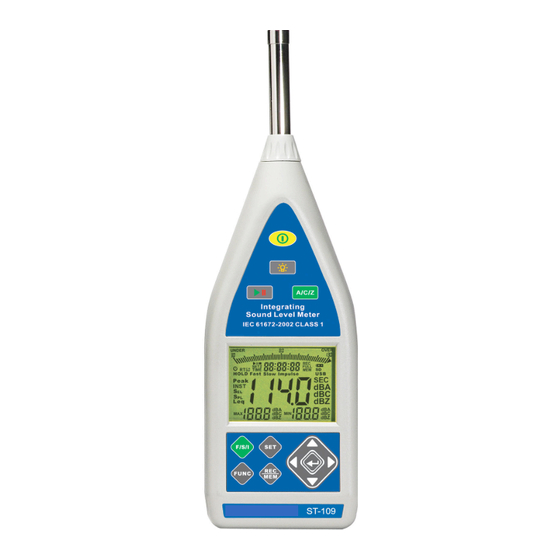
INSTRUMENT INSTRUCTIONS 3.1. Instrument Description 3.1.1. Controls Description Microphone : Power Button : Backlight Button : Frequency Weighting Select Butto :Start or Pause Test Button : Time Weighting Select Button :Test function select button :Set Button :Record dada / Reading Record dada button :Data Hold/ Setup function up Button. -
Page 8: Display Description
3.1.2. Display Description Bargraph Auto Power Off Reverberation Time Data Hold Peak Sound exposure level Sound pressure level Equivalent continuous level Sound level read out Maximum Minimum Z Weighting C Weighting A Weighting Reverberation Time unit USB deliver SD Install Low Batty Recode Memory Full... -
Page 9: St-109 Microphone
3.1.3. ST-109 Microphone Diameter : 1/2 inch Polarization voltage : 0V Dynamic range : 25dBA ~140dB Sensitivity : -26±2dB Free field frequency response : Frequency (KHz) Deviation pressure 0.25 0.30 0.40 0.50 0.63 0.80 1.25 1.60 3.15 12.5 16.0 20.0... -
Page 10: St-107S Microphone
3.1.4. ST-107S Microphone Diameter : 1/2 inch Polarization voltage : 0V Dynamic range : 25dBA ~140dB Sensitivity : -32±3dB (250Hz 0dB=1V/Pa) Free field frequency response : ±2dB(25Hz 12.5kHz) Frequency (KHz) Deviation of pressure 0.25 -0.1 -0.5 -0.6 -0.9 -1.2 -1.7 -2.2 -2.8 -3.3... -
Page 11: Data Hold
CAUTION Wind blowing across the microphone would bring additional extraneous noise. Once using the instrument in the presence of wind with speed higher than 10m/s, it must mount the windscreen to prevent the undesirable signals. Keep the microphone dry and avoid severe vibration. -
Page 12: Set Mode
Press button again to exit viewing logged reading mode 3.7. Set Mode Press button into set mode , can set 7 functions in set mode 3.7.1. Clock set Press button to select option to adjust Press button to change digit Press button to store set and exit set mode Press... -
Page 13: Clear Data Logger Memory
Press button to change digit Press button to store set and exit set mode Press button no store set data, into next set mode If you want to not auto power off, you can set auto power off time to 0 Maximum auto power off time: 99 minutes 3.7.4. -
Page 14: Auto Backup
Copy to micro SD card file to be named this machine ID; The max support capacity of micro SD card is 4GB This machine ID can be gone to by the user to define by oneself in the PC program, file format is ○○○○○○○○.IAR; Can define word dollar as 0~9;A~F Press button Starts copying data logger data to micro SD Card Press... -
Page 15: Spl (Lxyp) Test Mode
4. SPL (LXYP) TEST MODE SPL (Lxyp) test mode deform frequency weighting is A weighting; time • weighting is FAST. Press button start a Lxyp Max/Min measurement. • Press to change frequency weighting before starting a measurement . • Press button to change time weighting . -
Page 16: Leq Test Mode
5. LEQ TEST MODE Leq test mode deform frequency weighting is A weighting; time weighting is • FAST; Time of the integral 30 secs. Press to change frequency weighting before starting a measurement. • Press button pause measurement after starting a measurement. •... -
Page 17: Integral Time Set
5.1. INTEGRAL TIME SET Leq test mode press button into integral to set for time, can select that 9 kinds of integral time or hand operation establish definite integral for time . SET 0 prepare to establish integral time 10 sec •... -
Page 18: Sel (Lae) Test Mode
6. SEL (LAE) TEST MODE SEL (LAE) test mode deform frequency weighting is A weighting;time weighting • is FAST. Press to change frequency weighting before starting a measurement • Press button pause measurement after starting a measurement. • Press button can end a measurement in advance. •... -
Page 19: Peak Maximum Test Mode
7. PEAK MAXIMUM TEST MODE Peak test mode deform frequency weighting is C weighting; time weighting is • Peak. Press button pause measurement after starting a measurement. • Press button can end a measurement in advance. • LCD show on the period of the measurement is for experience time,the longest •... -
Page 20: Rt60( Reverberation Time) Test Mode
8. RT60( REVERBERATION TIME) TEST MODE RT60 test mode deform frequency weighting is A weighting; time weighting is • Fast. Press to change frequency weighting before starting a measurement. • Press button pause measurement after starting a measurement. • Press button can end a measurement in advance. -
Page 21: Rt 60 Estimate Mode
8.1. RT 60 ESTIMATE MODE RT 60 estimate formula is RT60= 0.161×V • Press button for setting / input the room’s m3 (cube meter), for example: • Press button for setting the value of sound surface absorb accumulates • value (SA), for Example : 1.0 . -
Page 22: Explanation
9. EXPLANATION 9.1. 1. MEASUREMENT PARAMETERS: Test Function Screen parameter Explanation LAFp Sound pressure level (SPL) LASp Sound pressure level (SPL) LCFp Sound pressure level (SPL) LCSp Sound pressure level (SPL) LZFp Sound pressure level (SPL) LZSp Sound pressure level (SPL) Equivalent continuous level for the LAFq duration of the measurement for A... -
Page 23: A, C, Z Weighting Instruction
9.2. A, C, Z WEIGHTING INSTRUCTION: A: The A weighting curve is based on 40 Phon Fletcher-Munson Equal Loudness Contour, Noise assessment in human, suggest to use the A weighting. C: The C weighting in essentially is approximate smooth. With labor safety concern, suggest using the C weighting. -
Page 24: Input Interface
The front is PLT 4, the signal input receptacle. The pin definition and function are shown in Fig 2 ST-107 Pin 1 Power Pin 2 GND Pin 3 NC Pin 4 NC ST-109/ST-107S Pin 1 Power(+) Pin 2 GND Pin 3 Power(-) Pin 4 GND Fig 2 9.2.2. ANALOG AC/DC OUTPUT... -
Page 25: The Microphone Lengthens The Test
The Microphone Lengthens The Test In order to avoid the measurement deviation caused by the reflection effect and operation problem, use the cable to extend the microphone for measuring. (Refer to chapter 11.3.2). 1. Press button to turn the power off. 2. -
Page 26: Maintenance
MAINTENANCE 10.1. GENERAL INFORMATION This is a precision instrument. To guarantee its performances be sure to use it or keep it stored on suitable environmental conditions. Do not expose it to high temperatures or humidity or direct sunlight. Be sure to turn it off after use. If you expect not to use the instrument for a long period remove batteries to avoid leakages of battery liquid which could damage the its inner components. -
Page 27: Technical Specifications
Environmental conditions: temperature 23 ± 5 , relative humidity < 80%. Display Double rows LCD MAX reading 1999 Display Refresh Rate 1 Time/sec Major Applicable IEC 61672-1 2002 Class1(ST-109) Standards JJG-188-2002 Class 1(ST-109) IEC 61672-1 2002 Class2(ST-107/ST-107S) JJG-188-2002 Class 2(ST-107S) Other Standards IEC60651:1979 TYPE 1(ST-109) IEC60804:2000 TYPE 1(ST-109) ANSI S1.4:1983 Type1 (ST-109) - Page 28 10Hz~20KHz(ST-109) DC Output 2Vdc/130dB AC Output 2Vrms/130dB Starting Time 10 Second Battery Life 30 hours (LR6 : 4 Alkaline batteries) AC Adapter Input : 100V~240V ACV,Output:6V~9V DCV Dimensions 285(L) x 90(W) x 39(H) mm Weight 500g ( including Batteries) EN - 26...
-
Page 29: Standard
11.1.1. Standard: The instrument complies with IEC 61672 (2002) class 1; JJG-188-2002 Class 1;IEC60651:1979 TYPE 1, IEC60804:1985 TYPE 1, ANSI S1.4:1983 Type1.(ST- 109) The instrument complies with IEC 61672 (2002) class 2; JJG-188-2002 Class 2;IEC60651:1979 TYPE 2, IEC60804:1985 TYPE 2, ANSI S1.4:1983 Type2.(ST- 107) The instrument complies with IEC 61672 (2002) class 2;... -
Page 30: Emc
11.2.2. EMC This instrument was designed in accordance with EMC Standards in force and its compatibility has been tested in accordance with EN61326-2 (2006). 11.3. ACCESSORIES 11.3.1. Standard Accessories Meter: Instrument body x 1 . User’s manual. Switching power supply: 100V ~ 240V AC to DC 6V~9V/500mA. Carrying case. -
Page 31: Service
12. SERVICE 12.1. WARRANTY CONDITIONS This instrument is guaranteed for one year against material or production defects, in accordance with our general sales conditions. During the warranty period the manufacturer reserves the right to decide either to repair or replace the product. Should you need for any reason to return back the instrument for repair or replacement take prior agreements with the local distributor from whom you bought it. - Page 32 SCARLET TECH CO., LTD 4F-3, No. 347 , HePing E Rd, 2nd Sec, DaAn District, Taipei City 106 E-mail: info@scarlet.com.tw http://www.scarlet.com.tw...
Need help?
Do you have a question about the ST-109 and is the answer not in the manual?
Questions and answers