Table of Contents
Advertisement
Quick Links
Advertisement
Table of Contents

Related Manuals for TechniSat VIOLA 2 S


Summary of Contents for TechniSat VIOLA 2 S
- Page 1 Operating instructions VIOLA 2 S Portable DAB+/FM radio...
-
Page 2: Table Of Contents
Important instructions ..................10 2.2.1 Security......................12 2.2.2 Disposal......................19 2.2.3 legal information ....................23 2.2.4 Service information ..................25 Setting up the device ..............27 Description of the VIOLA 2 S radio ............30 Contents of the kit ...................30 Features of the VIOLA 2 S ................30... - Page 3 Preparation for operation of the VIOLA 2 S radio ..........31 4.3.1 Battery installation ...................31 4.3.2 Power connection ....................32 4.3.3 Telescopic antenna setup................33 4.3.4 Headphone connection..................34 General device functions .................35 4.4.1 Switching on the device...................35 4.4.2 Switching off the device ...................36 4.4.3...
- Page 4 6.2.1 Full search .......................42 6.2.2 Programme selection..................43 6.2.3 Storing a DAB+ programme in the list .............43 6.2.4 Calling up a DAB+ programme from the list ............44 6.2.5 Overwriting/deleting a programme from the list..........45 6.2.6 Signal level ......................45 6.2.7 Manual settings....................46 6.2.8 Volume adjustment (DRC)................47 6.2.9...
- Page 5 Overwriting/deleting a programme from the list..........54 External AUX input .................54 System settings ................55 Sleep timer ......................55 Corrector......................56 9.2.1 MeinEQ......................56 Time and date settings ..................57 9.3.1 Manual date and time setting ................57 9.3.2 Time update.....................58 9.3.3 Setting the time format..................59 9.3.4 Date format setting ..................60 Display brightness ...................61 Language......................62...
- Page 6 10.1 Alarm clock settings..................64 10.2 Switching off the alarm clock and alarm ............66 10.3 Snooze function ....................66 Cleaning ..................67 Problem solving ................68 Technical data ................70 Notes....................71...
-
Page 7: Photos
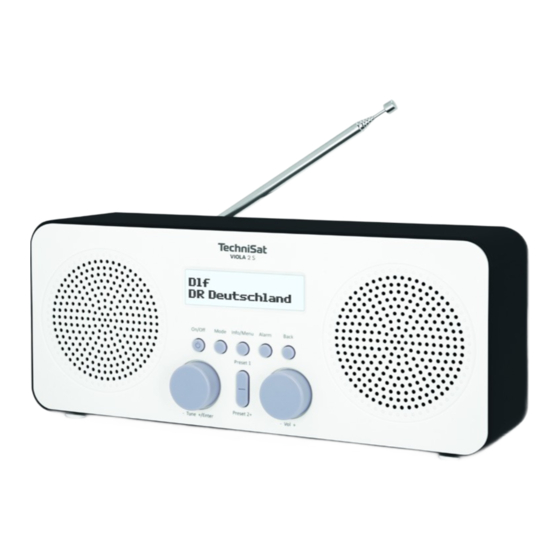
1 Photos 6 7 8 Loudspeaker 1 2 3 4 5 Speaker... - Page 8 Tune +/-/Enter knob (knob: Tune +/- , Select function options / station search), (press: Enter to confirm / save functions / options). Mode change DAB+, FM, AUX. Preset 1 and Preset 2+ to save/recall your favourite stations. Alarm to set up the alarm clock, switch the alarm clock on/off. Vol +/- changes volume.
-
Page 9: Rear View
1.1 Rear view Telescopic antenna Power connector Headphone AUX- Battery cover input connector... -
Page 10: Foreword
2 Foreword These instructions will help you to use your radio, hereafter referred to as DIGITRADIO or the device, safely and as intended. 2.1 Target group of instructions The operating instructions are intended for anyone who sets up, operates, cleans or removes the unit. - Page 11 Please read all safety instructions carefully and keep them for future reference. Always observe all warnings and cautions in this manual and on the back of the appliance. Caution - Indicates an important guideline to be followed to avoid defects in the device, loss/misuse of data or unintended operation.
-
Page 12: Security
2.2.1 Security For your own protection, please read the safety instructions carefully before operating the VIOLA 2 S. The manufacturer is not liable for damage caused by improper handling and non-compliance with the safety instructions. Never open the appliance! Touching live parts is life-threatening! Any necessary interventions must only be carried out by trained personnel. - Page 13 Do not switch on immediately in case of prolonged transport in cold conditions and subsequent change to warm rooms; wait for the temperature to even out. Do not expose the appliance to dripping or splashing water. If water has entered the appliance, switch it off and call for service.
- Page 14 In the event of a noticeable malfunction of t h e a p p l i a n c e , the appearance of odour or smoke, serious faults, damage to the housing, switch off the appliance and contact the service department. The device can only be connected to the mains voltage printed on the power supply.
- Page 15 Do not operate the unit near bathtubs, swimming pools or splashing water. Never attempt to repair a faulty unit yourself. Always contact one of our service centres. Foreign bodies, e.g. needles, coins, etc. must not fall into the device. Do not touch the connection contacts with metal objects or fingers.
- Page 16 The appliance remains connected to the power supply even when it is switched off/ready. If the appliance is not going to be used for a long time, unplug the power cord from the wall socket. Only pull the plug, not the cable, and remove the batteries.
- Page 17 Damaged devices or damaged accessories may no longer be used. Battery handling Make sure the batteries are out of the hands of children. Children could put the batteries in their mouths and swallow them. This can cause serious damage to health.
- Page 18 Risk of explosion if batteries are inserted incorrectly! Only replace batteries with the correct type and model number. Be careful! Do not expose batteries to extreme conditions. Do not place on radiators, do not expose to direct sunlight! Leaking or damaged batteries can cause burns if they come i n t o contact with the skin.
-
Page 19: Disposal
2.2.2 Disposal The appliance packaging consists exclusively of recyclable materials. Please sort them appropriately and return them to the "Dual System". This product must not be disposed of with normal h o u s e h o l d waste at the end of its useful life, but must be taken to a collection point for the recycling of electrical and electronic equipment Symbol found on the product, in the instruction manual or on the packaging that... - Page 20 a responsible disposal centre. Ensure that empty batteries/batteries and electronic waste are not disposed of in household waste, but are disposed of properly (return to specialised dealers, hazardous waste). Batteries/accumulators may contain toxins that are harmful to health and the environment.
- Page 21 Please help and dispose of packaging in an environmentally friendly manner, please contact your dealer or local waste disposal facility f o r information on current disposal methods. Danger of suffocation! Packaging and its parts should not be left to children. Danger of suffocation due to foil and other packaging materials.
- Page 22 waste electrical and electronic equipment (WEEE). When the product has reached the end of its life, it should not be disposed of with normal household waste, but taken to a collection point for the recycling of electrical and electronic equipment. This is indicated by the symbol on the product, user manual or packaging.
-
Page 23: Legal Information
2.2.3 Legal information TechniSat hereby declares that the radio system type VIOLA 2 S complies with Directive 2014/53/EU. The full text of the EU Declaration of Conformity is available at the following web address: hGp://konf.tsat.de/?ID=22303 TechniSat is not responsible for damage to the product caused by external factors, wear and tear or improper handling, unauthorised repairs, modifications or accidents. - Page 24 VIOLA 2 S and TechniSat are registered trademarks: TechniSat Digital GmbH TechniPark Julius-Saxler-Straße 3 D-54550 Daun/Eifel www.technisat.de...
-
Page 25: Service Information
2.2.4 Service information This product is quality tested and has a statutory warranty period of 24 months from the date of purchase. Please keep your invoice as proof of purchase. For warranty claims, please contact the seller of the product. Tip! For questions and information or if you have a problem with this device, our technical hotline:... - Page 26 If the unit needs to be returned, please contact TechniSat customer service for an RMA service number! The names of the companies, institutions or brands mentioned are trademarks or registered trademarks of their respective owners.
-
Page 27: Setting Up The Device
3 Setting up the device > Place the unit on a hard, safe and horizontal surface. Ensure good ventilation. Attention! > Do not place the unit on soft surfaces such as carpets, ceilings or near curtains or wall hangings. The ventilation openings could be covered. This could interrupt the necessary air circulation. - Page 28 Please note that the feet of the appliance may leave coloured marks on some furniture surfaces. Use protection between the furniture and the appliance. > Keep the VIOLA 2 S away from devices that generate strong magnetic fields. > Do not place any heavy objects on the unit. >...
- Page 29 > Make sure that the power cable or mains adapter is always easily accessible so that the unit can be quickly unplugged! > The power socket should be as close to the device as possible. > To connect the unit to the mains, insert the mains plug fully into the socket. >...
-
Page 30: Description Of The Viola 2 S Radio
1x power supply 1x instruction manual 4.2 Features of the VIOLA 2 S The VIOLA 2 S consists of a DAB+/FM receiver with the following functions: - The radio receives on FM frequencies 87.5-108 MHz (analogue) and DAB+ 174.9-239.2 MHz (digital). -
Page 31: Preparation For Operation Of The Viola 2 S Radio
4.3 Preparing the VIOLA 2 S radio for operation 4.3.1 Battery installation > Open the battery compartment at the back of the unit by pressing the latches on the battery compartment cover in the direction of the printed arrow. Then remove the cover. -
Page 32: Power Connection
> To do this, connect the plug of the supplied power supply unit to the socket marked DC 6V on the back of the VIOLA 2 S. Then connect the power supply to the mains. Make sure that the operating voltage of the power supply is compatible with... -
Page 33: Telescopic Antenna Setup
4.3.3 Telescopic antenna set-up The number and quality of stations received depends on the reception conditions at the installation site. Excellent reception can be achieved with a telescopic antenna. > Position the telescopic antenna and extend it to its full length. Start the first search run on the window in the direction of the transmitter mast. -
Page 34: Headphone Connection
4.3.4 Connecting headphones Hearing damage! Do not listen to the radio at high volume through headphones. This can cause permanent damage to your hearing. Adjust the volume of the radio to a minimum before using headphones. Only use headphones with 3.5 millimetre jack plugs. >... -
Page 35: General Device Functions
To ensure good DAB+/FM(FM) reception, the antenna on the rear of the unit must be fully extended. Please also refer to section 4.3.3. > First prepare the VIOLA 2 S for operation as described in points. 4.3.1 i 4.3.2. Press the ON/OFF button to switch the VIOLA 2 S on. >... -
Page 36: Switching Off The Device
4.4.2 Switching off the device In mains power mode: A short press on the On/Off button switches the device into the > Standby. The display briefly shows [Standby]. The time is shown on the display. The brightness of the standby display can be changed as described in section 9.4. In battery mode: In battery mode, pressing the On/Off. -
Page 37: Calling Up The Display
4.4.4 Calling up the display Briefly press the Info/Menu button to cycle through the available > display options: In DAB+ mode: [Text scroll] (scroll through text with additional information that stations may provide), [Signal strength], [Programme type], [Band], [Frequency], [Signal quality], [Bit rate], [Time] and [Date]. -
Page 38: Changing The Dab+/Fm Mode
(FM) and AUX- analogue input. 5 Menu operation Through the menu, all functions and settings of the VIOLA 2 S can be accessed. The menu is navigated using the Info/Menu, Tune +/- /Enter buttons. The menu is divided into submenus and contains various menu items or functions that can be activated depending on the mode (DAB+, FM or AUX). - Page 39 The settings are only saved when the Tune +/ - /Enter knob is pressed. If the Info/Menu or Back button is pressed instead, the settings are not applied and saved. The functions and buttons to be pressed are shown in bold in this manual. Display indications in [square brackets].
-
Page 40: Dab+ (Digital Radio) Support
6 DAB+ function 6.1 What is DAB+ DAB+ is a new digital format that allows you to hear crystal clear sound without interference. Unlike traditional analogue radio stations, DAB+ broadcasts multiple stations on the same frequency. This is called a multiplex. A multiplex consists of a radio station and several service components or data services that are broadcast individually by the radio stations. -
Page 41: Audio Stream
filtered from the signal to be transmitted. This leads to a reduction in the transmitted data stream with no noticeable difference in sound for the listener (HE AAC v2 method as an additional coding method for DAB+). 6.1.2 Audio stream In digital radio, audio streams are continuous data streams that contain MPEG 1 Audio Layer 2 frames and thus represent acoustic information. -
Page 42: Dab+ Reception
6.2 DAB+ reception Press the Mode button until [DAB] appears in the display. > When DAB+ is started up for the first time, a full station scan is performed. Once the scan is complete, the first station is played in alphanumeric order. 6.2.1 Full search The automatic full scan function scans all DAB+ Band III channels to find all broadcast stations in the coverage area. -
Page 43: Programme Selection
The display will show [Suchlauf...]. > During the search, a progress bar and the number of stations found are displayed. If no station is found, check the telescopic antenna and change the installation location if necessary (section 4.3.3 / 2.2.1). 6.2.2 Station selection To select a DAB+ station, turn the Tune +/ - knob and confirm the station... -
Page 44: Calling Up A Dab+ Programme From The List
+/- select the preset station (1...20). Press Enter to save. > Repeat this procedure to store additional stations. Press and hold Preset 1 to store the station directly. > 6.2.4 Calling up a DAB+ programme from the list > To recall a station that has previously been stored in the Favourites memory, briefly press Preset 2+ and select the station memory (1...20) with the Tune +/- knob. -
Page 45: Overwriting/Deleting A Programme From The List
6.2.5 Overwrite/delete DAB+ programme from the list > Simply save the new station to your favourite memory location as described. All memory locations are deleted when the factory settings are recalled. 6.2.6 Signal level > Briefly press the Info/Menu button several times until the display shows the signal strength as a bar graph. -
Page 46: Manual Settings
6.2.7 Manual settings This menu item is used to check the reception channels and can be used to set the antenna Hold down the Info/Menu button and use the Tune +/- knob to select the > [Manuell einstellen] and press the Enter button. Use the Tune +/ - knob and Enter to select a channel (5A to 13F) The display >... -
Page 47: Volume Adjustment (Drc)
6.2.8 Volume level matching (DRC) The volume control is used to set the compression level, which compensates for dynamic fluctuations and associated volume changes. Hold down the Info/Menu button and use the Tune +/- knob to select the > [Lautstärkeanpassung] and press the Enter button. >... -
Page 48: Fm Mode (Ukw)
Hold down the Info/Menu button and use Tune +/- to select the > [Inaktive Sender löschen]. Press the Enter button. > You will be asked [Löschen?] if you want to delete inactive stations. > Use the Tune +/- knob to select [I] and confirm by pressing Enter. 7 FM (UKW) mode 7.1 Activation of FM (UKW) mode Switch to FM mode by pressing the Mode button. -
Page 49: Automatic Search
If you have already tuned in or saved a station, the radio will play the last station you tuned in. In the case of RDS broadcasting, the station name will appear. To improve reception, adjust the telescopic antenna (section 4.3.3). FM (UKW) so that reception is compatible with RDS information. -
Page 50: Manual Search
If an FM station with a sufficiently strong signal is found, the search stops and the station is played. If an RDS station is received, the station name and, if applicable, the radio text are displayed. To tune into weaker stations, use the manual station search. 7.3 Manual search Turn the Tune +/ - knob to tune to the desired station or frequency. -
Page 51: Search Settings
7.4 Search settings In this menu item, the sensitivity of the search run can be set. Hold down the Info/Menu button and use Tune +/- to select the > [Suchlauf-Einstellungen]. Press the Enter button. Select whether you want to stop the search only on strong stations [Nur >... -
Page 52: Audio Settings
7.5 Audio settings Hold down the Info/Menu button and select [Audio-Einstellung] by > rotating the Tune +/- option. Press the Enter button. > Turn the Tune +/- button to select [Stereo möglich] or [Nur Mono] to play > stereo or mono when FM reception is poor. Confirm by pressing the Enter button. -
Page 53: Calling An Fm Programme From The List
Press and hold Preset 1 to store the station directly. > 7.7 Calling an FM programme from the list > To recall a station that has previously been stored in the Favourites memory, briefly press Preset 2+ and select a station memory (1...20) with the Tune +/- setting knob. -
Page 54: Overwriting/Deleting A Programme From The List
7.8 Overwriting/deleting a programme from the list > Simply save the new station to the appropriate memory location as described. When the factory settings are recalled, all memory locations are deleted. 8 External AUX input To play audio from an external audio device, such as a smartphone, on the VIOLA 2 S, connect it to the AUX-IN connector using a jack-jack cable (3.5 mm). -
Page 55: System Settings
For all settings listed in this chapter, you must first enter the System submenu. 9.1 Sleep timer A timer allows the VIOLA 2 S to automatically switch to standby after a preset time. Select [Sleep] in the System submenu by rotating Tune +/- and press Enter. -
Page 56: Corrector
9.2 Equalizer > To adjust the sound of the VIOLA 2 S, the equalizer is available with a setting of Normal, Classic, Rock, Pop, Speech, Jazz and MyEQ. Via Menu > System > Equalizer, the equalizer settings can be called up. -
Page 57: Time And Date Settings
9.3 Time and date settings 9.3.1 Manual date and time setting > Depending on the time update setting (section 9.3.2), the time and date must be set manually. Select [Uhrzeit] with Tune + /- and press Enter. > Select [Zeit/Datum einstellen] with Tune + /- and press Enter. >... -
Page 58: Time Update
After all settings have been made and the Enter key has been pressed for > the last time, the display will show [Uhrzeit Gespeichert]. 9.3.2 Time update In this submenu, you can specify whether the time update should be carried out automatically by DAB+ or FM (UKW), or whether it should be entered manually (section 9.3.1). -
Page 59: Setting The Time Format
9.3.3 Setting the time format In the 12/24Std submenu, the 12- or 24-hour format can be activated. In the submenu System > Uhrzeit, select [Set 12/24 hours]. > Press the Enter key. > Use Tune + /- to select one of the following options: >... -
Page 60: Date Format Setting
9.3.4 Setting the date format > In the submenu Datumsformat einst. (Date format setting), the date display format can be set. Select [Datumsformat einst.] from the submenu System > Uhrzeit. > Press the Enter key. > Select one of the following options using the Tune + /- buttons: >... -
Page 61: Display Brightness
9.4 Display brightness The brightness of the display can be adjusted for both operating and standby modes. Using the Tune + /- knob, select [Beleuchtung] and press Enter. > Use the Tune + /- knob and then press Enter to select one of the >... -
Page 62: Language
9.5 Language Select System > Language in the submenu and press Enter. > Select one of the available languages with Tune + /- and confirm your choice > by pressing Enter. 9.6 Factory settings If you change the location of the device, e.g. if you move house, you may not be able to receive the stored stations. -
Page 63: Software Version
The VIOLA 2 S has an alarm function with two configurable wake-up times. Please note that the alarm clock is only active and configurable when the VIOLA 2 S is connected to the mains. In battery operation, the alarm function is disabled. -
Page 64: Alarm Clock Settings
As an example, we will now explain how to set an alarm clock using Alarm Clock 1. > Connect the VIOLA 2 S with the power supply to the mains and switch it on. Press Alarm [Wecker 1 Einrichten] is shown on the display. - Page 65 setting. > Next, select how often you want the alarm to be repeated. You can choose between Einmal (Once), Täglich (Daily), Werktags (Monday to Friday) or Wochenende (Saturday and Sunday). Press Enter to accept the setting. If [Einmal] is selected, you can set a date on which the alarm clock is to be active only once.
-
Page 66: Switching Off The Alarm Clock And Alarm
10.2 Switching off the alarm clock and alarm Press the On/Off or Alarm button to switch off the alarm. > The display will show [Alarm aus] and the alarm icon will remain on when Täglich (Daily), Wochenende (Saturday, Sunday) or Werktage (Working days) is set for alarm repetition. -
Page 67: Cleaning
11 Cleaning To avoid the risk of electric shock, do not clean the appliance with a wet cloth or under running water. Before cleaning, pull the mains plug and switch off the unit! Do not use sponges, cleaning powders or solvents such as alcohol or petrol. Do not use any of the following: salt water, insecticides, chlorine or acidic solvents (ammonia). -
Page 68: Problem Solving
Poor reception via FM/DAB+. Fully extend the antenna. Reposition the antenna or VIOLA 2 S The device cannot be operated. Disconnect the unit from the power supply/shortly remove the batteries and reconnect the power... - Page 69 Symptom Possible cause/solution Display backlight flickers Battery voltage too low. Replace batteries or connect mains adapter. If the fault still cannot be rectified after carrying out the checks described, contact the customer service.
-
Page 70: Technical Data
13 Technical data Reception sources DAB/DAB+, FM Power supply AC input: 100-240V, 50/60Hz, 0.3A max. DC Output: 6V, 1A Batteries: 4 x C/LR14 (not included) Operating temperature 0 - 45°C Received frequencies FM/UKW: 87.5-108MHz DAB/DAB+: 174-240MHz Audio output power 2x 2W RMS Weight 656g (without battery) Dimensions (LxDxW) -
Page 71: Notes
14 Notes... - Page 72 BEDIE UNssANtElTUNE BEALLEM BÏOITXL IHREM TXBLET BBER MI\RTPH0NE "LESEN ARCHÏVIEREN InfoDesk 29022019ORV1...
Need help?
Do you have a question about the VIOLA 2 S and is the answer not in the manual?
Questions and answers