SilverCrest SUR 46 A1 - Ultrasonic Cleaner Manual
- Operation and safety notes (105 pages) ,
- Operation and safety notes (109 pages) ,
- Operation and safety notes (129 pages)
Advertisement
Introduction
| The following pictograms are used in these operating instructions / on the device: | |
 | Read instruction manual! |
 | Keep children and other unauthorised personnel at a safe distance when using electrical tools. |
 | Avoid damaging the insulation on the lead: Do not trap the lead in the cupboard doors, pull it over hot surfaces or sharp edges! |
 | Warning! Please observe the warning and safety instructions! |
 | Caution! Danger of electric shock! Hazardous electrical voltage – danger of death! |
 | Do not use in the vicinity of filled bathtubs, washbasins or other vessels. Never immerse the device in water or other liquids. |
 | Protection class II; double protective insulation |
 | Dispose packaging and appliance in an environmentally-friendly way! |
Ultrasonic Cleaner
The device creates ultrasound waves that are emitted into the liquid contained in the device. This allows dirt to be efficiently removed from many kinds of objects in a very gentle way.
Intended Use
The device is only authorised for private use and not for commercial purposes. It is only intended for use for the applications described in these instructions. If it is used for other purposes, the warranty no longer applies.
Scope of Delivery
1 x Ultrasonic cleaning device
1 x Basket insert
1 x Curved insert for watches
1 x CD holder
1 x Operating instructions
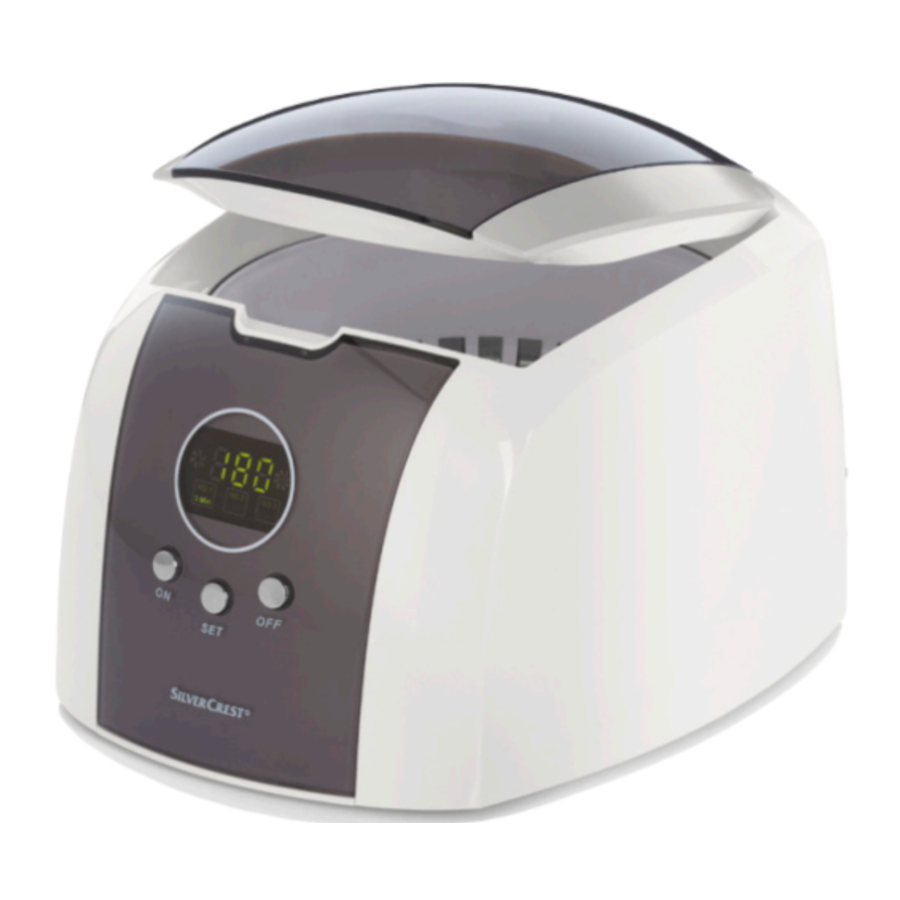
Description of Parts

- On-switch for timer (ON)
- Display (with seconds indicator)
- Off-switch for timer (OFF)
- Timer button (SET)
- Cover with viewing window
- Blue indicator lamp
- Stainless steel tank
- Housing
- Basket insert
- Curved insert for watches
- CD holder
- Mains plug
Technical Data
| L&P Art. No.: | 9611720 |
| Time intervals: |  |
| Mains voltage: | 220–240 V ~ / 50 Hz |
| Power consumption: | 50 watts |
| Ultrasonic frequency: | 46 kHz |
Stainless steel tank : : | at max. marking approx. 600 ml (without insert) |
| Protection class: | II / |
| Model No.: | SUR 46 A1 |
Example Applications
Objects to be cleaned
Jewellery:
Gold, silver, metal jewellery such as necklaces, rings, earrings, bracelets, watch chains, etc.
Metal Parts:
Coins, medals, badges, valves, small parts, waterproof watch components, etc.
Stationery:
Nibs of fountain pens, ballpoint pen casings, printer nozzles, signature stamps, etc.
Optical Objects:
Spectacles*, sunglasses*, magnifying glasses*, etc.
Note: Dry spectacle lenses after cleaning with a soft cloth. Streaks occur if the lenses are allowed to dry in the air.
Shiny surfaces should be polished afterwards.
Hygiene Articles:
Toothbrushes, dentures, braces and shaving heads of razors, razor blades, etc.

- A ll optical lenses (glass or plastic) may be cleaned in the ultrasonic bath for a maximum of 90 seconds.
- Under no circumstances may polycarbonate lenses (plastic) be cleaned in the ultrasonic bath.
The following are unsuitable for ultrasonic cleaning:
Wood, genuine pearls, leather goods, clock and watch mechanisms, materials with sensitive or scratched / damaged surfaces.
Default Time Intervals
At the factory there are five time intervals that have been preset for this device.
See Fig. D

180 seconds (3 minutes):
Standard time for a normal level of dirt. The time interval setting appears automatically on the display  when the device is plugged in.
300 seconds (5 minutes):
Recommended for the first cleaning of objects that have not been cleaned for a long time.
480 seconds (8 minutes):
Recommended for the first cleaning when several objects are cleaned together.
 090 seconds:
This is the shortest time interval. Recommended for very light levels of dirt or if a short period of recleaning is required. Once the water is noticeably dirty, it must be changed. If you wish to remove any residual dirt from the cleaned surface, clean the object again for 90 seconds in fresh liquid.
600 ![]() seconds:
seconds:
This is the longest time interval. Recommended to increase the effectiveness of the cleaning.
Note: If the selected cleaning period is too long, it can lead to insecurely attached items, such as fittings, stick-on labels or decorations becoming detached from the object being cleaned. The same applies to other insecure items, e.g. the screws on spectacles, which may be come lose during the cleaning process.
Before Initial Use
Unpacking and setting up the ultrasonic cleaning device:
- Take the device carefully out of the box, remove the transport packaging and check the device for any possible damage that may have occurred during transport. Check also that all of the parts are present:
1 x basket insert![]()
1 x curved insert![]()
1 x CD holder![]()
- If not all of the parts are present or your new device is damaged, please contact the service hotline (see guarantee notice).
- Place the ultrasonic cleaning device in such a way on a firm, flat surface that it cannot tip over. This surface should be easy to clean, brightly lit and readily accessible. Do not place the device on surfaces that may become hot, e.g. on hotplates or next to a gas cooker.
- Insert the mains plug
![]() into a power socket. The number
into a power socket. The number ![]() (180 seconds) appears in the display
(180 seconds) appears in the display ![]() as standard.
as standard.
 (180 seconds) appears in the display
Ensure that the mains voltage is 220 -240 V! (See the type plate on the underside of the device). The device might otherwise be damaged.
Operation
Fittings, stickers and decorations that are loosely attached to objects, as well as other loose parts, e.g. screws on / in spectacles, may become detached during the cleaning process. You should therefore clean such items not more than once a month.
Note: The On-switch "ON"  and the Off-switch "OFF"
  simply control the time interval of the timer or the cleaning process. The actual switching on and off of the device is controlled by the mains plug
  .
.
Cleaning without the Insert
- Ensure that the device is disconnected from the mains supply.
- Open the lid
![]() manually.
manually. - Place the object to be cleaned into the stainless steel tank
![]() .
. - Then fill the stainless steel tank
![]() with normal tap water.
with normal tap water. - The liquid must cover the object that is to be cleaned, but must not exceed the mark indicating the maximum filling height.
- If the stainless steel tank
![]() overflows, wipe off the outside of the device immediately until dry.
overflows, wipe off the outside of the device immediately until dry.
Never use the ultrasonic cleaning device without water as the device may be damaged!
Operation
- Close the cover
![]() and insert the mains plug
and insert the mains plug ![]() .
.
The figure![]() (180 seconds) appears in the display as standard – this is the standard time for a normal degree of soiling.
(180 seconds) appears in the display as standard – this is the standard time for a normal degree of soiling. - Select the desired time from five possible intervals: (180 → 300 → 480→ 090 →600). Use the timer button to set the desired time according to the degree of soiling.
- Press the On-switch
![]() and start the cleaning process. The blue indicator light
and start the cleaning process. The blue indicator light ![]() on the lid
on the lid ![]() illuminates while the time in the display
illuminates while the time in the display ![]() counts down to 0.
counts down to 0.
Note: During the cleaning process a quiet vibration noise can be heard; this is caused by the cleaning process. - After the set time has elapsed the cleaning process is automatically stopped, the blue indicator lamp
![]() goes off and the display
goes off and the display ![]() shows 000. The originally selected time interval in minutes/symbol remains visible.
shows 000. The originally selected time interval in minutes/symbol remains visible. - Press the Off-switch
![]() to stop the cleaning process prematurely if necessary. The time remaining from the selected time interval is shown on the display
to stop the cleaning process prematurely if necessary. The time remaining from the selected time interval is shown on the display![]() . Press the On-switch
. Press the On-switch ![]() again to resume the cleaning process
again to resume the cleaning process![]() . Or select a new time interval using the timer button
. Or select a new time interval using the timer button ![]() and press the On-switch
and press the On-switch![]() again.
again.
![]()
You can repeat the cleaning process in order to intensify the cleaning effect.
If the cleaning process is started several the liquid becomes very warm (approx. 41°C after the first cleaning process and approx. 60°C after the third in spite of a five-minute cooling down phase). However, it is recommended that between the cleaning processes a pause of at least five minutes is inserted in order to allow the device to cool down. Do not change the time interval while a cleaning process is still running. Allow the time interval to expire normally, thus ensuring that the cleaning process is properly time-controlled. - If you wish to repeat the cleaning process, press the timer button
![]() . The next timing program appears on the display
. The next timing program appears on the display ![]() .
. - Set the desired time interval from the five time interval settings available using the timer button
![]() .
. - Press the On-switch
![]() and start the cleaning process.
and start the cleaning process. - After the cleaning process has ended, remove the mains plug
![]() from the socket, open the cover
from the socket, open the cover ![]() and take the cleaned object out of the device.
and take the cleaned object out of the device.
Note: In order to avoid lime residues, always empty the stainless steel tank![]() and wipe dry with a fabric or microfibre cloth. We recommend that the liquid should be renewed after every cleaning process if possible.
and wipe dry with a fabric or microfibre cloth. We recommend that the liquid should be renewed after every cleaning process if possible. - Please store the device in a cool and dry place.
 on the lid
  and press the On-switch
Cleaning with Inserts
Note: The basket insert  absorbs one third of the ultrasonic waves and therefore reduces the cleaning performance. It may therefore be necessary to carry out several cleaning processes.
Basket Insert :
- If you would like to clean sensitive and small objects, please use the basket insert
![]() (see Illustration A).
(see Illustration A).

Place the item to be cleaned in the basket insert![]() . You can clean several items together in one cleaning procedure. However you should ensure that the items do not touch one another in order to avoid damage (e.g. scratches).
. You can clean several items together in one cleaning procedure. However you should ensure that the items do not touch one another in order to avoid damage (e.g. scratches). - Place the filled basket insert
![]() carefully in the device.
carefully in the device. - Fill the device with water. The liquid must cover the item that is to be cleaned, but must not exceed the mark indicating the maximum filling height.
- Then start the cleaning process as described in paragraphs 1 to 10 of the section "Cleaning without an Insert".

Curved Insert for Watches  :
:
Cleaning straps of waterproof watches:
- Please use the curved insert
![]() supplied for watchstraps made of metal.
supplied for watchstraps made of metal. - This curved insert
![]() is tall enough to project above the MAX. marking to allow watch straps to be placed in the cleaner.
is tall enough to project above the MAX. marking to allow watch straps to be placed in the cleaner. - Attach the watch so that the watch mechanism housing sits above the surface of the liquid (see Illustration B).

This means that the watch mechanism housing does not have to be detached from the strap.
![]()
If the watch mechanism is in the liquid, it may be damaged during the cleaning process by the ultrasonic waves. - Carefully place the curved insert
![]() with the wristwatch in the device.
with the wristwatch in the device. - Fill the device with water. The liquid must cover the object that is to be cleaned, but must not exceed the mark indicating the maximum filling height, or the watch housing must be outside the liquid.
- Then start the cleaning process as described in paragraphs 1 to 10 of the section "Cleaning without an Insert".

CD holder for CD/DVDs  :
:
Cleaning CDs and DVDs (see Illustration C):

- Insert a CD or DVD into the supplied CD holder
![]() .
. - Fill the device with water.
- 2 CDs or DVDs can be cleaned at the same time by using the ring as a spacer.
Using a Cleaning Concentrate
- It is possible to use a cleaning additive for problematic or stubborn dirt such as grease, resin, rust, wax, pigments, etc., which cannot be removed with water (see the section on "Cleaning Methods").
- It is essential to read the warnings and manufacturer's information before using the product.
- Please ask in specialist shops, such as those dealing in watches or jewellery, for advice.
Cleaning Methods
General Cleaning:
- Use normal tap water for general cleaning (the water should completely cover the item to be cleaned, although the maximum filling height should not be exceeded).
Basic Cleaning:
- Cleaning concentrates can be used to intensify the cleaning effect of the device (e.g. commercially available washing-up liquid).
- Fill the stainless steel tank
![]() with a cleaning mixture consisting of five parts of water and one part of washing-up liquid (e.g. 250 ml of water, 50 ml of washing-up liquid).
with a cleaning mixture consisting of five parts of water and one part of washing-up liquid (e.g. 250 ml of water, 50 ml of washing-up liquid). - Please note the information provided by the manufacturer on the pack.
Partial Cleaning:
For the partial cleaning of large objects please use the device with the cover  open. During operation avoid contact with the liquid! Ultrasound is harmful to the skin and bones.
Cleaning and Care
- Please ensure that the device is switched off and remove the mains plug
![]() from the socket.
from the socket.
![]()
During the cleaning and care process the device, lead and mains plug![]() must not be immersed in water or another liquid.
must not be immersed in water or another liquid. - The ultrasonic cleaning device must not be treated with acidic detergents or pointed objects.
- Clean the stainless steel tank
![]() , housing
, housing ![]() , and inserts
, and inserts ![]() ,
, ![]() and
and ![]() with a cloth and wipe dry.
with a cloth and wipe dry. - In order to avoid lime residues, do not allow any residual water to remain in the container after use or cleaning.
- The device should be stored in a cool and dry place.
- The ultrasonic cleaning device must be kept out of the reach of children.
![]()

 , and inserts
Do not make any modifications to the device or the connection cable. All repairs should only be carried out by the service centre or an authorised specialist workshop.
Problems and Solutions
| Problem / Fault | Possible Cause(s) | Solution | ||
The device is connected to the power supply but the display is blank  | The mains plug is not correctly inserted. | Insert the mains plug firmly in the power socket. | ||
| No power supply. | If necessary, have the 230 V socket to which the device is connected or the installation checked by a professional electrician. | |||
| The mains lead is broken. | Repairs should only be carried out by a specialist dealer. | |||
| The object to be cleaned remains dirty. | The timer was not started. | Switch on the timer with the On-switch | ||
There is no or too little water in the stainless steel tank  . . | The stainless steel tank can be filled up to the "MAX" mark with normal tap water or a cleaning mixture (see the sections "Operation" and "Cleaning Methods"). | |||
| No detergent was added. | Add cleaning concentrate according to the type of soiling (see the section on "Cleaning Methods"). | |||
| Too little detergent was added. | In the case of stubborn dirt, increase the cleaning mixture (see the section on "Cleaning Methods") to 2 parts of water and 1 part of washing-up liquid (e.g. 200 ml of water, 100 ml of washing-up liquid. | |||
| Clean with the basket insert | The basket insert absorbs one third of the ultrasonic waves and therefore reduces the cleaning performance. It may therefore be necessary to carry out several cleaning procedures. | |||
Safety Instructions
- This device is not intended for use by individuals (including children) with restricted physical, sensory or mental capacities or those w ith a lack of experience and / or knowledge, unless they are supervised by an individual who is responsible for their safety or have received instructions from such an individual on how to use the device. Children should be supervised in order to ensure that they do not play with the device.
![]()
- Please store the ultrasonic cleaning device where it is not accessible to children as they are not always able to correctly assess any possible hazards.
![danger]() DANGER TO CHILDREN! DANGER OF DEATH THROUGH SUFFOCATION! Keep the packaging material away from children.
DANGER TO CHILDREN! DANGER OF DEATH THROUGH SUFFOCATION! Keep the packaging material away from children. - In order to avoid injury, please note the following
- During operation, ensure that you do not come into contact with the liquid: ultrasound can be harmful to the skin and bones!
- Please note the following in order to ensure correct operation
- Operate the device only in accordance with the information contained on the type plate in order to ensure that the device functions correctly.
- Do not expose the ultrasonic cleaning device to temperatures lower than –10°C or above +40°C.
- Do not place the device on surfaces which may become hot, e.g. a hotplate or next to a gas cooker.
- Clean the device thoroughly after every use (see the section on "Cleaning and Care").
- In order to prevent a life-threatening electric shock, please note the following
- Remove the mains plug after use or before cleaning the device.
![]()
Do not use while bathing. Never immerse the device or the lead in water or another liquid.
![]()
- Never operate the device unsupervised and only in accordance with the instructions on the type plate.
- Always remove the mains plug from the socket
- if a malfunction occurs,
- before you clean the device,
- if you are not going to use the device for a prolonged period,
- after every use.
- You should pull on the mains plug directly and not on the lead.
- If you find there is damage to the lead, mains plug, housing or other parts of the device, the device must not be used.
- Repairs should only be carried out by a specialist dealer.
- If the device's mains lead is damaged, the lead must be replaced by the manufacturer, his customer services centre or a suitably qualified person, in order to avoid causing further danger.
![]()
If the device has fallen into water, it is essential to remove the mains plug from the socket first before you put your hands into the water.
![]()
Never touch the mains plug with wet hands, particularly when you insert it into or remove it from the socket. - The installation of an earth leakage circuit breaker device with a rated tripping current of not more than 30 mA offers further protection against an electric shock. The installation should only be carried out by a specialist electrician.
- Please ensure that the lead does not become caught in cupboard doors or pulled across hot surfaces. Otherwise the insulation of the lead may be damaged.
![]()
- Remove the mains plug after use or before cleaning the device.
- Please observe the following in order to avoid a fire
- Remove the mains plug after use or before cleaning the device.
- Never operate the device unsupervised and only in accordance with the information on the type plate.
- Remove the mains plug from the socket
- if a malfunction occurs,
- before you clean the device,
- if you are not going to use the device for a prolonged period,
- after every use.
Please pull on the mains plug itself and not on the lead.
- If you should find any damage to the lead, mains plug, housing or other parts, the device must not be used.
- Check the device regularly for any mechanical defects.

 DANGER TO CHILDREN! DANGER OF DEATH THROUGH SUFFOCATION! Keep the packaging material away from children.


Documents / ResourcesDownload manual
Here you can download full pdf version of manual, it may contain additional safety instructions, warranty information, FCC rules, etc.
Advertisement


Need help?
Do you have a question about the SUR 46 A1 and is the answer not in the manual?
Questions and answers