Table of Contents
Advertisement
Quick Links
Advertisement
Table of Contents

Related Manuals for AXIOMTEK AIE110-ONA Series


Summary of Contents for AXIOMTEK AIE110-ONA Series
- Page 1 AIE110-ONA Series Edge AI Developer Kit User’s Manual...
-
Page 2: Disclaimers
Axiomtek does not make any commitment to update any information in this manual. Axiomtek reserves the right to change or revise this document and/or product at any time without notice. No part of this document may be reproduced, stored in a retrieval system, or transmitted in any forms or by any means, electronic, mechanical, photocopying, recording, among others, without prior written permissions of Axiomtek Co., Ltd. -
Page 3: Esd Precautions
⚫ Wear a wrist-grounding strap, available from most electronic component stores, when handling boards and components. Trademarks Acknowledgments Axiomtek is a trademark of Axiomtek Co., Ltd. IBM, PC/AT, PS/2, VGA are trademarks of International Business Machines Corporation. ® ® Intel and Pentium are registered trademarks of Intel Corporation. -
Page 4: Table Of Contents
Table of Contents Disclaimers ......................ii ESD Precautions ....................iii SECTION 1 INTRODUCTION .................. 1 General Description ................2 Developer Kit Specifications ............. 3 1.2.1 Product Specification ..................3 1.2.2 I/O System ......................3 1.2.3 System Specification ..................4 Dimensions ..................5 1.3.1 Developer Kit Dimensions ................ - Page 5 Sample Program ................34 Register Table .................. 34...
-
Page 7: Section 1 Introduction
AIE110-ONA Series User’s Manual SECTION 1 INTRODUCTION This chapter contains general information and detailed specifications of the AIE110-ONA. The Chapter 1 includes the following sections: ◼ General Description ◼ Developer kit Specifications ◼ Dimensions ◼ I/O Outlets ◼ Packing List ◼... -
Page 8: General Description
AI performance, excellent I/O flexibility, varied peripherals, and accommodation for board support packages (BSP). It enables users to easily convert the developer kit to an edge system using Axiomtek industrial design services. This developer kit is equipped with one 4 GB or 8GB 128-bit LPDDR5 102.4GB/s, and a built- in watchdog timer. -
Page 9: Developer Kit Specifications
AIE110-ONA Series User’s Manual Developer Kit Specifications 1.2.1 Product Specification ⚫ NVIDIA Jetson SKU ® ◼ NVIDIA Jetson Orin™ Nano 4GB (20 TOPS) ® ◼ NVIDIA Jetson Orin™ Nano 8GB (40 TOPS) ⚫ ◼ 6-core Arm® Cortex® -A78AE v8.2 64-bit CPU 1.5MB L2 + 4MB L3 ⚫... -
Page 10: System Specification
AIE110-ONA Series User’s Manual ⚫ Two LED Indicators (System Power, M.2 Storage) ⚫ One 12 VDC Power Jack connector 1.2.3 System Specification ⚫ Watchdog Timer ® ◼ Built-in NVIDIA Jetson Orin™ Nano Series ⚫ Power Supply ◼ Input : 12 VDC ⚫... -
Page 11: Dimensions
AIE110-ONA Series User’s Manual Dimensions The following diagrams show the dimensions and outlines of the AIE110-ONA. 1.3.1 Developer Kit Dimensions Introduction... -
Page 12: Assembly Drawing
AIE110-ONA Series User’s Manual 1.3.2 Assembly Drawing Introduction... -
Page 13: Packing List
HDMI, 1 GbE LAN, 1 GbE PoE and 2 USB Edge AI Developer Kit with NVIDIA® Jetson Orin™ Nano 8GB, 1 AIE110-ONA-8GB HDMI, 1 GbE LAN, 1 GbE PoE and 2 USB If you cannot find this package or any items are missing, please contact Axiomtek distributors immediately. Introduction... - Page 14 AIE110-ONA Series User’s Manual This page is intentionally left blank. Introduction...
-
Page 15: Section 2 Board And Pin Assignments
AIE110-ONA Series User’s Manual SECTION 2 BOARD AND PIN ASSIGNMENTS Proper jumper settings configure the AIE110-ONA to meet your application purpose. We are here with listing a summary table of all jumpers and default settings for onboard devices, respectively. Board Dimensions and Fixing Holes... -
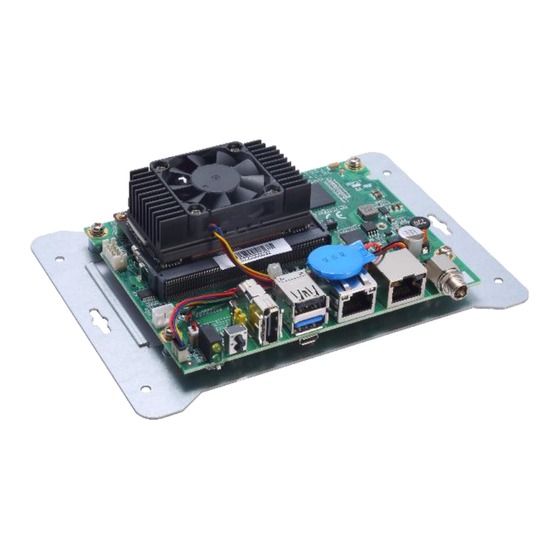
Page 16: Board Layout
AIE110-ONA Series User’s Manual Board Layout Top View Bottom View Board and Pin Assignments... - Page 17 AIE110-ONA Series User’s Manual Side View Note: We strongly recommended that you should not modify any unmentioned jumper setting without Axiomtek FAE’s instruction. Any modification without instruction might cause damage to the system. Board and Pin Assignments...
-
Page 18: Connectors And Switches
Connectors connect the board with other parts of the system. Loose or improper connection might cause problems. Make sure all connectors are properly and firmly connected. Here is a summary table shows you all connectors and button on the AIE110-ONA Series. External Connectors / Buttons... -
Page 19: Digital I/O Header (Cn2)
AIE110-ONA Series User’s Manual 2.3.1 Digital I/O Header (CN2) The CN12 is a 2 x 5-pin header for 8-Channel digital I/O interface. The digital I/O is controlled via software programming. Signal Signal DIO1 DIO2 DIO3 DIO4 DIO5 DIO6 DIO7 DIO8 +5V_SBY 2.3.2... -
Page 20: Usb2.0 & Usb3.1 Gen2 Connector (Cn5)
AIE110-ONA Series User’s Manual 2.3.3 USB2.0 & USB3.1 Gen2 Connector (CN5) The Universal Serial Bus connectors are compliant with USB 2.0 (480Mbps) and USB 3.1 Gen2 (10Gbps), and ideally for installing USB peripherals such as keyboard, mouse, scanner, etc. Signal... -
Page 21: Pci-Express Mini Card Connector (Scn1)
AIE110-ONA Series User’s Manual 2.3.6 PCI-Express Mini Card Connector (SCN1) The AIE110-ONA supports a full-size PCI-Express Mini Card slots. SCN1 is applying to either PCI-Express or USB 2.0 signal, and complies with PCI-Express Mini Card Spec. V1.2. Signal Signal Signal Signal +3.3V... -
Page 22: 2280 Key M Pcie X4 Ssd Slot (Scn2)
AIE110-ONA Series User’s Manual 2.3.7 M.2 2280 Key M PCIe x4 SSD slot (SCN2) The AIE110-ONA comes with one M.2 2280 Key M PCIe x4 NVMe SSD slot for storage. Signal Signal Signal Signal +3.3V +3.3V PEX3_RX- PEX3_RX+ LED_1# PEX3_TX- +3.3V... -
Page 23: Sim Card Slot (Scn3)
AIE110-ONA Series User’s Manual 2.3.8 SIM Card Slot (SCN3) AIE110-ONA comes with SIM Card Slot (SCN3) for inserting SIM Card. In order to work properly, the SIM Card must be used together with 3G/LTE module which would be inserted to PCI-Express Mini Card Connector (SCN1). It is mainly used for 3G/LTE wireless network application. -
Page 24: Ethernet Ports (Lan1, Lan2)
AIE110-ONA Series User’s Manual 2.3.10 Ethernet Ports (LAN1, LAN2) ® The AIE110-ONA comes with two RJ-45 connectors: LAN1 (NVIDIA Jetson Orin™ Nano) ® and LAN2 (Intel I210-IT). LAN1 is a GbE port, but LAN2 is the GbE PoE port (non-isolated), which is compliant IEEE 802.3af class 3, and the total power budget is 15Watts maximum. -
Page 25: Power Button & Reset Button (Sw1)
AIE110-ONA Series User’s Manual 2.3.11 Power Button & Reset Button (SW1) Power button can allow users to either turn on the AIE110-ONA or forcibly shut down the system, and the reset button can allow users to reset AIE110-ONA during system abnormal situation. -
Page 26: Debug Port Header (Jp1)
AIE110-ONA Series User’s Manual 2.3.14 Debug Port Header (JP1) The JP1 is the serial debug port (UART Port0) for debugging purposes at software development. Signal UART2_TXD_3.3V UART2_RXD_3.3V 2.3.15 Reserved Connector: Power Button & Recovery mode (JP2) JP2 is a reserved connector for entering recovery mode (1-2) and power button (3-4). It supports the same function as SSW2 and SSW1(Power button only). -
Page 27: Cmos Battery Interface (Bat1)
AIE110-ONA Series User’s Manual 2.3.17 CMOS Battery Interface (BAT1) This connector is for CMOS battery interface. Signal +VBAT 2.3.18 Power and Storage LED Indicator (LED1) The Yellow LED is linked to Solid-state Drive (SSD) activity signal. LED flashes every time SSD is accessed. -
Page 28: Cables
AIE110-ONA Series User’s Manual Cables 2.4.1 Digital I/O Cable This cable is for 8-Channel digital I/O programming, please connect the digital I/O cable to Digital I/O Header (CN2). Signal Signal DIO1 DIO6 DIO3 DIO4 DIO5 DIO2 DIO7 DIO8 Board and Pin Assignments... -
Page 29: Section 3 Jetpack Bsp Flash Method
AIE110-ONA Series User’s Manual SECTION 3 JETPACK BSP FLASH METHOD This chapter provides users with a detailed description of how to flash NVIDIA Jetpack BSP for AIE110-ONA, the user could follow the below instruction to install or reinstall Jetpack BSP by themselves. - Page 30 AIE110-ONA Series User’s Manual 3. If the check result returns OK, untar the image file with the command below: $ tar jxvf <image_tarball_file_name>.tbz2 For example: $ tar jxvf mfi_jetson-orin-nano-8GB-JP5.1.1-SBC87903-V1.0.0.tbz2 4. Change the directory to the image package folder with the command below: $ cd <image_file_name>...
- Page 31 AIE110-ONA Series User’s Manual Running the following command to flash the image. $sudo ./tools/kernel_flash/l4t_initrd_flash.sh --flash- only --massflash 5 7. The flashing procedure takes approximately 20 minutes or more. Once finished, and AIE110-ONA will automatically reboot, and please remove the Micro USB cable and switch the recovery switch(SSW2) to OFF to return to standard mode.
-
Page 32: Image Information Inquiry Command
AIE110-ONA Series User’s Manual Image Information Inquiry Command axiomtek.sh Running command to inquiry the current image information, image version, L4T version, Linux kernel version, and Ubuntu version. Jetpack BSP Flash Method... -
Page 33: Jtop-Third-Party Jetson Platform Monitor Tool
AIE110-ONA Series User’s Manual JTOP-Third-party Jetson Platform Monitor Tool JTOP is a third-party system monitoring utility that runs on the term inal to see and control realtime the status of the AIE Series Platform. CPU, RAM, GPU status, power mode management, toolkits version and more. - Page 34 AIE110-ONA Series User’s Manual This page is intentionally left blank. Jetpack BSP Flash Method...
-
Page 35: Appendix Awatchdog Timer
AIE110-ONA Series User’s Manual APPENDIX A WATCHDOG TIMER About Watchdog Timer Software stability is major issue in most applications. Some embedded systems are not watched by human for 24 hours. It is usually too slow to wait for someone to reboot when computer hangs. -
Page 36: Wdt.c
AIE110-ONA Series User’s Manual wdt.c #include <stdio.h> #include <stdlib.h> #include <unistd.h> #include <fcntl.h> #include <errno.h> #include <sys/ioctl.h> #include <sys/types.h> #include <sys/stat.h> #include "watchdog.h" int main(int argc, char **argv) fd, ret; timeout = 0; /* open WDT0 device (WDT0 enables itself automatically) */ = open("/dev/watchdog0", O_RDWR);... -
Page 37: Watchdog.h
AIE110-ONA Series User’s Manual /* close WDT0 device */ close(fd); (ret<0) { fprintf(stderr, "Failed to close watchdog device."); return return watchdog.h #include <linux/ioctl.h> #include <linux/types.h> Generic watchdog defines. Derived from.. * Berkshire PC Watchdog Defines * by Ken Hollis #ifndef _LINUX_WATCHDOG_H... - Page 38 AIE110-ONA Series User’s Manual #define WDIOF_EXTERN2 0x0008 /* External relay 2 */ #define WDIOF_POWERUNDER 0x0010 /* Power bad/power fault */ #define WDIOF_CARDRESET 0x0020 /* Card previously reset the CPU */ #define WDIOF_POWEROVER 0x0040 /* Power over voltage */ #define WDIOF_SETTIMEOUT...
-
Page 39: Appendix Bprogrammable Digital I/O
AIE110-ONA Series User’s Manual APPENDIX B PROGRAMMABLE DIGITAL I/O About Programmable Digital I/O The AIE110-ONA supports 8 channels programmable digital I/O which allows user to program the DI or DO. For more details, please refer to the below sample code. - Page 40 AIE110-ONA Series User’s Manual Sample Program DIO Output Sample Code # i2cset -f -y 7 0x24 0x01 0xFF //Set DIO1 ~ 8 as High # i2cset -f -y 7 0x24 0x03 0x00 //Set DIO1 ~ 8 as Output # i2cset -f -y 7 0x24 0x01 0xF0...
- Page 41 AIE110-ONA Series User’s Manual Register 1 - Output Port Register Bit Description This register reflects the outgoing logic levels of the pins defined as outputs by Register 3. Bit values in this register have no effect on pins defined as inputs. Reads from this register return the value that is in the flip-flop controlling the output selection, not the actual pin value.
Need help?
Do you have a question about the AIE110-ONA Series and is the answer not in the manual?
Questions and answers