Table of Contents
Advertisement
Quick Links
QUICK GUIDE
®
®
COMPUTRAC
MAX
4000/4000XL
MOISTURE ANALYZER
Firmware Rev 1.5X
February 2013
ARIZONA INSTRUMENT LLC
3375 N Delaware Street | Chandler, AZ 85225 USA
800.528.7411 | 602.470.1414 | f 602.281.1745
www.azic.com
Email:
General –
azi@azic.com
International –
intl@azic.com
Customer Service –
support@azic.com
AZI P/N 700-0120-H
Last update February 2013
Advertisement
Table of Contents

Related Manuals for Arizona Instrument COMPUTRAC MAX 4000


Summary of Contents for Arizona Instrument COMPUTRAC MAX 4000
- Page 1 QUICK GUIDE ® ® COMPUTRAC 4000/4000XL MOISTURE ANALYZER Firmware Rev 1.5X February 2013 ARIZONA INSTRUMENT LLC 3375 N Delaware Street | Chandler, AZ 85225 USA 800.528.7411 | 602.470.1414 | f 602.281.1745 www.azic.com Email: General – azi@azic.com International – intl@azic.com Customer Service –...
-
Page 2: Table Of Contents
4000XL for features that are only available in the MAX 4000XL. PROPRIETARY RIGHTS NOTICE This quick guide contains valuable information developed by Arizona Instrument LLC for use with ® the Computrac line of moisture analyzers. No part of this quick guide can be reproduced or transmitted in any form or by any means, electronic, mechanical, or otherwise. -
Page 3: How To Use This Quick Guide
HOW TO USE THIS QUICK GUIDE ® ® The Arizona Instrument Computrac 4000 moisture analyzer is an advanced, ® highly customizable instrument. As a result, the manual for the MAX 4000 is extensive, comprehensive and detailed. For best results, read the manual in its entirety and keep it available for reference during instrument operation. - Page 4 With the power switch off, power is still applied to the Before using any cleaning or decontamination method power entry module. Remove the power cord from the except those recommended by Arizona Instrument, ® 4000 to ensure complete power removal from the check with AZI Customer Service to ensure that the instrument.
-
Page 5: Packing And Shipping Instructions
PACKING AND SHIPPING INSTRUCTIONS IMPORTANT Movement, handling, and packaging of the instrument must be done with ® EXTREME CARE to avoid permanent, expensive internal damage. The MAX 4000 uses a delicate and very sensitive electronic force balance to measure small weights and weight losses. -
Page 6: Instrument Setup
INSTRUMENT SETUP Review and perform the setup steps in this entire section before testing samples. 4.1. Instrument Location ® The MAX 4000 is designed to provide reliable results under normal ambient conditions in the laboratory and on the production floor. Compliance with the following guidelines will help ensure optimum accuracy and minimum test times: •... -
Page 7: Ac Power Connection
4.3. AC Power Connection Power Requirements: 100-120 VAC, 50/60 Hz @ 8 Amps – fuse is F8A T250V 220-240 VAC, 50/60 Hz @ 4 Amps – fuse is F4A T250V Fused on/off switch is part of an EMI power entry module ®... -
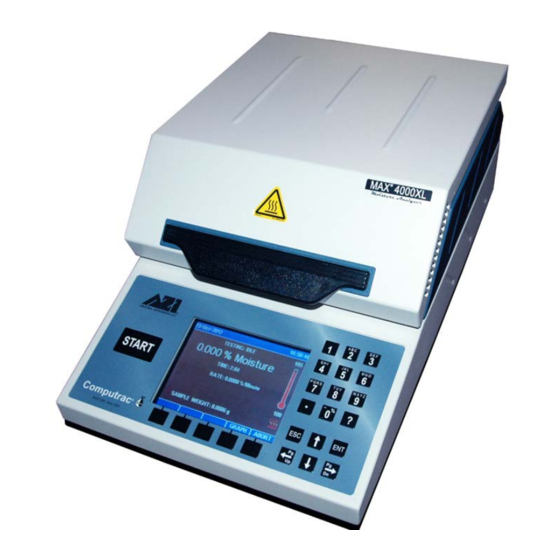
Page 8: User Interface Operation
4.4. User Interface Operation • After power up, the Main Test screen shown below appears. (It may be necessary to press the [ESC] key to clear any calibration reminders). Soft Keys The keypad button functions are as follows: • [START] - Begins a test using the currently selected Test Program. •... -
Page 9: Contrast Adjustment
To begin editing an item either: • Press [ENT] to edit the existing value. • Press an Alphanumeric or Numeric key to overwrite the existing value with a new value. Typical keys during item editing are: • Left and Right Arrow Keys – Move the cursor one position left or right. •... -
Page 10: Back Panel Connections
4.6. Back Panel Connections In addition to the AC power connection, these connections are also available from the back panel of the instrument: • RJ-45 Ethernet Connection (marked ETHERNET) ® o The Ethernet port is used primarily to connect the MAX 4000 to a Local Area Network (LAN) for use with the optional Web Server. -
Page 11: Connecting A Usb Printer
4.7. Connecting a USB Printer An optional graphics capable printer is available from AZI (AZI P/N: Y990-0212). The printer connects to the USB Type A / Host port (marked USB) on the back panel. Test Programs, Test Results and graphs, and calibrations can be printed. The reports can be custom configured through the menu system. -
Page 12: Report Setup
• OUTPUT TO USB DRIVE enables reporting to a USB drive. Make sure to insert the USB drive in the USB Type A / Host port (marked USB) before printing the report. When the desired report is printed, a file name is constructed from the instrument’s serial number with a “.TXT”... -
Page 13: Perform Balance Span Calibration
4.8. Perform Balance Span Calibration To get here, navigate: [MENU]CALIBRATION MENUBALANCE CALIBRATION MENUPERFORM SPAN CALIBRATION Span calibration should be done: • Immediately after initial setup and 60-minute warm-up from cold start. • Whenever the instrument is moved. • Whenever a problem is suspected. •... - Page 14 To perform a WEIGHT test: • If a clean pan is not already installed, then place a new/clean sample pan on the pan support. • Close the lid. • If not at the Main Test screen, press [ESC] repeatedly until the Main Test screen is displayed.
- Page 15 • Close the lid, and the instrument weighs the weights. • Immediately after the instrument weighs the weights, gently open the lid, carefully remove the 3-gram weight, and gently close the lid. • The test finishes once the ending criteria has been met. •...
-
Page 16: Moisture Analysis Testing
MOISTURE ANALYSIS TESTING ® ® The Computrac Series loss-on-drying moisture analysis system takes advantage of computer technology to reduce test times and increase precision over standard vacuum oven or convection oven drying procedures. Prior to testing, a Test Program is created with the parameters to be used for testing the sample. - Page 17 To perform a test: • If a clean pan is not already installed, then place a new/clean sample pan on the pan support. • Close the lid. • If not at the Main Test screen, press [ESC] repeatedly until the Main Test screen is displayed.
- Page 18 To load difficult samples more easily, remove the sample pan from the instrument after the correct amount of sample has been placed on the pan, place the filled pan on a level work surface, and spread the sample by gentle shaking or tapping, or use a small flat brush, spoon, knife or spatula (depending on the consistency of the sample), and then replace the loaded sample pan on the pan support.
-
Page 19: Main Menu
MAIN MENU ® Pressing the MENU soft key on the Main Test screen provides access to the MAX 4000 menu system. To get here, press: [MENU] The first and second levels of the menu system are shown below for reference. Refer to the manual for detailed explanations of all of the options available. -
Page 20: Test Programs
6.1. Test Programs Test Programs are test parameter sets. They are sequentially numbered from 1 to the total number of programs entered into the instrument. The figure below shows program 1 selected, as indicated by the yellow arrow. The 1/20 in the upper right hand corner indicates that a total of 20 test programs have been defined and the blue cursor bar is on number 1 out of 20. -
Page 21: Test Results
There are 8 categories of test parameters for each Test Program, as shown, each explained in more detail in the manual. Refer to section 4.4 User Interface Operation on page 8 for instructions on how to edit items. ® When the MAX 4000 is powered on, it will immediately begin heating to the IDLE TEMPERATURE of the first Test Program in the list. - Page 22 • [ANALYZE] – Compute the mean, standard deviation, and relative standard deviation of the selected results. (The relative standard deviation is also known as the coefficient of variation or CV.) The analysis can be printed with [PRINT]. The analysis is performed using the following formulas that are available on many hand calculators: ∑...
-
Page 23: Graph
6.2.1 Graph ® Available only on the MAX 4000XL. Pressing the [GRAPH] from the Main Test screen or when viewing Test Results brings up the test graph. The [RESULT], [TEMP], [PREDICT], and [RATE] soft keys allow their specific curves to be removed from or added to the graph. -
Page 24: Web Server
WEB SERVER ® Available on the MAX 4000XL only ® An optional Web Server can be purchased for the MAX 4000XL, and then the instrument ® can be accessed from your local area network (LAN) or intranet by a Windows PC with ®... -
Page 25: Ethernet Setup
7.1. Ethernet Setup To get here, navigate: [MENU]SETUP MENUETHERNET SETUP The Ethernet Setup menu provides the necessary options to configure the instrument to ® use the Web Server (if purchased). Generally, the MAX 4000XL cannot be viewed on the Internet because of company firewalls, but it is possible and requires a registered IP address. -
Page 26: Sodium Tartrate Test
SODIUM TARTRATE TEST The (Factory) TARTRATE test verifies the heater and force balance operation, and can also be used to familiarize oneself with the instrument and test procedure. Sodium tartrate dihydrate is a chemical with a known moisture concentration that releases moisture at temperatures greater than 120 ºC.
Need help?
Do you have a question about the COMPUTRAC MAX 4000 and is the answer not in the manual?
Questions and answers