Advertisement
INTRODUCTION
 Attention: To prevent siphoning, the soft outlet hose should be higher than the water surface.
Hygger smart ATO is designed to refill water automatically and drain water manually. Can be installed in a cabinet filter or directly on the aquarium edge. Connect water pump, external sensor and power supply to monitor and it's ready to go. Build in two sensors, the monitor provides overfilling protection. When the water goes below the minimum water level, the power will be activated, the pump automatically works, and cut off once the water level reach to maximum. Once it occurs below situations, it make a loud beeping noise to warn you.
- Bucket where the water pump placed is out of water
- Water pump's electric wire loose
- ExternaI sensor is out of water
- Water level is higher than the auto top off. Please read this manual carefully before using and follow the instructions carefully.
PRODUCT FEATURES
- Safety: Two optical sensors monitor the water levels to ensure desired levels are maintained and to provide double protection to avoid an overfill. The monitor will make a loud beeping when external sensor is out of water.
- Double Effect: Refill water automatically and drain water manually.
- Easy to install and use: Easy installation with magnetic holders
- Suitable for saltwater and freshwater: Designed for tanks up to 60 gals and to be used on less than 12mm thick tank.
PRODUCT PARAMETERS
- PACKAGE INCLUDES:
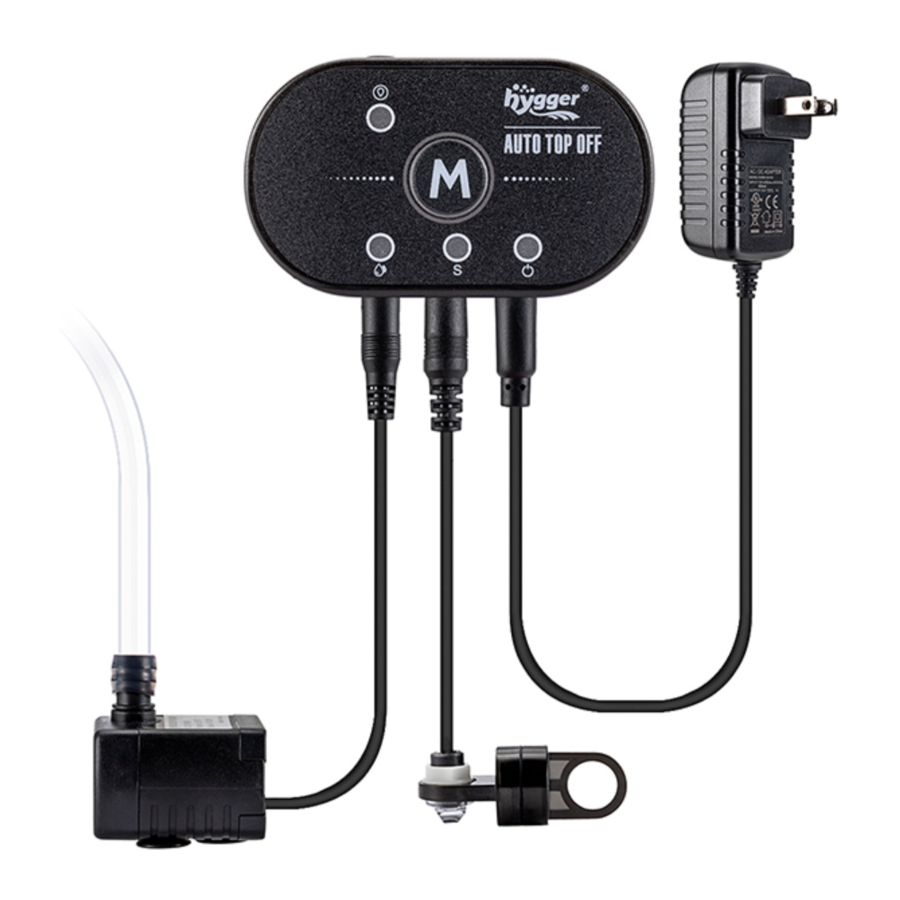
Item Picture Description ATO monitor x 1 ![]()
- Has two optical sensors
- Contains the refill water pump and drain water pump female jack
- External optical sensor jack
- Power jack
Water pump x 1 ![]()
Can be used to refill and drain water Soft pipe x 1 ![]()
6x8 mm External optical sensor x 1 ![]()
Beep when external optical sensor is out of water from reserve water tank. Power adapter x 1 ![]()
DC 12V IA Universal holder (3/4 inch) x 1 ![]()
Hose holder User manual x1 -


- CONTROL DESCRIPTION
The monitor is composed of external part and internal part, attach external monitor outside of the tank and internal monitor inside of the tank.


- M Mode button
There are two functions one is pause the other is change working mode. PAUSE: Press the button to suspend/restart the refilling and drain water pump when the ATO system is working (invalid during the refilling mode when the water is higher than the normal water level) CHANGE WORKING MODE:Long press the M button to change the working mode (change from the refilling mode to the draining mode or from the draining mode to refilling mode)
- Yellow light
Plug in pump to drain water - Blue light
Plug in pump to refill water
- Green light
Plug in external optical sensor to avoid water shortage in the reserve water tank. - Red light
Plug in power adapter to use
- LED indicators
LED colour Working state Stop working Display abnormal Trouble shooting Red Constant brightness Blank Blank - Make sure the power adaptor is plugged in
- Confirm that the power supply is not damaged
Green Constant brightness Blank flash - Make sure the external sensor is plugged in
- Clean the optical sensor. If it doesn't beep when removed out of the water, then the sensor is damaged.
Blue Constant brightness Blank flash - Make sure the water pump is plugged in.
- When the water pump is plugged in and the alarm still rings, the water pump is broken.
Yellow Constant brightness Blank flash - Make sure the drain water pump is plugged in
- When the water pump is plugged in and the alarm is still ringing, the water pump is broken.
- Alarm: The ATO will make a loud beeping when the product is unstable.
Monitor state Led light state Reason Solution Beep Green light flashing - Water shortage in reserve water tank
- External sensor's electric wire loose
- The external sensor is working abnormally.
- Refill the water in the reserve water tank, make sure the reserve water is higher than external sensor
- Plug the sensor into the monitor tightly
- Change the external sensor
Blue light flashing - The refill pump is out of water in the reserve water tank
- The refilling pump's electric wire loose
- The water pump is working abnormally
- Place the pump into the water then press the M button
- Plug the refilling pump into the monitor tightly
- Change the pump
Yellow light flashing - The drain pump is out of water in the fish tank
- The drain water pump's electric wire loose
- The water pump is working abnormally
- Place the pump into the water then press the M button
- Plug the drain water pump into the monitor tightly
- Change the pump
All lights flashing - Calibration is not stable
- The water level is higher than the ATO in the tank
- Remove the external monitor and set it down horizontally. Let it re-calibrate precisely.
- Wipe the monitor and the fish tank.
INSTALL
Refill water

- Mount the ATO on the tank and make sure it's in line with the water level
- Clean the fish tank where you plan to place the monitor and the part being placed inside the tank. Place the monitor away from air bubbles
- Place the monitor horizontally
Clean the fish tank

The monitor away from air bubbles

Place the monitor horizontally


- Install the hose holder in the tank
- Connect one side of the soft hose to the pump and the other side to the hose holder.
![warning]() Attention: the soft hose shall always be higher than the water level or it will end up siphoning out water.
Attention: the soft hose shall always be higher than the water level or it will end up siphoning out water. - Connect the refill pump to the monitor and place the pump in the reserve tank.
- Place the external sensor in the reserve water tank then plug it in


- Plug the power in
- All indicators flash a couple of times then the device will enter the refilling mode automatically; If it keeps flashing or flashing simultaneous with alarming at the same time, please lift the external monitor and re-calibrate.
- The assembly is now complete. When the water in the aquarium is lower than the water level on the device, it will refill automatically to the set water level; Ifthe water level is higher than the internal monitor, the equipment will alarm and force the water pump to stop working. Press M button can suspend/restart the refilling.
Insert the plug when drain water pump is not in use.
- Unplug the jack of refill water pump and plug it in the jack of drain water pump, put the pump from reservoir tank to aquarium, put the soft hose to waste water container then long press M button, it can drain water. Press M button can suspend/restart the drain water. Then long press M button can back to refilling state.
Drain water

ATTENTION:
- Please read the manual carefully before use and follow all instructions.
- The Reserve tank and the aquarium should not be taller than 1.5meters; the reserve tank's water level shall not be higher than the aquarium.
- The optical sensor is sensitive, please remove the dust on the sensor.
- Clean the wet side of the monitor when cleaning the fish tank.
- When the drain pump is not used, please plug the silicone cover into the female jack.
- Please make sure the external monitor will not drop into the water because it's not waterproof.
- The internal monitor cannot float. Please do not drop it into the tank.
- Please unplug the power before maintenance.
- Please remember that the temperature range for the ATO is 23-113º F.

To avoid possible electrical shock, do not immerse the monitor in water. If the monitor falls into the water, or otherwise becomes wet, do not touch it until you have unplugged it. Basic safety precautions should be observed including the following:
- Read and follow this user manual strictly.
![]()
To avoid possible electric shock, special care should be taken. For each of the following situations, do not attempt to repair yourself; return the monitor to an authorized service facility for service or discard the monitor.- Carefully examine the monitor after installation. It should not be plugged in if there is water on parts not intended to be wet.
- Do not operate the monitor if it has a damaged cord or plug, if it is malfunctioning or if it is dropped or damaged in any manner. The power cord of this monitor cannot be replaced, if the cord is damaged, the monitor should be discarded.
- To avoid the possibility of the monitor plug getting wet, position the aquarium stand and tank to one side of a wall-mounted receptacle to prevent water from dripping onto the receptacle or plug. A "drip loop", shown in the figure below, should be arranged by the user for each cord connecting the monitor to the receptacle. The "drip loop" is the part of the cord below the level of the receptacle or the connector. If an extension cord is used, prevent water from traveling along the cord and coming in contact with the receptacle. If the plug or receptacle does get wet, DO NOT unplug the cord. Disconnect the fuse to the circuit breaker that supplies power to the monitor. Then unplug and examine for the presence of water in the receptacle.
![]()


- Close supervision is necessary when the monitor is used near children.
- To avoid injury, do not touch moving or hot parts.
- Make sure the monitor is securely installed before operating it.
- Read and observe all the important notices on the monitor.
- If an extension cord is necessary, a cord with a proper rating should be used. A cord rated for less amperes or watts than the appliance rating may overheat. Care should be taken to arrange the cord so that it will not be tripped over or pulled.
- The monitor is intended FOR HOUSEHOLD USE ONLY.
- SAVE THIS USER MANUAL.
Contact information:
Website: www.hygger-online.com
E-mail: Mago@hygger-online.com
Facebook: https://www.facebook.com/shenzhenmago
Or @shenzhenmago

If you have any problems or suggestions for the Hygger smart ATO, please contact us by email before leaving feedback or opening a case, it will be the fastest way to solve your problem. If you are satisfied with this product, please leave positive feedback for our product in order to let more customers enjoy it.

Documents / Resources
References
Download manual
Here you can download full pdf version of manual, it may contain additional safety instructions, warranty information, FCC rules, etc.
Download HYGGER HG-987 - Aquarium Auto Top Off System Manual
Advertisement


Need help?
Do you have a question about the HG-987 and is the answer not in the manual?
Questions and answers