Advertisement
INTRODUCTION
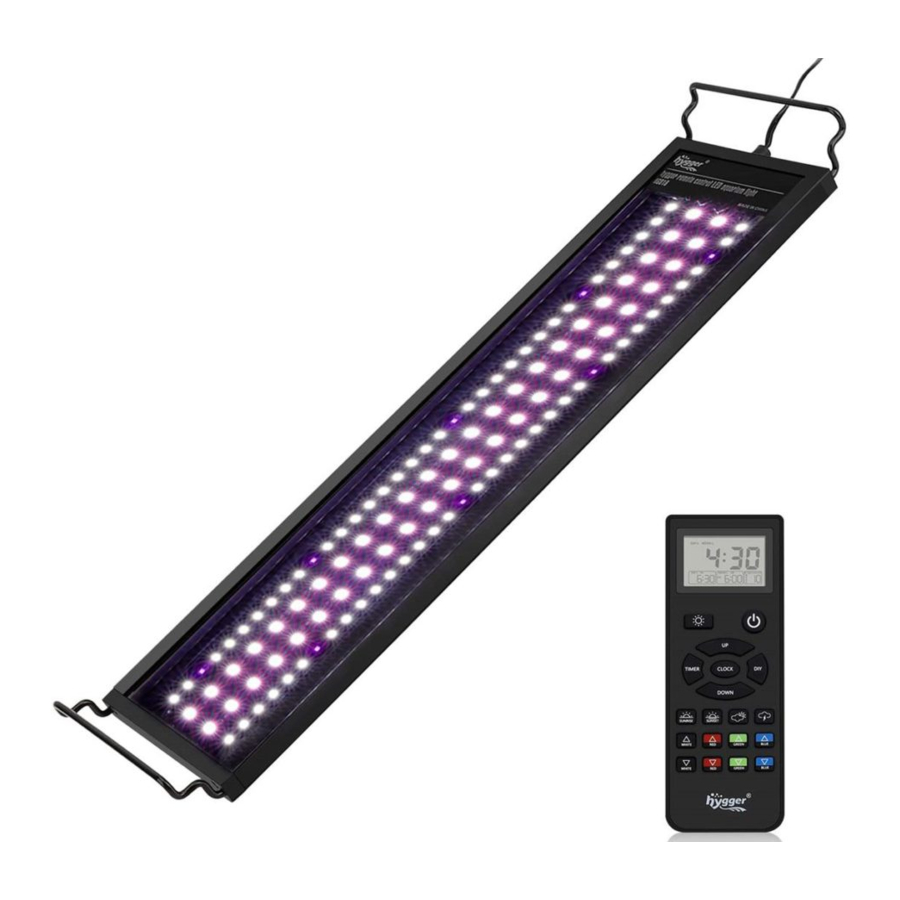
hygger remote LED aquarium light is a complicated, remote control led light which features multiple weather simulation options: sunrise, sunset, lightning, etc. With remote, advanced aquarists can create a customized lighting for its own need. Please read this manual carefully before using and follow strictly in accordance with the manual.
PACKAGE INCLUDED
- 1x Led Light
- 1x LCD Remote Control
- 1x DC Power Supply
- 2x Metal Brackets
- 1x User Manual
NOTE:
- If your LED light is missing any parts, please contact us directly with your order number, mago@hygger-online.com
- For additional installation instructions and videos, please visit our website.
INSTRUCTIONS
Device Installation
- Unpack light fixture and components.
- Slide the adjustable legs on the side of the light fixture to match the length of aquarium.
- Set fixture on aquarium and ensure metal brackets fit snug on edges of aquarium-or-slide end of wire mounts into rimless tank brackets until they snap into place.
Remote Controller Installation
![]()
Plug-in light before mounting controller- Remove plastic cover from remote controller 3.Install 2 (AAA) batteries

Product Overview
RF Remote Controller: suitable for receiving and transmitting signals at a distance in 10 meters, and can be remote controlled through the wall.

 | Switch button - Turns controller and light OFF/ON | ||||||
 | Color - select color, red, green, blue, purple, orange, cyan, yellow. Long press 3 seconds to run RGB gradient cycle lighting | ||||||
 | Up/Down- press to adjust brightness, adjust time, turn on/off DIY mode | ||||||
 | Timer-press to program DAY-Light or MOON-Light time setting | ||||||
 | Clock- long press 3 seconds to chose 12H/24H, press up/down to select. Press to set local time, press to save and esc | ||||||
 | DIY-press to program DIY mode | ||||||
| Control Panel Overview | |||||||
 | Sunrise simulate sunrise |  | Sunset simulate sunset |  | Cloud simulate cloud |  | Lighting simulate thunder |
 | White up turn up brightness of white |  | Red up turn up brightness of red |  | Blue up turn up brightness of blue |  | Green up turn up brightness of green |
 | White down tum down brightness of white |  | Red down turn down brightness of red |  | Green down turn down brightness of green |  | Blue down turn down brightness of blue |
Set local time
- Long press the
![]() "12H" will begin flashing, the "12H" flash in the screen.
"12H" will begin flashing, the "12H" flash in the screen.
Then press![]() or
or ![]() button select either a 12H or 24H time display, press
button select either a 12H or 24H time display, press ![]() to save it.
to save it.

- Hold the
![]() until you see "12H" flashes, then press once
until you see "12H" flashes, then press once ![]() you will see the hour number flash, then press
you will see the hour number flash, then press ![]() or
or ![]() to set the local time. Press
to set the local time. Press ![]() the minute number will flash, then press
the minute number will flash, then press ![]() or
or ![]() to set the minute. Press once
to set the minute. Press once ![]() button to save.
button to save.

 "12H" will begin flashing, the "12H" flash in the screen.
 or
or  button select either a 12H or 24H time display, press

Note: It will display "PM" on the screen when you choose "12H" time.

hygger remote LED light controller features two timer functions:
- DAY-L/MOON-L mode for running a gradual sunrise, daylight, sunset, and moonlight programmed around a daily ON/OFF time.
- DIY mode for playing a custom scene with 8 sections ON/OFF time, selected light color and brightness.
- Weather mode for stimulating sunrise, sunset, cloudy, lightning storm, you can wish to view any on-demand dynamic mode.
DAY-L/MOON-L mode
DAY-L setting
- Press the
![]() button once "DAY-L ON" will begin flashing.
button once "DAY-L ON" will begin flashing.

- Long press the
![]() button again to enter into edit mode.
button again to enter into edit mode.
The "DAY-L ON" of hours number will flash, press![]() or
or ![]() to set the hour start time. Then press the
to set the hour start time. Then press the ![]() button once, the "DAY-L ON" of minute number will flash, press
button once, the "DAY-L ON" of minute number will flash, press ![]() or
or ![]() to set the minute time.
to set the minute time.

- Press the
![]() button to save the daylight start time, and the brightness will flash, press
button to save the daylight start time, and the brightness will flash, press ![]() WRGB button to set each light color's brightness.
WRGB button to set each light color's brightness.

Tips: when you press![]() , the corresponding color (W, R, G, B) flashes on the brightness interface.
, the corresponding color (W, R, G, B) flashes on the brightness interface. - Press the
![]() button once to save the brightness, and enter into set daylight off time, the screen will read "DAY-L OFF" flash. Press
button once to save the brightness, and enter into set daylight off time, the screen will read "DAY-L OFF" flash. Press ![]() or
or ![]() to set the hour off time. Then press the
to set the hour off time. Then press the ![]() button to save, and the minute number will flash, press
button to save, and the minute number will flash, press ![]() or
or ![]() to set the minute time.
to set the minute time.

- Press the
![]() button to save the daylight off time.
button to save the daylight off time.
 button once "DAY-L ON" will begin flashing.

 WRGB button to set each light color's brightness.
 , the corresponding color (W, R, G, B) flashes on the brightness interface.
  or
or  to set the hour off time. Then press the
Tips
- DAY-L ON means the time of light turn on in the daytime, DAY-L OFF means the time of light turn off in the daytime
- When the time of DAY-L ON and the time of DAY-L OFF is the same, the screen display DAY-L OFF.
MOON-L setting
To modify the moonlight ON and OFF time of the Standard timer, follow the next steps:
- Press the
![]() button twice, the "MOON-L ON" will start flashing.
button twice, the "MOON-L ON" will start flashing.

- Long press the
![]() button again to enter into edit mode. The "MOON-L ON" of hours number will flash, press
button again to enter into edit mode. The "MOON-L ON" of hours number will flash, press ![]() or
or ![]() to set the hour start time. Then press the
to set the hour start time. Then press the ![]() button to save, and the minute number will flash, press
button to save, and the minute number will flash, press ![]() or
or ![]() to set the minute time.
to set the minute time.

- Press the
![]() button to save the moonlight start time, and the WRGB brightness will flash, press
button to save the moonlight start time, and the WRGB brightness will flash, press ![]() WRGB button to set each light color's brightness.
WRGB button to set each light color's brightness.

Tips:
when you press![]() , the corresponding color (W, R, G, B) flashes on the brightness interface.
, the corresponding color (W, R, G, B) flashes on the brightness interface. - Press the
![]() button once to save the brightness, and enter into set moonlight off time, the screen will read"MOON-L OFF" flash. press
button once to save the brightness, and enter into set moonlight off time, the screen will read"MOON-L OFF" flash. press ![]() or
or ![]() to set the hour off time. Then press the
to set the hour off time. Then press the ![]() button to save, and the minute number will flash, press
button to save, and the minute number will flash, press ![]() or
or ![]() to set the minute time.
to set the minute time.

- Press the
![]() button to save moonlight off time.
button to save moonlight off time.


 WRGB button to set each light color's brightness.
 , the corresponding color (W, R, G, B) flashes on the brightness interface.
 ATTENTION
All four LED's colors (white, red, green, blue) are adjustable in intensity in steps from 0 to 25%, you can control the light intensity from very dim to extremely bright. 0% means no light. 25% brightness of every single color is the most bright of each light. It depends on how you arrange light color and brightness.

For example, you prefer 17% white and 10% blue light, then you can see 27% brightness at the display, and W for white, B for blue.
Press  all these button until the brightness display, W R G B disappear. Then press
  to 17% brightness, Press
  to 27% brightness.

DAY-L MODE & MOON-L MODE Default Program

Daylight ON: 06:30am
Daylight OFF: 18:00 (06:00pm)
Color Spectrum: W 25%,R 25%,G 25%,B 25%. The intensity of lighting from 0% slowly ramps up in 15 minutes until 100% full spectrum.
Moonlight ON: 18:00 (06:00 pm)
Moonlight OFF: 23:30 (11:30 pm)
Color Spectrum: B 25%. The intensity of lighting from 0% faint blue light slowly ramps up in 15 minutes until 25% full blue.
Note: There is no need to set when selecting the Default Mode, just to set local time after out of the box and plugged in.

DIY mode
DIY setting
- Press and hold
![]() until "DIY" flashing, then press
until "DIY" flashing, then press ![]() or
or ![]() to turn on/off DIY mode. Press
to turn on/off DIY mode. Press ![]() once to enter setting.
once to enter setting. - After turned on DIY mode, you can see L1 displays on LCD screen, hour of L1 ON flash, you can press
![]() or
or ![]() to adjust hour of L1 ON. Press
to adjust hour of L1 ON. Press ![]() again, minute of L1 flash, you can press
again, minute of L1 flash, you can press ![]() or
or ![]() to adjust minute of L1 ON time.
to adjust minute of L1 ON time.

- Press
![]() again, hour of L1 OFF time flash, you can press
again, hour of L1 OFF time flash, you can press ![]() or
or ![]() to adjust hour of L1 OFF time, press
to adjust hour of L1 OFF time, press ![]() again, minute of L1 flash, you can press
again, minute of L1 flash, you can press ![]() or
or ![]() to adjust minute of L1 OFF time.
to adjust minute of L1 OFF time.

- Then press
![]() , Brightness flashing you can press
, Brightness flashing you can press ![]() to increase or decrease the brightness of four colors.
to increase or decrease the brightness of four colors.

- Press
![]() to set L2, L2 ON time is the L1 OFF time, and so on for L3-L7, so you just need to set L2 OFF time, the hour of L2 OFF time flash, you can press
to set L2, L2 ON time is the L1 OFF time, and so on for L3-L7, so you just need to set L2 OFF time, the hour of L2 OFF time flash, you can press ![]() or
or ![]() to adjust hour of L2 OFF time, press
to adjust hour of L2 OFF time, press ![]() , the minute of L2 OFF time flash, you can press
, the minute of L2 OFF time flash, you can press ![]() or
or ![]() to adjust minute of L2 OFF time.
to adjust minute of L2 OFF time.

- Press
![]() , the brightness flash then you can press
, the brightness flash then you can press ![]() to increase or decrease the brightness of four colors. Repeat the flow above to set L3-L7.
to increase or decrease the brightness of four colors. Repeat the flow above to set L3-L7.

- And so on to finish setting L7. The start time of L8 is the end time of L7, and the end time of L8 is one minute before the start time of L1, please note that L1-L8 must be set for the whole 24 hours in DIY mode.
 until "DIY" flashing, then press

 to increase or decrease the brightness of four colors.

 to increase or decrease the brightness of four colors. Repeat the flow above to set L3-L7.
DIY Mode Default Program

| L1 | 6:30-8:00 | Color Spectrum: WRG 15%, sunrise |
| L2 | 8:00-10:00 | Color Spectrum: WRGB 60% |
| L3 | 10:00-15:00 | Color Spectrum: WRGB 100% |
| L4 | 15:00-17:00 | Color Spectrum: WRGB 60% |
| L5 | 17:00-18:30 | Color Spectrum: W 2%,R 10%,G 3%,B 0%,sunset |
| L6 | 18:30-20:30 | Color Spectrum: B 25% |
| L7 | 20:30-22:00 | Color Spectrum: B 4% |
| L8 | 22:00-6:29 | Color Spectrum: 0% |
Weather Mode
You can press any of these weather button (  ,
,  ,
,  ,
,  ) which simulates sunrise, sunset, cloudy and lightning storm mode. You'd have to press
  button manually turn the weather off. Otherwise, it will last until the ON time of DAY-L or MOON-L or L1.
For example:
When the lights are running in DAY-L/MOON-L mode, then you press sunrise button at 8 a.m., the lights will slowly ramps up to full bright in 30 minutes. If you don't turn off the weather mode manually, it will stay on, until the 18:00 the light turns into blue light. At this time, the light runs on default day light moon light mode.
- Sunrise: Enabled by a
![]() button on the remote. The lights start gradient orange lights slowly ramps up to 100% full spectrum.
button on the remote. The lights start gradient orange lights slowly ramps up to 100% full spectrum.
Sunrise Color Spectrum: R25%+G3% slowly ramps up to color spectrum B 25%, W 25%, R 25%, G 25%. - Sunset: Enabled by a
![]() button on the remote. The lights start 100% full spectrum slowly ramps down to orange lights until the light off. Duration 30 minutes.
button on the remote. The lights start 100% full spectrum slowly ramps down to orange lights until the light off. Duration 30 minutes.
Sunset Color Spectrum: B 25%, W 25%, R 25%, G 25% slowly ramps down to color spectrum B 0%, W 0%, R 0%, G 0%. - Cloudy: Enabled by a
![]() button on the remote. It is a non-adjustable color setting that is mostly blue and not very bright.
button on the remote. It is a non-adjustable color setting that is mostly blue and not very bright.
Color Spectrum: W1%+R1%+B4%+G2% - Lightning Storm: Enabled by a
![]() button on the remote. The lightning flash is set to last for 2 seconds before returning back to dark clouds, then reciprocating cycle.
button on the remote. The lightning flash is set to last for 2 seconds before returning back to dark clouds, then reciprocating cycle.
Color Spectrum: W1%+R1%+B3%+G3%
PRODUCT PARAMETERS
| MODEL | HG016 | |||||
| INPUT VOLTAGE | AC100-240V | |||||
| OUTPUT VOLTAGE | DC20V | |||||
| POWER | 18W | 24W | 30w | 36W | 42W | 58W |
| WHITE LED QUANTITY | 32 | 54 | 64 | 74 | 84 | 130 |
| RGB LED QUANTITY | 24 | 36 | 48 | 60 | 72 | 96 |
| PURPLE LED QUANTITY | 4 | 6 | 8 | 10 | 12 | 14 |
| LIGHT SIZE (without bracket) | 10.8" | 16.7" | 22.6" | 28.5" | 34.4" | 46.2" |
| APPLICATION | 12"-18" | 18"-24" | 24"-30" | 30"-36" | 36"-42" | 48"-54" |
| POWER CORD | 4.9ft+2.3ft | |||||
| COLOR TEMP | 6000-10000k | |||||
| RENDER INDEX | 89 | |||||
| LUMENS | 1000 | 1600 | 2100 | 2700 | 3100 | 3600 |
Maintenance
For maximum LED performance, it is recommended that the fixture be cleaned on a weekly basis. Unplug transformer prior to cleaning the light fixture and remove from aquarium. Wipe exposed surfaces carefully with a damp cloth to remove any dust or mineral deposits that may collect over time. Do not use detergents or harsh cleaners as it can damage the light fixture.
Troubleshooting
Light stopped working
- Please check the remote control batteries. Replace it if it is run out of battery. If still not working, please contact us to get a new power supply. Maybe the power supply damaged.
Light is not response to remote
- Unplug the light, take out the battery on the remote. Then put it back and plug in light, press on/off button to match with light.
PS: The step of taking out the battery would restore factory setting. You have to reset the light again.
Memory Function
If power failure, the light turns on at 100% full spectrum once restore. Then the light will revert back to the previous mode within one hour.
Restore Factory Default Settings
Take out the battery, you need to manually unplug the power adapter to turn off the light, reinstall the battery and reset the program.
IMPORTANT SAFETY INSTRUCTIONS

To guard against injury, basic safety precautions should be observed, including the following:
READ AND FOLLOW ALL SAFETY INSTRUCTIONS
- You should read all the important notices on the appliance before using. Failure to do so may result in loss of fish life or damage to this appliance.
![]()
to avoid possible electric shock, special care should be taken since water is employed in the use of aquarium equipment. For each of the following situations, do not attempt to repair by yourself. Return the appliance to an authorized service facility for service or discard the appliance.- Carefully examine the appliance after installation. Do not operate any appliance if it has a damaged cord or plug, or if it is malfunctioning or it is dropped or damaged in any manner. The power cord of this appliance cannot be replaced. If the cord is damaged, the appliance should be discarded. Never cut the cord.
- To avoid the possibility of the appliance plug or receptacle to one side of a wall mounted receptacle to prevent water from dripping onto the receptacle or plug. A "drip loop" (see illustration) should be arranged by the user for the cord connecting appliance to a receptacle. The drip loop is that part of the cord below the level of the receptacle or the connector if an extension cord is used to prevent water travelling along the cord and coming in contact with the receptacle. If the plug or receptacle does get wet, do not unplug the cord. Disconnect the fuse or circuit breaker that supplies power to the appliance. Then unplug and examine for presence of water in receptacle.
![]()
- This appliance is not intended for use by persons (including children) with significantly impaired physical or mental capabilities, unless they have been given supervision or instruction concerning the use of the appliance by a person responsible for their safety. Children should always be supervised to ensure that they do not play with the appliance.
- To avoid injury, do not touch moving parts or hot parts.
![]()
Always unplug or disconnect all appliances in the aquarium from electricity supply before placing hands in water, before putting on or taking off parts and while the equipment is being installed, maintained or handled. Never yank cord to pull plug from outlet. Grasp the plug and pull to disconnect. Always unplug an appliance from an out let when not in use.- Do not install or store the appliance where it will be exposed to weather or temperatures below freezing. For indoor household use only. Do not immerse.
- Make sure the appliance is mounted correctly and securely positioned on the aquarium before operating the appliance.
- If an extension cord is necessary, a cord with proper rating should be used. A cord rated for less amperes or watts than the appliance rating may overheat. Care should be taken to arrange the cord so that it will not be tripped over or pulled. The connection should be carried out by a qualified electrical installer.
- The socket-outlet shall be installed near the equipment and shall be easily accessible.


Contact information
Brand owner: Shenzhen Mago Trading Co., Ltd
Add: Bantian Group Business Central, Longgang District, Shenzhen City, Guangdong Province, China
E-mail: mago@hygger-online.com
Website: http://www.hygger-online.com
Please provide your amazon order id (amazon invoice) and shipping address by E-mail: mago@hygger-online.com if you have any problems.

Documents / Resources
References
Download manual
Here you can download full pdf version of manual, it may contain additional safety instructions, warranty information, FCC rules, etc.
Download HYGGER HG-016 - Remote Control LED Aquarium Light Manual
Advertisement


Need help?
Do you have a question about the HG-016 and is the answer not in the manual?
Questions and answers