
Related Manuals for HP Velotechnik Delta tx


Summary of Contents for HP Velotechnik Delta tx
- Page 1 INFO recumbent . . .recline in style! technology Operating Manual and Service Instructions for HP V Delta tx ELOTECHNIK December 2023...
-
Page 2: Fax +49 - 61 92 - 97
Serial number of your Delta tx and its parts:... - Page 3 Please be reminded: Send us the attached warranty registration form for your extended warranty (see page 66). This guide helps you to keep your Delta tx in perfect condition so you will always experience maximum comfort, safety, and fun.
-
Page 4: Table Of Contents
The first miles Handlebar grips Steering damper Safety instructions Legal requirements Segmenting Working on the Delta tx Segmenting the Delta tx No alteration of parts Putting the tricycle back together Frame number and identification marks Added parts and accessories Lighting system... - Page 5 GmbH & C . KG ELOTECHNIK Kapellenstrasse 49 65830 Kriftel Germany Phone +49 - 61 92 - 97 99 2 - 0 Fax +49 - 61 92 - 97 99 2 - 299 mail@hpvelotechnik.com www.hpvelotechnik.com HP V Delta tx 12/2023 ELOTECHNIK...
-
Page 6: Parts Designation
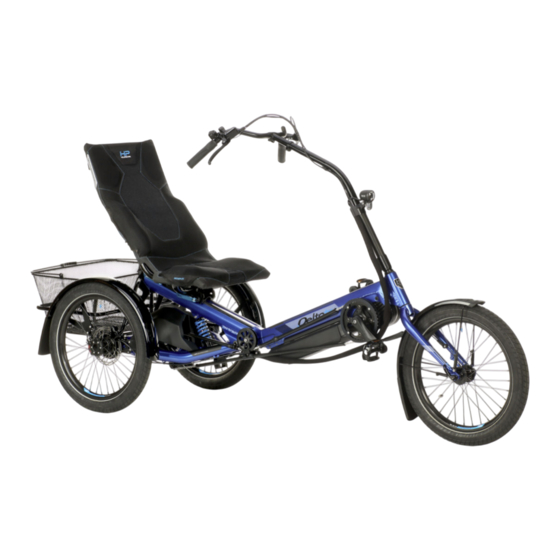
Parts designation The figure shows a Delta tx.The configuration of your tricycle may differ. 1 ErgoMesh seat 2 seat adapter 3 mudgard brackets 4 intermediate gear cover 5 rear frame part 6 chain protection tube 7 front wheel with fork... - Page 7 Parts designation View with removed wheel driver cover. 1 brake support sheet 2 rear swingarm 3 axle driver 4 intermediate gear 5 swingarm 6 intermediate gear support sheets 7 primary chain 8 suspension element 9 secondary chain 10 wheel driver cover HP V 12/2023 ELOTECHNIK...
- Page 8 11 head tube 1 front light 2 front light and cable holder 3 cable hose 4 stem lower part 5 stem middle part 6 headset adjuster 1 rear rack 2 basket 3 rear light HP V Delta tx 12/2023 ELOTECHNIK...
-
Page 9: General Safety Instructions
ELOTECHNIK The texts in the grey boxes are particularly Read the chapter “Riding your Delta tx trike” important for your safety. Please read them before your first ride and get aquainted to the carefully. Please note: The signs explained riding behaviour of your recumbent trike. -
Page 10: Loading Capacity
HP V rack is intended for use with ELOTECHNIK Delta tx with rear rack and basket the respective basket. For bicycle bags there is a special bag mount available. Smaller bags can be attached to the seat using the ErgoMesh si- de bag mounts. -
Page 11: Final Assembly
Do use high quality acid free grease, if possible a lubricant with added solid particles like Teflon or MoS .Their ingredients still work HP V Delta tx 12/2023 ELOTECHNIK... -
Page 12: Quick Release Levers
71.This first sion. Do this by screwing the adjustment nut service is the prerequisite for further use of the tricycle and for your warranty claims. HP V Delta tx 12/2023 ELOTECHNIK... -
Page 13: Safety Instructions
Safety instructions Legal requirements Working on the Delta tx When you ride your tricycle on public roads it Attention! must comply with national legislation and gui- Your bicycle has moving parts.Your fingers delines.They vary from country to country. or other body parts can be squeezed by moving parts.When carrying out adjustment,... -
Page 14: Added Parts And Accessories
The frame number is placed on the left side of the frame at the beginning of the seat rail. Fairings If you want to add an additional identification Mounting a fairing to the Delta tx is not allo- mark, we recommend to usw adhesive stic- wed. kers. -
Page 15: Taking Children With You
Safety instructions Replacement of parts: Pedelec Trailers Electric assist systems are carefully tested by To connect the trailer to your Delta tx you HP V before they are used on ELOTECHNIK must use the trailer hitch provided by HP V recumbents. - Page 16 Moisture must not be allowed to vironment. Contact your specialist dealer for condense on the rechargeable battery i.e. al- advice and further diagnosis. low the battery to adapt its temperature af- HP V Delta tx 12/2023 ELOTECHNIK...
- Page 17 After changing any setup parame- • Immediately stop using the battery. ters get aquianted to the new characteristics • Avoid inhaling smoke or fumes. in safe, traffic-free environment first. HP V Delta tx 12/2023 ELOTECHNIK...
-
Page 18: Riding Your Delta Tx Trike
20 and following in the caught on the ground and be pulled bak- chapter "Adjusting your Delta tx". kwards which could lead to a serious injury. We recommend using a pedal binding sy- Before you sit down on your tricycle and en- stem like clipless pedals (see p. - Page 19 Familiarize yourself with the behaviour of your sist level - the higher the risk of the front Delta tx with different starting gears and diffe- wheel leaving the ground or you tipping rent assist levels on flat and traffic-free terrain backwards.
- Page 20 Please note the reduced ground clearance with an anti-tip device mounted.The anti-tip device, the rear rack, or the frame of the Delta tx may be damaged if you ride over curb stones or steps contrary to the instructions given in this manual.
-
Page 21: Before Every Ride
At first, the damage may be un- tions while driving noticed.This can lead to accidents. Please check your tricycle immediately for deformations and cracks. If you are in doubt, please consult your local dealer. HP V Delta tx 12/2023 ELOTECHNIK... -
Page 22: Clothing
When you ride on a recumbent you use diffe- rent muscles than on a conventional bicycle, The pedals of your Delta tx can be exchanged and they have to be trained first.The more re- to pedals featuring a clipless binding system. - Page 23 Riding your Delta tx If there is pain in your knees occurring while riding this is usually the result of too much force put into the pedals at too low cadence. The good support of the back sometimes mis- leads to putting the full power of the legs in the pedal, similar to the leg training machines in a fitness center.When you repeat it regular-...
-
Page 24: Adjusting Your Delta Tx
11cm (4.3") higher seat position. HP V offers two different types of ELOTECHNIK mesh seats for the Delta tx: ErgoMesh seat Danger! and ErgoMesh Premium seat. Due to the increased height of HS and HS XL seats the tricycle tends to tip over easily. - Page 25 Adjusting your Delta tx Seat adapter The seat is connected to the frame of the Delta tx through a seat adapter.This adapter provides the tried-and-tested HP V ELOTECHNIK seat adjustment system in connection with a lengthwise seat position adjustment on a seat rail integrated in the tricycle frame.
- Page 26 Adjusting your Delta tx ErgoMesh Premium seat: ErgoMesh and ErgoMesh Premium: mounting and adjusting the seat frame Adjusting the mesh ErgoMesh and ErgoMesh Premium seat are both ergonomically shaped and support the natural S-curve of your spine. Forces from pe- daling are supported in the area of your lower back just above your hips (lumbar support).
-
Page 27: Cleaning
The long pads are for the seat back, the short Adjusting to leg length pads for the lower seat. Optimum adjustment of the Delta tx to your Open the “OrthoFlex”-labelled bag (hook-and- leg length is crucial for a pain-free, comforta- loop locked) and slide in the pad. -
Page 28: Adjusting The Handlebars
Components Do not push or pull the handlebars.Adjust the position of the brake levers together with the The Delta tx stem consists of three single handlebars.The hand should lie in the straight parts that provide a variety of adjustments. extension of the arm and should not be consi- derably bent at the wrist. - Page 29 Adjustment options of the Delta tx stem Middle stem part/lower stem part:There is a hole in the stem below the clamp. It must be...
- Page 30 Short stem middle part, shortened by 20 mm (0.8"), rider height 1.61 m (5.3 ft) rider height 1.61 m (5.3 ft) Standard stem middle part, rider height 1.92 m (6.3 ft) Standard stem middle part, rider height 1.92 m (6.3 ft) HP V Delta tx 12/2023 ELOTECHNIK...
-
Page 31: Adapting The Cables
Adjusting your Delta tx Adapting the cables Steering damper The cables are protected by 2 neoprene ho- The steering damper pulls the front wheel to ses, which are partially overlapping. Starting be- the center position, where it rolls straight ahe- low the front light holder the cables should lie ad.The steering damper prevents unwanted vi-... -
Page 32: Segmenting
Segmenting The Delta tx trike can be segmented into Open the 2 blue quick release lever. (The three pieces plus seat in order to make the black quick release levers stay closed, they tricycle ready for transport.Two of the three are needed to adjust the seat angle only.) -
Page 33: Putting The Tricycle Back Together
2 mage the cables. Make sure that the cables screws.They are located at the lowest point are not squeezed during assembly. of the frame on the left side of the Delta tx. HP V Delta tx 12/2023 ELOTECHNIK... - Page 34 Please pay attention to the instructions ab- out quick release levers on page 11. Do not start a journey if a clamping connec- tion is defective. In this case contact your specialist dealer for assistance. HP V Delta tx 12/2023 ELOTECHNIK...
-
Page 35: Lighting System
A failure of a LEDs in a short circuit and consequently in failure indicates a defect. In this case, contact a speci- of the electric drive system. If a defect alist dealer. should occur, contact a specialist dealer. HP V Delta tx 12/2023 ELOTECHNIK... -
Page 36: Brakes
Practice on a quiet road away from traffic. HP V Delta tx 12/2023 ELOTECHNIK... -
Page 37: Parking Brake
As an option the Delta tx can be equipped with a parking brake that is operated with a Danger! thumb-shifter mounted on the handlebars. It is... -
Page 38: Maintenance
Regularly check the thickness of brake pads possible leaks and brake discs. Do not ride the tricycle with worn-out brake pads or brake discs. HP V Delta tx 12/2023 ELOTECHNIK... - Page 39 If the pressure point conti- nues to feel soft you must not ride the tricy- le! A specialist dealer needs to bleed the whole braking system. HP V Delta tx 12/2023 ELOTECHNIK...
-
Page 40: Gear System And Chain
Your Delta tx is equipped with drivetrain divi- Danger! ded into two sections: The primary drive from Practice shifting gears on a traffic-free street. -
Page 41: Adjusting The Gear System
Chain ting gears again. The Delta tx drivetrain contains two chains. All moving parts of the gear system are affec- One longer chain is for the primary drive, one ted by wear. Cleaning and lubricating these short chain is for the secondary drive. - Page 42 Diligent lubrication is important.The chain of of the chain.Worn out chains do not fit the your Delta tx is approximately 2 times the sprockets and chain rings anymore and wear length of a standard bicycle chain (approxima- them away very quickly.
-
Page 43: Chain Protection Tubes
In order to perform any work at the chaintubes you'll have to open the chain and finally close it again. Please see also the in- structions on "Chain" on page 41. HP V Delta tx 12/2023 ELOTECHNIK... - Page 44 Now move the smooth part of the new tube through the spring and rubber tube, then expand the tube end as described above. HP V Delta tx 12/2023 ELOTECHNIK...
-
Page 45: Chain Roller
Replace the chaintube and mount it by follo- solvents since this may destroy the sealings wing the above steps vice versa. and remove grease from the bearings. If the bearings don't move smoothly anymore you'll have to replace them. HP V Delta tx 12/2023 ELOTECHNIK... -
Page 46: Unmounting The Wheels
(logo) side outwards. Rear wheels To remove a rear wheel of the Delta tx first the disc brake caliper needs to be removed from the brake disc because the brake disc stays attached to the removed wheel. - Page 47 When dismounting the right rear wheel or mounting the left rear wheel: Use a chain whip to fix the axle mounted sprocket. HP V Delta tx 12/2023 ELOTECHNIK...
-
Page 48: Tires And Tubes
Damages at the tires may lead to a sudden burst of the tire and thus result in a serious total failure of the wheel while braking and result in a serious fall! fall and injury. HP V Delta tx 12/2023 ELOTECHNIK... -
Page 49: Headset, Pedals
Adjusting the headset ning the 2 mm hexagon set screw. The fork of the Delta tx is supported by an Pedal mounting A-Head type headset.The headsets must be adjusted in order to let the fork turn easily wi- thout showing play. -
Page 50: Adjusting The Rear Suspension
R Monarch uses ce extreme variations in the load as it is air as spring medium. known from dancing on the pedals while riding uphill on a mountain bike. HP V Delta tx 12/2023 ELOTECHNIK... - Page 51 Adjusting to load The luggage carrier of your Delta tx is moun- ted to the suspended part of the frame.This way your luggage is also fully suspended and it spares the material.
-
Page 52: Coil Spring Element Dnm
Coil spring element DNM DV-22 depending on how much you weigh and how much you load your tricycle either by adjusting The Delta tx comes standard with the coil the suspension preload for fine tuning or by spring element DNM DV-22.The suspension... - Page 53 We recommend the following spring rates, de- pending on the overall weight: Load Spring stiffness • up to 80 kg: 850 lbs/inch • up to 110 kg: 1100 lbs/inch • up to 145 kg: 1500 lbs/inch HP V Delta tx 12/2023 ELOTECHNIK...
- Page 54 If there is a safety spring ring, push it back HP V Delta tx 12/2023 ELOTECHNIK...
-
Page 55: Air Shock Rock Shox Monarch
To be able to attach a air pump to the valve damper.The internal oil can become foamy. on the Delta tx you must either dismount the This may lead to some noise when the damper cover of the intermediate gear or screw on an is working.This noise does not affect the func-... - Page 56 When mounting the Air shock to the frame, take care to place it in correct position:The lever must not get in contact with the frame or swingarm when the shock is being com- pressed. HP V Delta tx 12/2023 ELOTECHNIK...
-
Page 57: Swingarm Pivot
ELOTECHNIK the bushings are machined to adjust them. Loosening the axle screws The Delta tx rear swingarm uses special axle 1 - washer, 2 - bushing screws that are equipped with fitting surfaces. To disassemble the rear swingarm, the axle can... -
Page 58: Drivetrain
For derailleur gears: Intermediate gear The intermediate gear is located in the drive train of the Delta tx between crank and rear axle. It contains the gear system of the bicycle and therefore consists of a rear hub for derail- leur gears or a gear hub.The primary chain... - Page 59 (22 teeth with 6x44mm The adapter aligns the chain line of the A LFINE IS2000 mounting pattern). If your Delta tx is chain tensioner to the chain line of the equipped with a R hub, you need a spe- hub.
-
Page 60: Secondary Drive
Check the secondary chain tension over the entire chain length by rotating the chainrings one turn. The number of chain links of the secondary chain is: Derailleur gears: 42 chain links Gear hubs: 38 chain links HP V Delta tx 12/2023 ELOTECHNIK... -
Page 61: Rear Axle
46 (rear wheel) and on page 60 (se- condary drive). Observe the specified torques and secure the screws with medium-strength threadlocker. The left-hand-threaded 16 teeth freewheel is a special part that is available through HP V ELOTECHNIK HP V Delta tx 12/2023 ELOTECHNIK... - Page 62 1. Remove the rear wheels as described on pa- ge 41. knock it all the way out of the swingarm. 2. Dismount the cover. HP V Delta tx 12/2023 ELOTECHNIK...
-
Page 63: Removal Of The Rear Axle
12. Adjust the tension of the secondary chain as described in the chapter "Secondary drive" on page 60. Disassembly of the chainring from the axle driver 13. Mount the cover over the intermediate gear. HP V Delta tx 12/2023 ELOTECHNIK... -
Page 64: Mudguards
7 mm (0.3") between mudguard and wheel. Rear mudguards Each rear mudguard on the Delta tx is atta- ched to the trike by two sheetmetal brackets. These brackets are mounted to the mudguar- d’s side flange by two screws and washers.The... -
Page 65: Water Bottle Cages
HP V ELOTECHNIK A useful alternative to water bottles are sy- stems with a "water bag" and a drinking hose, e.g. from C .You can simply strap them AMELBAK behind the seat. HP V Delta tx 12/2023 ELOTECHNIK... -
Page 66: Maintencance And Care
If ters on the relevant parts. you are in doubt consult your local bike shop. HP V Delta tx 12/2023 ELOTECHNIK... -
Page 67: Storing The Tricycle
15. film. Now polish the waxed parts of your bicy- cle with a soft cloth to make it real shiny. HP V Delta tx 12/2023 ELOTECHNIK... -
Page 68: Transport In A Car
(water bottles, basket, pumps etc.). Also disassemble the stem-handlebars-assem- bly (see chapter „Segmenting“ on page 32) and use additional straps to secure it under the re- ar frame part. HP V Delta tx 12/2023 ELOTECHNIK... -
Page 69: Tightening Torques
7–9 Nm rear axle axle driver clamp M5 size 4 5–6 Nm central bolt M8 size 8 20–22 Nm wheel driver/hub M5 size 4 5–6 Nm wheel dr. towing screws M5 size 4 5–6 Nm HP V Delta tx 12/2023 ELOTECHNIK... -
Page 70: Warranty
Bike leasing for a personal use only is not exclu- to be sent to HP V through your dea- ded. ELOTECHNIK ler. This warranty does not have any influence on the rights of the purchaser according to his statutory rights. HP V Delta tx 12/2023 ELOTECHNIK... -
Page 71: Warranty Pass
I am aware that I need to send ve special winter check offers. At any rate do the warranty registration form to HP VELOTECHNIK make an appointment. Clean your bicycle prior within four weeks of the purchase to qualify for the ex- tended warranty. - Page 72 Warranty Service at delivery 1st service At the delivery of a new Delta tx No later than 300 kilometers (190 mi) or 2 months after the purchase. Order No.: Order No.: milage approx. km: milage approx. km: Date: Date: Dealer's Stamp and Signature:...
- Page 73 Order No.: Order No.: milage approx. km: milage approx. km: Date: Date: Dealer's Stamp and Signature: Dealer's Stamp and Signature: Exchanged or additionally mounted parts: Exchanged or additionally mounted parts: HP V Delta tx 12/2023 ELOTECHNIK...
- Page 74 Order No.: Order No.: milage approx. km: milage approx. km: Date: Date: Dealer's Stamp and Signature: Dealer's Stamp and Signature: Exchanged or additionally mounted parts: Exchanged or additionally mounted parts: HP V Delta tx 12/2023 ELOTECHNIK...
- Page 75 Order No.: Order No.: milage approx. km: milage approx. km: Date: Date: Dealer's Stamp and Signature: Dealer's Stamp and Signature: Exchanged or additionally mounted parts: Exchanged or additionally mounted parts: HP V Delta tx 12/2023 ELOTECHNIK...
- Page 76 Order No.: Order No.: milage approx. km: milage approx. km: Date: Date: Dealer's Stamp and Signature: Dealer's Stamp and Signature: Exchanged or additionally mounted parts: Exchanged or additionally mounted parts: HP V Delta tx 12/2023 ELOTECHNIK...
- Page 77 Order No.: Order No.: milage approx. km: milage approx. km: Date: Date: Dealer's Stamp and Signature: Dealer's Stamp and Signature: Exchanged or additionally mounted parts: Exchanged or additionally mounted parts: HP V Delta tx 12/2023 ELOTECHNIK...
- Page 78 Order No.: Order No.: milage approx. km: milage approx. km: Date: Date: Dealer's Stamp and Signature: Dealer's Stamp and Signature: Exchanged or additionally mounted parts: Exchanged or additionally mounted parts: HP V Delta tx 12/2023 ELOTECHNIK...
- Page 79 Order No.: Order No.: milage approx. km: milage approx. km: Date: Date: Dealer's Stamp and Signature: Dealer's Stamp and Signature: Exchanged or additionally mounted parts: Exchanged or additionally mounted parts: HP V Delta tx 12/2023 ELOTECHNIK...
- Page 80 HP V Delta tx 12/2023 ELOTECHNIK...
-
Page 81: Service Plan
- a good thing to ing to the momentary technical standard and professional knowledge. have when you are going to sell your Scorpion one day. HP V Delta tx 12/2023 ELOTECHNIK... - Page 82 HP V Delta tx 12/2023 ELOTECHNIK...
- Page 83 Service plan see page before every ride monthly annually note ● ● ● ● ● ● ● ● ● ● ● ▲ ● ● ▲ ● ▲ ▲ ● ● ▲ ● ▲ ● ● HP V Delta tx 12/2023 ELOTECHNIK...
- Page 84 HP V Delta tx 12/2023 ELOTECHNIK...
- Page 85 Service plan see page before every ride monthly annually note ▲ ▲ ▲ ▲ ● ● ● ● ● ● ● ● ● ● ▲ ▲ HP V Delta tx 12/2023 ELOTECHNIK...
-
Page 86: Hp Velotechnik Gmbh & C O . Kg
INFO recumbent Liegerad- perspektiven technology GmbH & Kapellenstraße 65830 Kriftel Germany ELOTECHNIK phone +49 61 92 - 97 99 2 - 0 fax +49 61 92 61 92 - 97 99 2 - 299 mail@hpvelotechnik.com www.hpvelotechnik.com...
Need help?
Do you have a question about the Delta tx and is the answer not in the manual?
Questions and answers