
Related Manuals for ROBOTIQ AX10


Summary of Contents for ROBOTIQ AX10
- Page 1 ROBOTIQ AX10 PALLETIZING SOLUTION Original instructions (en) © 2024 Robotiq Inc. Robotiq AX10 Palletizing Solution for Universal Robots robotiq.com | leanrobotics.org User Manual...
-
Page 2: Table Of Contents
4.2. Palletizing Operation Instructions 4.3. Palletizing Operation Diagrams 4.4. Status Light States 5. URCap Software 5.1. License Agreement 5.2. Copilot 5.3. Command Window 5.4. Program Tree 5.5. Palletizing Script Functions 6. Safety Devices 6.1. General Operation 6.2. Nomenclature 6.3. Connections AX10 Palletizing Solution... - Page 3 10.1. Palletizing Solution (excluding the PowerPick10 Vacuum Gripper) 10.2. PowerPick10 Vacuum Gripper (Optional) 11. Warranty 12. Harmonized Standards 12.1. EC Declaration of Incorporation 12.2. Identification plate 13. Appendix 13.1. Palletizing Cell Layout 13.2. Pneumatic Diagram 14. Contact AX10 Palletizing Solution...
- Page 4 AX10 Palletizing Solution...
-
Page 5: Revisions
If such modification is made, the manual will also be revised, see revision information. See the latest version of this manual online at robotiq.com/support. 2024/02/22 Updated several sections to account for changes made to the AX10 palletizer to accommodate the new version of the PowerPick10 Vacuum Gripper PowerPick10 Vacuum Gripper and Vacuum Generation Unit installation and specifications... - Page 6 Added script functions Updated Installation on Universal Robots e-Series section The palletizer model is now named AX Series 2021/10/07 Updated Center of mass, tool center point (TCP) table 2021/09/22 Updated Safety Connections Appendix Pink wire is now orange AX10 Palletizing Solution...
- Page 7 Update of the Specifications section Update of the Installation section (Robot configurations) 2020/12/16 Update of the safety section Update of the installation section Update of the specifications section 2020/11/30 Update of the Installation section. 2020/11/25 Initial release AX10 Palletizing Solution...
- Page 8 Information provided by Robotiq in this document is believed to be accurate and reliable. However, no responsibility is assumed by Robotiq for its use. There may be some differences between the manual and the product if the product has been modified after the edition date.
-
Page 9: General Presentation
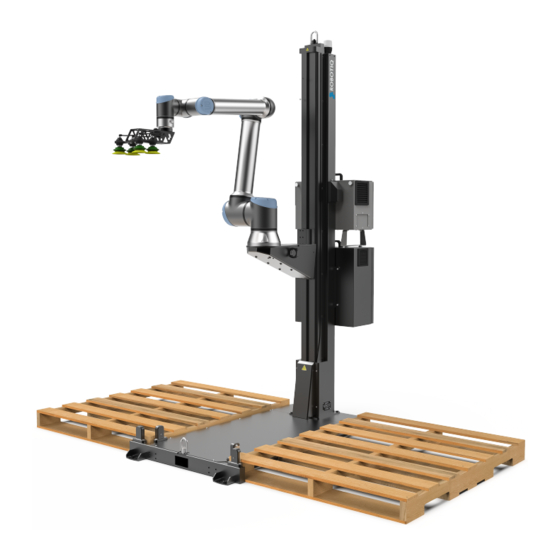
Fig. 1-1: Robotiq AX10 Palletizing Solution 1.1.1. Base and Column The Robotiq Palletizing Solution is composed of a base and a column on which all the components that are necessary to the good operation of the Solution are attached. The base has to be anchored to the floor. For more details, please refer to the Installation section... - Page 10 The kit consists of a gripper, multiple suction cups and interchangeable components, along with a dual-channel vacuum generation unit. The unit also includes a shut-off valve and an integrated filter regulator. Its design is suitable for the Robotiq Palletizing Solution when used with a UR10e robot (weight, payload, independently controllable channels).
- Page 11 NOTICE Please refer to the user manual of the PowerPick10 Gripper on Robotiq's support website for more information on other end-of-arm configurations, including suction cups, suction cup brackets, wrist extension and hollow offset links. 1.1.7. Box Detection Sensor The Solution includes a box sensor that needs to be installed at the end of the conveyor, and positioned so that it triggers a signal when a box is at the picking position.
-
Page 12: Safety
The installer is responsible for the safe installation and commissioning of the Palletizing Solution. Robotiq accepts no liability for damage, injury or any legal responsibility incurred directly or indirectly from the use of this product. The user (installer and operator) shall observe safe and lawful practices including but not limited to those set forth in this document. -
Page 13: Risk Assessment
Risk of load dropping resulting from loss of vacuum. Risk of pinching by any moving component of the Robotiq Palletizing Solution or the robot. Risk of damage or breaking if using a custom suction cup bracket that does not meet the technical requirements. - Page 14 2.2.2. Emergency Stop WARNING There is no emergency stop button directly on the Robotiq Palletizer. The emergency stop button used by the Palletizing Solution is the one found on the robot’s teach pendant. Make sure operators know how to stop the Solution in case of emergency.
- Page 15 All electric tools and devices must be safely isolated before maintenance and repair work. Always inform the operator before performing maintenance or repair work. Notify a supervisor and lock out/tag out the machine to prevent users from turning on and using the system. Enforce local safety regulations. AX10 Palletizing Solution...
- Page 16 Hot Surfaces The proper use of the Palletizing Solution does not create hot surfaces. If surfaces get hot, please stop using the Solution and contact the Robotiq support team. Radiation The proper use of the Palletizing Solution does not create non-ionizing radiation.
- Page 17 Be aware of the possible residual energy after turning off an electrical device with large capacitive components. Wait the appropriate amount of time before working on the device. Secure the work area with temporary barriers and a warning note. Secure the main switch with a padlock to prevent unauthorized switching on. AX10 Palletizing Solution...
- Page 18 Changes to the robot's safety settings may only be made by competent and authorized personnel. The changes must be verified and documented. Reducing the speed and acceleration of the robot reduces the risks as it: Gives the operator more time to react appropriately. Reduces the robot's braking time. AX10 Palletizing Solution...
-
Page 19: Use Of The Solution
The emergency stop function is intended for use in emergency conditions and not for stops in normal conditions. The Robotiq Palletizing Solution is specifically designed for palletization. Only use the Solution in its original condition without making unauthorized modifications. Only use the Solution if it is in perfect technical condition. - Page 20 The unit should be used exclusively within the range of its technical data. Any other use of the Solution is deemed improper and unintended. Robotiq will not be liable for any damages resulting from any improper or unintended use of the Solution.
- Page 21 Expected System Behavior in Normal Operating Conditions NOTICE Various types of external safety devices can interface with the Robotiq Palletizing Solution to ensure a safe operation. Please refer to the Safety Devices section for best practices on how to connect them to the linear axis controller.
- Page 22 *Calculated using the following assumptions: static force at peak current with a 90% efficient ball screw and no friction. Fig. 2-2: Safety Logic Diagram AX10 Palletizing Solution...
- Page 23 500mm/s. And so, the worst case stopping time for a Category 1 Stop of the linear axis is 560 ms (safe stop 1 + safe torque off), which corresponds to the maximum travel distance of 45mm. AX10 Palletizing Solution...
- Page 24 WARNING Please bear in mind that the reaction and response time of any sensing device that triggers the stop will add to and extend the overall stopping time (Δt). AX10 Palletizing Solution...
-
Page 25: Installation
3. Installation This section will guide you through the installation and general setup of the Robotiq Palletizing Solution. Before installing: Read and understand the safety instructions related to the Palletizing Solution. Refer to the Safety section. Verify the package according to the scope of delivery and the order. -
Page 26: Scope Of Delivery
3.1. Scope of Delivery 1 x AX10 Palletizing Solution base kit 1 x AX10 base 4 x Pallet sensors 1 x AX10 Palletizing Solution Column 1 x Linear axis (1500 mm stroke) 1 x Linear axis motor 1 x Linear axis controller... - Page 27 1 x PowerPick10 Gripper Offset Accessory kit 2 x Large suction cup brackets 1 x 120 mm Wrist Extension 1 x 100 mm Hollow Offset Link 1 x 0 mm Offset plate Air tubing Tools and hardware for installation on AX10 AX10 Palletizing Solution...
-
Page 28: Required Tools And Equipment
Fig. 3-1: Components of the Robotiq AX10 Palletizing Solution 3.2. Required Tools and Equipment The following tools are required to install the Palletizing solution. Included: 1 x 1/2 in x 6 in concrete drill bit 1 x 2 mm hex key... - Page 29 Ratcheting socket wrench with 10 mm (3/8 in) drive or adapter Torque wrench with 10 mm (3/8 in) drive or adapter, minimum torque range of 20 - 50 Nm (14.8 - 36.9 ft-lb) For the installation of the concrete anchors provided by Robotiq: Hammer drill...
-
Page 30: Environmental And Operating Conditions
Speed values might be derated at temperatures above 35 °C (95 °F). Table 3-1: Environmental and operating conditions of the Robotiq Palletizing Solution CAUTION Use of the Robotiq Palletizing Solution is not recommended in presence of chemicals. AX10 Palletizing Solution... -
Page 31: Mounting And Installation
The Robotiq Palletizing Solution is shipped on a pallet. A wooden crate protects the hardware from external elements. The wooden crate containing the Robotiq Palletizing Solution weighs 309 kg (680 lb). A forklift truck or pallet truck is therefore necessary to move it. The operation of such machinery should be done by qualified and authorized personnel. - Page 32 A minimum of two people is recommended to perform the following steps. WARNING The transport, lifting, and moving of the Robotiq Palletizing Solution should be performed by qualified and authorized personnel. Failure to do so may result in material damage, bodily injury or death.
- Page 33 12. Lower the foot base slowly and carefully. 13. Position the column vertically. Use the pivot point at the base to lift the column. AX10 Palletizing Solution...
- Page 34 14. Lift and place the column onto the base. Robotiq recommends attaching the hook at the top of the column to a lifting device (e.g., hoist) to bring the column upright. 15. Secure the column on the base using the four (4) M10 screws and washers provided. Tighten to a torque of 50 Nm.
- Page 35 987 mm 791 mm Fig. 3-2: AX10 Without Robot Although you can assemble the solution at the place of your choice, you will need to move it to its final location afterwards. You can use one of the two following methods to securely move the Solution: Using a forklift.
- Page 36 Solution is on its casters. Do not use the Solution while it stands on its casters. To make the Solution stand upright, simply screw the four (4) standing bolts, remove the casters, then unscrew the standing bolts. AX10 Palletizing Solution...
- Page 37 1. Place the robot on the robot base plate so its power cable is oriented towards the linear axis. Align properly with the two dowel pins (already installed on the robot base), and secure the robot using four (4) M8 x 25 mm screws and Belleville washers. The required torque is 20 Nm. AX10 Palletizing Solution...
- Page 38 Leave the cable carrier open for now. Do not channel the cable through the column just yet. 5. Attach the robot cable to each eand of the cable carrier using two (2) cable ties. NOTICE Do not tighten the cable ties completely. AX10 Palletizing Solution...
- Page 39 Base Cover Plate Remove the cover plate for cable management. AX10 Palletizing Solution...
- Page 40 Do NOT connect the UR control box's power cable to the UR control box. Power Connection CAUTION The Solution should only be connected to a power source once all connections have been made and completed. 1. Connect the power cable of the linear axis controller to the UR control box. AX10 Palletizing Solution...
- Page 41 3. Connect the robot's power cable to the UR control box. 4. Connect the power cable provided with the UR control box to the linear axis controller (the power cable provided with the UR control box is used to power the linear axis controller). AX10 Palletizing Solution...
- Page 42 5. Connect the Ethernet cable into the Ethernet socket on top of the linear axis controller. 6. Push the other end of the Ethernet cable through the hole under the UR control box and connect it to the USB-to-Ethernet adapter cable that is already connected. AX10 Palletizing Solution...
- Page 43 Cable Routing for Pallet Sensors and Palletizer Base 1. Channel the pallet sensor cables (W50 and W60) through the column and pull them out via hole #4. 2. Connect the pallet sensor cables to the linear axis controller. Follow cable labeling and connector identification. AX10 Palletizing Solution...
- Page 44 4. Connect the linear axis cable to the linear axis. 5. Push the grounding (green) cable of the linear axis controller into the column via hole #5 and bring it out at the front of the column. AX10 Palletizing Solution...
- Page 45 10. Remove the pneumatic plug from the end of the pneumatic tubing and connect it to the existing compressed air lines using a pneumatic fitting for 12 mm tubing (not included). Do not pressurize the Solution yet. 11. Secure the pneumatic tubing to prevent whipping hazards. AX10 Palletizing Solution...
- Page 46 SI1 0 V supply Emergency stop status signal (from Emergency Stop robot) to safety relay input of Robotiq controller (signal #1) Emergency stop status signal (from Emergency Stop robot) to safety relay input of Robotiq...
- Page 47 Do not completely remove the screws. (i.e., do not unscrew more than half a turn). Doing so can cause the column to tip over and, in turn, result in bodily injury and material damage. 2. Rotate the column counterclockwise as much as possible. AX10 Palletizing Solution...
- Page 48 CAUTION Move the robot slowly and monitor the movements to avoid collisions. 7. Rotate the column clockwise so that the side of the robot wrist touches the side of the base, as depicted in the figure below. AX10 Palletizing Solution...
- Page 49 -80° Wrist 2 -90° Wrist 3 90° If the scope of delivery of the AX10 Palletizing Solution does not include the PowerPick10 Vacuum Gripper, use the following parts to mount another generic gripper on the Palletizing Solution. AX10 Palletizing Solution...
- Page 50 1 x 0 mm Offset Plate For more information on how to install the PowerPick10 Vacuum Gripper, please refer to the Mechanical Installation section of the PowerPick10 user manual available at robotiq.com/support. WARNING Object picking causes the compression of the suction cup(s), which can result in pinching points between the gripper and the load.
- Page 51 Make sure that there is no pneumatic power present on the P+ Port located on the column under the Vacuum Generation Unit. 4. Using the provided 10 mm hex key, remove the pneumatic plug from the bulkhead fitting located on the column. AX10 Palletizing Solution...
- Page 52 3. Enter the appropriate center of mass and TCP of the gripper. NOTICE The TCP and center of mass of the PowerPick10 Vacuum Gripper can be found at section Tool Center Point and Center of Mass of the PowerPick10 user manual available at robotiq.com/support. AX10 Palletizing Solution...
- Page 53 Cable Management System Cable Management with Generic Gripper If the PowerPick10 Vacuum Gripper is not part of the scope of delivery along with the AX10, the following components are provided for the cable management of a generic gripper. 4x cable clips + 0.5 m hook and loop (VELCRO®) fastener...
- Page 54 Find the metallic mark on the tubing that is closest to the gripper (there are five (5) metallic marks in total on the tubing). At the metallic mark, tightly attach the tubing to the cable clip using a cable tie (red component in the figure below). AX10 Palletizing Solution...
- Page 55 Remove the cable entry frame from the robot base plate by unscrewing the four screws on top. Note the orientation of the cable entry frame. Open the cable entry frame by unscrewing the two screws on the side of the frame. Remove the grommets from the frame. AX10 Palletizing Solution...
- Page 56 Connect the end of the 10 mm air tubes labeled BASE SIDE to the union fittings. Push the air tube until fully seated. Back at the top of the column, remove the two (2) pneumatic plugs from the end of the 10 mm pneumatic tubes coming out of hole #1. AX10 Palletizing Solution...
- Page 57 Close all the lids of the cable carrier, starting with the lid that is closest to the opening on the column. NOTICE Please refer to the installation instructions of the igus E2 energy chain system for more details. AX10 Palletizing Solution...
- Page 58 Connect the brown wire to a 24 V terminal in a Digital Inputs block Connect the blue wire to a 0 V terminal in a Configurable Outputs block Connect the black wire to a digital input (DI) terminal (e.g. DI4, as shown in the figure below) AX10 Palletizing Solution...
- Page 59 The scope of delivery includes one (1) box sensor. Additional sensors can be ordered; refer to the Spare Parts, Kits and Accessories section for more information. AX10 Palletizing Solution...
- Page 60 And so, when both box sensors detect a box, the digital output (DO0 in the above figure) will send that combined signal to the robot. For that reason, the digital output must be connected to digital input (DI4 in the above figure) for it to be usable in the robot program. AX10 Palletizing Solution...
- Page 61 Anchoring the Solution The Robotiq Palletizing Solution must be anchored for it to be used. Contact Robotiq if anchoring is not possible. WARNING The transport, lifting, and moving of the Palletizing Solution should be done by qualified professionals. Failure to do so may result to machine damage, bodily injury or even death.
- Page 62 Anchors must be installed in conjunction with the provided serrated flange locknuts. Anchor nuts must be tightened to a torque ranging between 68 Nm and 74 Nm (50-54 lb-ft). Failure to account for these factors may result in material damage, bodily injury or death. AX10 Palletizing Solution...
- Page 63 3.4.5. Conveyor The Robotiq Palletizing Solution does not come equipped with a conveyor. However, the palletizing cell, as construed in this instruction manual, includes a conveyor. It is thus important to enforce standard EN 619 (or the equivalent in your region).
- Page 64 The Add virtual planes around pallet(s) option available in the Settings tab of the Palletizer node of the Robotiq URCap to contain the overrun within a certain distance of the pallet. Please refer to the Palletizer Node section to learn more about this option.
-
Page 65: Other Grippers
If the shape of the alternative gripper does not correspond with the shape of the following models, it might function as well, but Robotiq does not guarantee that there will be no collision. - Page 66 AX10 Palletizing Solution...
- Page 67 If a TCP offset is added in the X or Y directions, the software will act as if an extra reach bracket is being used. Bracket representation Height Width Length Direction 31.5 mm 75 mm Same length as TCP offset (X, Y) Same direction as TCP offset (X, Y) AX10 Palletizing Solution...
-
Page 68: Urcap Package
Before proceeding with the installation of the URCap package, make sure the Universal Robots control box is compatible with the URCap package. To download the latest version of the Copilot URCap required to run the Palletizing Solution, refer to the Robotiq support website robotiq.com/support under the sections Palletizing Solution, Universal Robots and Software. -
Page 69: Robot Configurations
1. Tap Installation→ Safety → Joint Limits 2. Unlock the section with the password and change the values. The minimum and maximum values for the Elbow are -167° and 3°. The minimum and maximum values for the Wrist #3 are -273° and 273°. AX10 Palletizing Solution... - Page 70 3.7.3. Configurable Outputs Some configurable outputs must be set. 1. Tap Installation→ Safety → I/O 2. Then, unlock the section with the proper password and set the Output Signal config_out[0], config_out[1] at System Emergency Stopped. AX10 Palletizing Solution...
-
Page 71: Operation
5. Activate and test the linear axis: Tap the UR+ icon → ActiveDrive toolbar→ Palletizing→ Scan (you may have to press the Start button). Use the arrows to test the linear axis action. AX10 Palletizing Solution... -
Page 72: Palletizing Operation Instructions
4.2. Palletizing Operation Instructions WARNING There is no emergency stop button directly on the Robotiq Palletizer. The emergency stop button used by the Palletizing Solution is the one found on the robot’s teach pendant. Make sure operators know how to stop the Solution in case of emergency. -
Page 73: Palletizing Operation Diagrams
The following diagrams explain the logic of the Palletizing Solution process based on the operator's actions, as well as responses such as signals, pallet and box sensor behaviors, etc. These steps are also explained in the Palletizing Operation Instructions section. Please refer to the Status Light States section for further information about light states. AX10 Palletizing Solution... -
Page 74: Status Light States
Program running without Palletizer node. YELLOW A Safeguard Stop has occurred. Press the safeguard reset button. Slow blink Pallet is complete or missing; BLUE Place a new pallet Solid The system is palletizing on the other side. AX10 Palletizing Solution... - Page 75 Place a new pallet Fast blink Pallet is not detected, system is idle. Linear axis is activated, brake is released; WHITE The Robotiq control box (PLC) is connected to the robot control box. Solid Program running without Palletizer node. GREEN A program with a Palletizer node is running but the pallet present is not completed.
-
Page 76: Urcap Software
1.4 hereof including their modifications and upgrades and their related materials; 3. Licensor means Robotiq inc., a corporation incorporated under the laws of Quebec, having its registered office at 500- 966 chemin Olivier, Lévis, Québec, Canada, G7A 2N1, which specializes into the conception, advanced manufacturing and sale of robotic products (the Licensor’s Business);... - Page 77 Such modifications and upgrades of the Software shall be installed by the End-User itself by consulting the Licensor’s Website http://robotiq.com/ where a link to proceed to such installation will be made available thereof. A new version of the Software shall not be covered by this Section 4 but shall require that a new End-User Software License Agreement be entered into between the Licensor and the End-User.
- Page 78 8. The parties confirm that they have agreed that this Agreement and all related documents be drafted in English only. Les parties aux présentes confirment qu’elles ont accepté que la présente convention et tous les documents y afférents soient rédigés en anglais seulement. AX10 Palletizing Solution...
-
Page 79: Copilot
Fig. 5-2: Copilot Configuration Tab in the Installation Menu NOTICE- Speed Slider Robotiq recommends to keep Copilot activated at all times. However, if another URCap or PolyScope option (for instance, ProfiNET or Ethernet/IP) needs to take control of the speed slider, the option Use Copilot to manage a soft speed transition when resuming from a Safeguard position can be deactivated. - Page 80 This will prevent the components of the Palletizing Solution from extending beyond this limit when in motion. 4. Open the ActiveDrive toolbar, tap Palletizing, Scan, then Start. Make sure your linear axis is ready. Fig. 5-3: ActiveDrive Toolbar Showing the Palletizer and Linear Axis Are Ready AX10 Palletizing Solution...
-
Page 81: Command Window
2. In the Command window, tap the Start button. The interface will display the Box, Pallet, Pattern and Settings blocks. Fig. 5-4: Home View of a New Palletizer Node 3. Tap the Edit button in the Settings block. Settings Block Settings Menu AX10 Palletizing Solution... - Page 82 Once enabled, the multi-recipe feature applies to the entire Palletizer node. The interface thus displays a visual indicator signaling the user that changes made to certain sections of the Settings menu will affect the entire Palletizer node. AX10 Palletizing Solution...
- Page 83 Boxes picked together must be dropped right next to each other at the same drop location (e.g., on a pallet layer). Boxes picked together must have the same dimensions. Boxes picked together must have the same payload. AX10 Palletizing Solution...
- Page 84 When enabled, this option unlocks the Distance field to enter a numerical value. This value will add to the measurement of each pallet side to create a virtual plane around it. This prevents the robot holding boxes, and the actual boxes, from reaching beyond the limits of the virtual plane. AX10 Palletizing Solution...
- Page 85 NOTICE Robotiq recommends keeping a minimum distance of 50 mm (2 in) around all pallet sides. 7. Tool speed and Tool acceleration Set the speed and acceleration of the end-of-arm tooling for: When it carries a load (With box) When it moves without carrying a load (Without box)
- Page 86 The recipe selected from the dropdown menu in the upper right corner will change the recipe for both pallets. The recipe selected from the dropdown menu in the lower right corner will change the recipe for the other pallet only. AX10 Palletizing Solution...
- Page 87 If required, duplicate a recipe and tap the OK button, or tap Cancel to go back to the list of recipes. Tap the Edit button under the name of a recipe to bring up the Box, Pallet, Pattern and Settings blocks specific to the recipe to edit. AX10 Palletizing Solution...
- Page 88 Fig. 5-10: Box Type Menu (Multi-Pick Feature) If applicable, tap the Add Box Type button to create a new box type, yet to be configured. If applicable, tap the Duplicate icon to open the duplication menu. AX10 Palletizing Solution...
- Page 89 Make sure the box type name you enter is devoid of spaces; failing to do so will prevent the program tree from calling the box type. Tap the Edit button under the name of a box type to bring up the Box menu. AX10 Palletizing Solution...
- Page 90 3. Box attributes Refer to the diagram and enter the length, width and height of the box in the corresponding fields. Enter the payload of the box in the corresponding field. AX10 Palletizing Solution...
- Page 91 NOTICE Best Practice - Multi-Pick Feature Should the user need to pick several identical boxes using one or several grippers, Robotiq recommends the following: Create a first box type (i.e., standard box type) that corresponds to a single box unit.
- Page 92 Multi-recipe > Select Recipe > Edit > Settings Block > Edit a. Box presence input dropdown menu Select the digital input to which the box presence sensor has been connected beforehand. b. Box center offset from TCP (multi-pick feature only) AX10 Palletizing Solution...
- Page 93 90- or 180-degree rotation on the Z-axis. When the multi-pick feature is enabled in the Settings menu, the system defaults to allowing the gripper to pick the boxes as if the robot wrist had performed a 180-degree rotation on the Z-axis. AX10 Palletizing Solution...
- Page 94 Tapping the Configure button will bring up the Conveyor menu. Conveyor Menu Tick the radio button that corresponds to the palletizing cell (Perpendicular, Parallel, Custom). Refer to the diagram on the interface and enter the corresponding values. AX10 Palletizing Solution...
- Page 95 When the multi-recipe feature is enabled, the home view of the Palletizer node displays the list of recipes created. Tap the Edit button under the name of a recipe to bring up the Box, Pallet, Pattern and Settings blocks specific to the recipe to edit. Tap the Edit button of the Pallet block to open the Pallet menu. AX10 Palletizing Solution...
- Page 96 If the multi-recipe feature has been enabled in the Settings menu, this callout will be shown. It informs the user of the fact that the pallet(s) selected will be processed in all recipes of the Palletizer node. AX10 Palletizing Solution...
- Page 97 Tap the Edit button under the name of a recipe to bring up the Box, Pallet, Pattern and Settings blocks specific to the recipe to edit. Tap the Edit button of the Pattern block to open the Pattern menu. Pattern Menu Fig. 5-22: Pattern Menu AX10 Palletizing Solution...
- Page 98 This preview indicates the layer sequence of the pallet pattern: A single layer pattern will display the actual name of the pattern. A multi-layer pattern will display "Mixed." 6. Edit Layer Sequence Tap the Edit Layer Sequence button to bring up the Layer Sequence menu. AX10 Palletizing Solution...
- Page 99 Multi-pick feature: Boxes that are part of the active box type are shown in light blue (including the active box, in dark blue); boxes that are not part of the active box type are shown in grey. AX10 Palletizing Solution...
- Page 100 The first box will automatically be placed at the origin (0,0) of the layer (i.e., top left corner on the pallet). The newly added box will feature a dark blue color, meaning it is the active box. NOTICE The user can select any box placed on the virtual pallet by tapping on it. AX10 Palletizing Solution...
- Page 101 Tap the Select all button to highlight all the boxes placed on the virtual pallet. The user can then move the box group altogether using the on-screen movement pad or clear the layer by tapping the minus (-) button. 8. Generate AX10 Palletizing Solution...
- Page 102 In the example below, there are five (5) layers and two (2) patterns, but bear in mind that there can be a greater number of both depending on the palletizing application at hand. The user can toggle between the different layer patterns created using the corresponding radio buttons. AX10 Palletizing Solution...
- Page 103 Tap Program > URCaps > Linear axis move to add a Linear axis move node in the robot program. The Linear axis move node can be used to move the linear axis to a specific position. It can be used inside or outside the Palletizer node. Fig. 5-27: Linear Axis Move Node - Command Window AX10 Palletizing Solution...
-
Page 104: Program Tree
7. When ticked, this box instructs the robot to make a protective stop should there be a collision. 5.4. Program Tree 5.4.1. Standard Palletizer Node Robotiq's Palletizer node provides a quick, versatile, adaptable and efficient way to program palletizing and depalletizing movements and actions. Fig. 5-28: Standard Palletizer Node in a Program Tree... - Page 105 Tip:This approach can be used to accommodate special situations such as the need to add a wait time between the sensor signal and the ready-to-palletize signal to ensure that the boxes are at the exact pick position. AX10 Palletizing Solution...
- Page 106 (Multiple Box Types - Multi-Pick Feature) section if this step has not been completed yet). Fig. 5-31: Set Node in the Thread Node 7. Tap the f(x) button adjacent to the dropdown menu. 8. In the panel that just opened, expand the Input dropdown menu. AX10 Palletizing Solution...
- Page 107 The link between box type and gripper-to-activate can vary depending on the configuration. 1. In the program tree, nest an If node within the Grip node (Program > Advanced). 2. Select the If node, tap the f(x) box in the Command window (leave the Check expression continuously box unticked). AX10 Palletizing Solution...
- Page 108 Enter the questioned equal to symbol (≟) (use the keyboard in the panel to enter the appropriate symbol). c. Open the Function dropdown menu d. Select rq_get_current_box_type(). e. Tap Submit. The result in the Command window should resemble this: AX10 Palletizing Solution...
- Page 109 19. Repeat steps 15 to 18 with the other Set node, but select the digital output to which the other gripper is assigned. In doing so, both grippers will activate when the robot will be instructed to pick up grouped boxes. The result in the program tree should resemble this: AX10 Palletizing Solution...
- Page 110 In doing so, the system will release the vacuum action in both grippers, even if only one gripper was activated. The result in the program tree should resemble this: Fig. 5-36: Set Nodes in the Release node AX10 Palletizing Solution...
- Page 111 5. This indicates the step that will occur next in the palletizing workflow. 6. The Confirm other pallet state section prompts the user to select the state of the other pallet (LEFT if the current pallet is the RIGHT one, or RIGHT if the current pallet is the LEFT one). AX10 Palletizing Solution...
- Page 112 Palletizer from processing the corresponding pallet. 7. The OK button will start the robot program based on the pallet states validated by the user. The Cancel button will close the Pallet viewer pop-up, and the robot program will not start. AX10 Palletizing Solution...
-
Page 113: Palletizing Script Functions
This function returns the linear axis position measured from the lowest point of the axis. It can be used anywhere in the program. Declaration rq_get_linear_axis_pos( ) Returned value This function returns a float which expresses the linear axis position in meters. AX10 Palletizing Solution... - Page 114 This function returns the number of processed boxes. It must be used inside the palletizer node in order to work properly. Declaration rq_get_nb_processed_boxes( ) Returned value This function returns an integer which expresses the number of processed boxes. AX10 Palletizing Solution...
- Page 115 0 = Waiting, Idle: Solution is waiting for a new pallet or a user confirmation that the pallet is ready. 1 = Ready: Pallet is ready to begin the palletizing or depalletizing process. 2 = In progress: Palletizing/depalletizing is in progress on the pallet. 3 = Completed: Pallet is full (palletizing) or empty (depalletizing). AX10 Palletizing Solution...
- Page 116 Corresponds to the recipe to process on the right side of the Palletizer. The user can leave this argument blank to continue processing the right pallet with the same recipe. The user can also enter the exact name of a specific recipe to replace the current recipe. Returned value There is no return value with this function. AX10 Palletizing Solution...
- Page 117 Box Menu or the Set Box Payload function. Generally used to manage high payloads. Declaration rq_use_payload_with_box(ratio) Parameters ratio: Percentage of the box payload. Must be between 0 and 1 (0 to 100%) Returned value There is no return value with this function. AX10 Palletizing Solution...
- Page 118 It applies to all boxes of the current box type. Generally used to manage high payloads. Declaration rq_set_box_payload(box_payload) Parameters box_payload: The mass of the box in kg. Returned value There is no return value with this function. AX10 Palletizing Solution...
-
Page 119: Safety Devices
The figure below is a configuration diagram of the linear axis controller. The portion in the red frame is where the safety connections will be made in the following subsections. Fig. 6-1: Configuration diagram of the linear axis controller with the safety connection section highlighted (red) AX10 Palletizing Solution... - Page 120 Terminal bank -X21, up until terminal block 20, is built with three-level terminal blocks. Terminal back -X21, terminal blocks 21 and up, is built with two-level terminal blocks. The figure below depicts cross-sections of two-level and three-level terminal blocks. AX10 Palletizing Solution...
- Page 121 Fig. 6-3: Cross-sections of two-level and three-level terminal blocks 6.2.4. Terminal Configuration Refer to the figure below for terminal configuration nomenclature: Fig. 6-4: Terminal Configuration Nomenclature Based on the nomenclature, the contact point in this figure would be identified as -X26.14.1. AX10 Palletizing Solution...
-
Page 122: Connections
(IN7) is allocated to Safety Scanner_1 (1). b. In this example, the second jumper goes from -X21.8.2 to -X21.8.3. The 8 terminal block (IN8) is allocated to Safety Scanner_1 (2). Fig. 6-6: Example of Jumper Connections AX10 Palletizing Solution... - Page 123 Shut down the robot and power off the linear axis controller before making inter-controller and safety signal connections. 1. Open the linear axis controller. 2. Run the safety device cable inside via the cable gland under the controller. AX10 Palletizing Solution...
- Page 124 7. Connect the ends of the second pair of wires (contact #2), each to a contact point, i.e., where one end of the jumper was initially located (-X21.14.2 to -X21.14.3). The result should look like the figure below. AX10 Palletizing Solution...
- Page 125 Fig. 6-11: Linear Axis Controller Connections 3. On terminal bank -X21, locate the two (2) jumpers that correspond to the E-stop contact point points. The 21st and 22nd terminal blocks (IN21 and IN22) are allocated to E-Stop Button. AX10 Palletizing Solution...
- Page 126 7. Connect the ends of the second pair of wires (contact #2), each to a contact point, i.e., where the ends of the second jumper were initially located (-X21.22.1 and -X21.22.2). The result should look like the figure below. Fig. 6-13: Example of External Emergency Stop Button Connections 8. Close the linear axis controller. AX10 Palletizing Solution...
- Page 127 5. Connect the ends of the pair of wires, each to a contact point, i.e., where the ends of the first jumper were initially locate (reset contact #1 to -X21.5.1 and reset contact #2 to -X21.5.3). The result should look like the figure below. AX10 Palletizing Solution...
- Page 128 Fig. 6-16: Example of Safeguard Reset Button Connections 6. Close the linear axis controller. AX10 Palletizing Solution...
-
Page 129: Specifications
7. Specifications NOTICE This manual uses the metric system. Unless specified, all dimensions are in millimeters. 7.1. Technical Dimensions 7.1.1. Linear Axis Base with Controller Fig. 7-1: Linear Axis Base with Controller - Technical Dimensions AX10 Palletizing Solution... -
Page 130: Mechanical Specifications
Maximum number of box patterns No constraint Energy source Electricity Table 7-1: Mechanical Specifications of the Robotiq Palletizing Solution Maximum box weight depends on the robot model and gripper used. Minimum box dimensions depend on pallet dimensions. Use the Robotiq Configurator to validate the combination Maximum pallet dimensions depend on your box dimensions and pallet configuration. -
Page 131: Electrical Specifications
5 A at 240 VAC Table 7-2: Electrical specifications of the Linear Axis controller. NOTICE These are the specifications of the Robotiq control box, excluding the robot. The overall voltage consumption will vary depending on the robot used. WARNING The linear axis controller is CE marked and cCSAus certified. Any modification will void the certification. -
Page 133: Periodic Inspection And Maintenance
8. Periodic Inspection and Maintenance CAUTION Maintenance operations are for the average normal use of the Robotiq Palletizing Solution. Maintenance intervals should be adjusted according to the environmental conditions. Following maintenance intervals will ensure: The correct functioning of the equipment The validity of the warranty The prescribed lifetime of the equipment. -
Page 134: Linear Axis
Examine the robot cable and pneumatic tubing inside the cable carrier.PowerPick10 Vacuum Gripper (Optional) 8.1.1. PowerPick10 Vacuum Gripper (Optional) For more information about the inspection guidelines for the Vacuum Gripper, please refer to the Maintenance section of the PowerPick10 user manual available at support.robotiq.com. 8.2. Linear Axis CAUTION For every maintenance operation, please verify the axial backlash in the ball screw. -
Page 135: Fastener Specifications
36.9 1/2"-13 Wedge anchors 54.2 40.0 Hoist ring Robot-carriage link 20.0 14.8 Lifting bracket - Linear axis link Motor Coupling Coupling collar Control box and Vacuum Generation Unit holder plates Table 8-1: Torque Values - Palletizing Solution AX10 Palletizing Solution... -
Page 136: Cleaning
PowerPick10 user manual available at support.robotiq.com. CAUTION Unless specified, any repairs performed on the Vacuum Gripper or Vacuum Generator should be done by Robotiq, otherwise the warranty will be void. 8.4. Cleaning 8.4.1. Palletizing Solution The solution should be cleaned at regular intervals depending on the environment in which it is located. -
Page 137: Spare Parts, Kits And Accessories
The following list is deemed up to date based on the moment at which this document was built. It is subject to change. Please check online for updates. Item Description Ordering Number 1 x Status Light for the Robotiq Palletizing Status Light for Palletizing Solution PAL-STAT-LIGHT Solution 1 x Type A Pallet Sensor... -
Page 138: Powerpick10 (Optional Gripper) Spare Parts & Accessories
1 x Hardware for protective earth electrical connection 1 x PowerPick10 Gripper Unit 1 x PowerPick10 Vacuum Gripper, default configuration 1 x PowerPick10 Offset Accessories kit 1 x 10 mm double air tube (3 m) 1 x Tools and hardware for installation on UR10 AX10 Palletizing Solution... - Page 139 4 x Piab 75 mm (1.5 bellows) 75 mm suction cups VAC-CUP-PIAB-75MM-G38-KIT-4 4 x 3/8-19 BSPP threaded adapters Kit of 4 suction cups 4 x Coval 78 mm (1.5 bellows) 78 mm suction cups VAC-CUP-COVAL-78MM-G38-KIT-4 4 x 3/8-19 BSPP threaded adapters AX10 Palletizing Solution...
-
Page 140: Troubleshooting
Verify the box height value. Protective stop triggered by robot Pallet height value is too high. Verify the pallet height value. placing a box on first layer Confirm that the TCP has been set Incorrect TCP. correctly. AX10 Palletizing Solution... - Page 141 Execute the centering procedure Collisions can occur with the pallet Column not centered on the base. found in the Installation section. sensor on one side, but not on the other. AX10 Palletizing Solution...
- Page 142 24V terminal block in No safeguard measure is being used, but the UR controller (bypass). none has been bypassed. Please refer to the Safety Connections section for more information. AX10 Palletizing Solution...
- Page 143 Bring the linear axis above home position (0 mm) before starting the "org.apache.xmlrpc.CmlRpcExecption: Linear axis may be below home position program. One parameter is invalid in the fromjson (0 mm). request" error message Update to the latest version of the Copilot software. AX10 Palletizing Solution...
-
Page 144: Powerpick10 Vacuum Gripper (Optional)
Robotiq, otherwise the warranty will be void. For more information on troubleshooting the PowerPick10 Vacuum Gripper, please refer to the Troubleshooting section of the PowerPick10 user manual, available at support.robotiq.com. If necessary, send an inquiry to the support team at : support@robotiq.com. -
Page 145: Warranty
Robotiq covers the Robotiq Palletizing Solution and all its components against defects in material and workmanship for a period of one year from the date of reception when utilized as intended. Robotiq also warrants that this equipment will meet applicable specifications under normal use. - Page 146 Robotiq reserves the right to make changes in the design or construction of any of its products at any time without incurring any obligation to make any changes whatsoever on units already purchased.
-
Page 147: Harmonized Standards
12. Harmonized Standards 12.1. EC Declaration of Incorporation 12.1.1. Robotiq Palletizing Solution AX10 Palletizing Solution... - Page 148 12.1.2. PowerPick10 Vacuum Gripper (Optional) AX10 Palletizing Solution...
-
Page 149: Identification Plate
12.2. Identification plate The following identification plate is riveted to the bottom of the Solution's column. AX10 Palletizing Solution... -
Page 150: Appendix
13. Appendix 13.1. Palletizing Cell Layout The figure above is a top view of the recommended palletizing cell layout and distances, with the handling of 500 mm square boxes. AX10 Palletizing Solution... - Page 151 The figure above is a side view of the recommended palletizing cell layout and distances, with the handling of 300 mm square boxes. AX10 Palletizing Solution...
- Page 152 Failure to follow this recommended layout may result in the inability to operate the Solution. The dimensions found in the figure are conservative. If for any reason it is impossible for the user to implement this layout, please contact Robotiq's application experts for assistance and support.
-
Page 153: Pneumatic Diagram
13.2. Pneumatic Diagram AX10 Palletizing Solution... -
Page 154: Contact
14. Contact Robotiq www.robotiq.com Contact Us Phone 1-888-ROBOTIQ (762-6847) (01) 418-380-2788 Outside US and Canada Technical support and engineering option 3 Sales option 2 Head office Robotiq: 966, chemin Olivier Suite 500 St-Nicolas, Québec G7A 2N1 Canada AX10 Palletizing Solution...
Need help?
Do you have a question about the AX10 and is the answer not in the manual?
Questions and answers