
Related Manuals for GeekChef GCF20FA


Summary of Contents for GeekChef GCF20FA
- Page 1 Espresso Coffee Maker User Manual Model No.: GCF20FA Toll Free: 1-844-801-8880 IMPORTANT: Read the instructions carefully before operating the appliance and keep them for future reference.
-
Page 2: Table Of Contents
TABLE OF CONTENTS Safety Instructions Product Components How To Use Cleaning And Maintenance Troublshooting Limited Warranty TECHNICAL SPECIFICATIONS Model No.: GCF20FA Power : 1350W Voltage: 120V~ 60Hz Pump Pressure: 20 Bar Capacity of Water Tank: 1.3L / 44 fl.oz Capacity of Milk Reservoir: 700 ML / 23.7 fl.oz... -
Page 3: Safety Instructions
SAFETY INSTRUCTIONS IMPORTANT SAFEGUARDS Before using this appliance, the following basic precautions should always be followed: 1. Read all the safety and operating instructions carefully and retain them for future reference. 2. Before using, check that the voltage of the wall outlet corresponds to the voltage marked on the rating plate. - Page 4 SAFETY INSTRUCTIONS 19. This appliance can be used by children aged from 8 years and above and persons with reduced physical, sensory or mental capabilities or lack of experience and knowledge if they have been given supervision or instruction concerning use of the appliance in a safe way and understand the hazards involved.
-
Page 5: Product Components
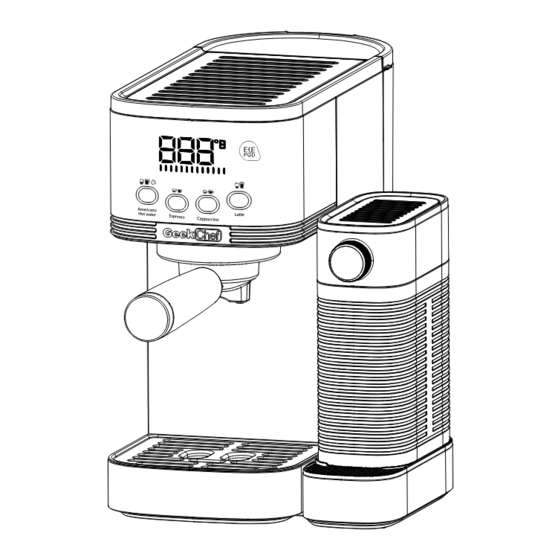
PRODUCT COMPONENTS KNOW YOUR ESPRESSO COFFEE MACHINE 1. Cup Warmer 12. Filter Holder / Portafilter 13. Measure Scoop and Tamper 2. LED Display 14. Water tank 3. Control Panel 15. Milk Reservoir Lid 4. Brew Head 16. Milk Dispensing Knob 5. - Page 6 PRODUCT COMPONENTS CONTROL PANEL A: Americano & Hot Water Button B: Espresso Button C: Cappuccino Button D: Latte Button BUTTONS’ FUNCTION TABLE: Press and hold Press once Press twice Operation for 3 seconds & Result Function Default Default Indicator Cup Size Indicator Cup Size Indicator...
-
Page 7: How To Use
HOW TO USE BEFORE THE FIRST USE CLEANING THE UNIT PRIOR TO THE FIRST USE 1. Carefully remove the unit from the packaging and remove all packaging materials. 2. Remove all accessories from the packaging and from the unit. 3. Remove the water tank. 4. - Page 8 HOW TO USE 3. Place the filter holder without coffee grounds into the brew head ensuring it is properly locked. The filter holder must be perpendicular to the machine or slightly tilted towards the right. 4. Adjust the hot water outlet position, turn it point at the cup. 5.
- Page 9 HOW TO USE 7. Place an empty cup under the brew head. Turn the milk knob point at the cup. Press and hold the Latte button for 3 seconds. The machine will start to make hot water from the milk tube. Let the hot water flow out of the milk tube for about 8 seconds, then press the Latte button again to stop.
- Page 10 HOW TO USE 1. Select the filter to be used as follows: FOR A SINGLE SHOT – use the filter for a single shot of espresso if using ground coffee, or use the E.S.E. filter if using E.S.E. (Easy Serving Espresso) pods.
- Page 11 HOW TO USE 4. Insert the filter holder into the brew head, align the filter holder with the UNLOCK " " mark and fits into the groove, and turn it counter-clockwise to the LOCK " " position. MAKING ESPRESSO 1. Place pre-warmed cup(s) underneath the filter holder. 2.
- Page 12 HOW TO USE There will be noise during the operating process. This is normal for a 20bar pump. Note: To brew less coffee than the preset serving, press the Espresso button at any time to stop the brewing process when the amount of coffee desired is reached. MAKING AMERICANO 1.
- Page 13 HOW TO USE 3. The machine will start brewing the Americano according to your selection. The machine will turn off automatically and the Americano indicator will fully illumi nate in a solid light, indicating that the cycle has been completed. Your delicious Americano is ready to be enjoyed! For a small cup, use the single shot filter.
- Page 14 HOW TO USE MAKING CAPPUCCINO 1. Slide the milk reservoir locker to the “Unlock” position. 2. Use two hands to hold the milk reservoir and lid, pull it out of the machine. The Cappuccino and Latte indicators will turn off indicating Note: the milk reservoir is not connected.
- Page 15 HOW TO USE 6. Place pre-warmed cup(s) underneath the filter holder. When brewing Cappucci no or Latte, make sure to adjust the milk dispensing knob to aim the milk dispensing tube in the direction of your cup. 7. Press the Cappuccino button once to brew a small cup of cappuccino. The Cappuccino indicator will flash in white when brewing.
- Page 16 HOW TO USE MAKING LATTE Follow the steps 1-6 for MAKING CAPPUCCINO, and then proceed following steps: 1. Press the Latte button once to brew a small cup of latte. The Latte indicator will flash in white when brewing. Press the Latte button twice to brew a large cup of latte.
- Page 17 HOW TO USE 2. Press and hold the Cappuccino button for 3 second, the machine will start to froth the milk alone. The Cappuccino indicator will flash in white and green alternately. 3. Press the Cappuccino button again to stop when the desired amount of frothed milk is reached.
- Page 18 HOW TO USE If no operation is selected within 15 seconds, the machine will Note : return to standby mode. A. CUSTOMIZE THE VOLUME OF ESPRESSO 1. To customize the volume of a single shot espresso, press the Espresso button once.
- Page 19 HOW TO USE 2. When the desired amount of frothed milk is reached, press the Cappuccino button again. Then the machine will start brewing espresso automatically. 3. When the desired amount of espresso is reached, press the Cappuccino button once again to stop. The machine will beep three times indicating that the volume has been customized successfully.
- Page 20 HOW TO USE RESETTING DEFAULT VOLUMES To reset the machine to the default volumes of Espresso, Americano, Cappuccino and Latte, press and hold the Espresso and Cappuccino buttons at the same time for 5 seconds. The machine will return to its original default settings. hold for 5 sec.
-
Page 21: Cleaning And Maintenance
CLEANING AND MAINTENANCE Regular cleaning and maintenance keep the machine in working condition and ensures perfect coffee flavor, a constant flow of coffee, and excellent milk froth for an extend period. CLEANING THE MILK RESERVOIR AND MILK DISPENSING TUBE Once you are done making your beverage with milk, you can either store the milk reservoir with milk directly in the refrigerator or completely clean the milk reservoir and milk dispensing tube. - Page 22 CLEANING AND MAINTENANCE If completely cleaning milk reservoir, follow the deep cleaning cycle instructions: 1. Place a large empty cup under the milk dispensing tube and make sure there is water in the water tank. 2. Remove milk reservoir from machine and discard any remaining milk. Fill the milk reservoir with clean water.
- Page 23 CLEANING AND MAINTENANCE CLEANING THE FILTER HOLDER/PORTAFILTER AND THE FILTERS The filter holder and filters should be kept clean to guarantee perfect results. To avoid burns, the filter must only be removed when the Warning: filter holder has cooled down completely. 1.
- Page 24 CLEANING AND MAINTENANCE CLEANING THE DRIP TRAY Empty the Drip Tray and Inner Drip Tray when required. If the red Water Level Indicator appears through the Grill, empty the Drip Tray immediately. Clean the Drip Tray and Grid weekly with warm water and a little non-abrasive washing up liquid, rinse and dry.
- Page 25 CLEANING AND MAINTENANCE 3. Press and hold the Cappuccino and Latte button together for 5 seconds. The machine will start the descaling cycle, and the descaling cycle will run 6 minutes then stop automatically. hold for 5 sec. 4. Repeat the previous steps until the tank empties. 5.
- Page 26 TROUBLESHOOTING PROBLEM CAUSE CORRECTIONS Make sure that the power plug is Machine is not switched on or plugged in, that the ON/OFF button has power plug is not plugged in. been pressed and that both coffee Machine buttons light up in white. doesn't work.
- Page 27 TROUBLESHOOTING PROBLEM CAUSE CORRECTIONS The water tank is not installed Remove the water tank and correctly Water is pooled correctly. install it. under the coffee machine. The drip tray is filled with water. Empty and clean drip tray. Too much coffee in the filter. Make sure to use the correct amount of coffee.
-
Page 28: Limited Warranty
LIMITED WARRANTY LIMITED WARRANTY Geek Technology Co., Ltd. warrants to the original consumer or purchaser this Geek Chef Espresso Coffee Maker is free from defects in material or workmanship for a period of One (1) year from the date of purchase. If any such defect is discovered within the warranty period, Geek Technology Co., Ltd. - Page 29 Geek Technology Co., Ltd. 120 US Route 46, Parsippany, NJ 07054 Toll Free 1-844-801-8880 Version Update --2022.11...
Need help?
Do you have a question about the GCF20FA and is the answer not in the manual?
Questions and answers
What size tamper do I get for this machine?