
Related Manuals for GeekChef CJ-265E


Summary of Contents for GeekChef CJ-265E
- Page 1 Espresso & Cappuccino Maker User Manual Model No.: CJ-265E Item No.: GCF20A Toll Free: 1-844-801-8880 IMPORTANT: Read the instructions carefully before operating the appliance and keep them for future reference.
-
Page 2: Specification
Safety Instructions Product Components How To Use Cleaning And Maintenance Troublshooting Limited Warranty Specification Model No. CJ-265E Item No. GCF20A Rated Voltage 120V~60Hz Rated Power 1300W Water tank capacity 900ml Product Dimension 256x193x283(mm) / 10.1x7.6x11.1(inch) -
Page 3: Important Safety Instructions
IMPORTANT SAFETY INSTRUCTIONS Read all the safety and operating instructions carefully and retain them for future reference. The appliance is designed exclusively for private use and for the envisaged purpose. This appliance is not fit for commercial use. Don’t use it outdoors. Keep it away from sources of heat, direct sunlight, humidity (never dip it into any liquid) and sharp edges. - Page 4 Do not place the device directly next to a gas or electric cooker or any other source of heat. The water tank must only be filled with cold water! The appliance is only to be used as described in the user manual. Do not use the appliance for any commercial purposes.
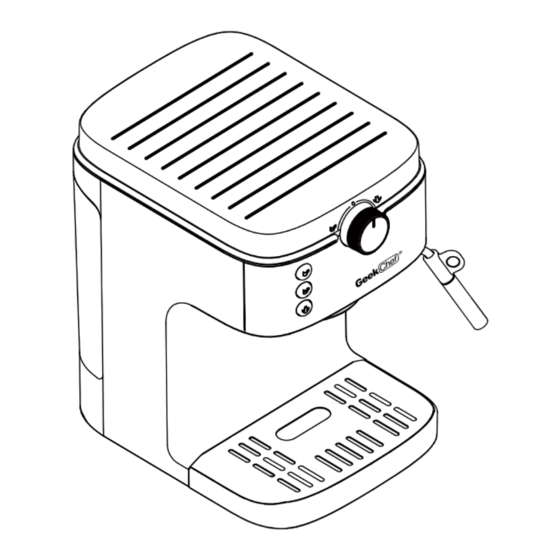
- Page 5 Unit drawings Top cover Drip tray grid Rotating knob Drip tray Espresso button (single cup) Bottom cover Espresso button (double cup) On/off switch Steam button Steam tube&nozzle Front panel Water tank Measure scoop Porta-filter: 7-1. Single cup filter 7-2. Double cup filter 7-3.
-
Page 6: How To Use
HOW TO USE BEFORE FIRST USE 1. Unpack the box with care. 2. Before using this product for the first time - It is advisable to test it only with water. - Clean the parts that will come into contact with food. 3. - Page 7 2. Fill water into the water tank NOT exceed the MAX line. Set up the water tank vertically and align the buckles to the hole on the back of the machine(fig. 3), and press it down to be parallel to the top of the machine(fig. 4). (Fig.
- Page 8 6. Wait for a while, the water will flow out from the coffee outlet. After the water stop flowing, turn the knob back to “0” position to stop(fig. 8). Pour away the water of the cup. (Fig. 8) MAKE ESPRESSO ALONE 1.
- Page 9 5. Install the porta-filter into coffee outlet at “Unlock” position(fig. 11). Hold the machine by one hand, using another hand to twist the porta-filter anticlockwise from the direction of“Unlock”to“lock”(fig. 12). (Fig. 11) (Fig. 12) 6. Place a cup on the drip tray, turn the knob to the coffee brewing side(fig. 13). Pre-heated cups will be recommended.
-
Page 10: Volume Adjusting
10. Remove the porta-filter clockwise to detach(fig. 16~17). (Fig. 16) (Fig. 17) 11. Clean the porta-filter and dry it after use. Make sure machine cool down before cleaning.. TIPS: Rotate the knob to the “0” position after coffee brewing, will help to remove the porta-filter easily. - Page 11 (Fig. 18) (Fig. 19) 3. Press down both Single Cup button and Steam button simultaneously (fig. 20) . Switch on the unit at the same time (fig. 21). (Fig. 20) (Fig. 21) 4. The Single Cup and Double Cup indicators will flash by turns. 5.
- Page 12 4. Pour desired amount of milk into the milk jug. Place the milk jug under the steam tube & nozzle. Dip the steam nozzle into the milk(fig. 23). Note: The milk must be at refrigerator temperature (not hot!) (Fig. 23) 5.
-
Page 13: Hot Water
IMPORTANT: -ALWAYS CLEAN THE STEAM TUBE&NOZZLE AFTER EACH USE -THE STEAM TUBE&NOZZLE CAN BE HOT. TAKE IT WITH CARE WHEN REMOVE AND CLEAN. Remark: The unit will dispense a small amount water to the drip tray, when the machine is in standby mode or preheating mode for steam function, and the knob is rotated to the “0”... -
Page 14: Cleaning And Maintenance
CLEANING AND MAINTENANCE BASIC CLEANING 1. Disconnect the appliance from the mains and let it cool before cleaning it with damp cloth. 2. Do not let water or any other liquid get into the machine. 3. After washing, dry all parts before fitting them together and storage. 4. - Page 15 TIPS FOR CLEANING THE SEAL RING 1. Uninstall the porta-filter in parallel from the coffee outlet from the direction of “Lock” to “Unlock”(fig. 32), then put it down(fig. 33). Pour away the coffee powder. (Fig. 32) (Fig. 33) 2. After the blue indicators stops flashing, turn the knob to coffee brewing side, press Single Cup or Double Cup button(fig.
- Page 16 1. Rotate the knob to coffee position. Press the steam button for more than 5 seconds. The unit will start the descaling of coffee brewing system for 5 minutes. During the descaling, the button lights of single cup, double cup and steam will flash once one by one.
-
Page 17: Troublshooting
TROUBLSHOOTING PROBLEM PROBABLE CAUSE Out of water from water tank, refill it. Filter hole is blocked, use a clean needle/pin No coffee comes out to unblock the hole. The ground coffee is too fine and press too tight into the filter. Change another ground coffee. Out of water from water tank, refill it. -
Page 18: Limited Warranty
LIMITED WARRANTY HOME EASY LTD warrants to the original consumer or purchaser this Geek Chef Espresso & Cappuccino Maker is free from defects in material or workmanship for a period of One (1) year from the date of purchase. If any such defect is discovered within the war- ranty period, HOME EASY LTD, at its discretion, will repair or replace the Product at no cost. - Page 19 THIS LIMITED WARRANTY DOES NOT APPLY TO 1.Failure of product to perform during power failures and interrup tions or inadequate electrical service 2.Damage caused by transportation or handling. 3.Damage caused to the product by accident, vermin, lightning, winds, fire, floods, or acts of God. 4.Damage resulting from accident, alteration, misuse, abuse, or improper installation, repair, or maintenance.
- Page 20 Kool Solutions For Life...
Need help?
Do you have a question about the CJ-265E and is the answer not in the manual?
Questions and answers