
Related Manuals for Zhiyun CRANE 4


Summary of Contents for Zhiyun CRANE 4
- Page 1 此PDF电子文档支持以下功能* 快速搜索关键词 在软件中点击搜索或 查找输入关键词 点击目录快速跳转 点击目录标题快速跳转 到各个章节内容 *需阅读软件支持, 以AdobeReader为例。...
- Page 2 CRANE 4 User Guide...
-
Page 3: Table Of Contents
Contents Product■List ■ Product■List■ ······················ 1 Get■to■Know■CRANE 4 ■ Get■to■Know■CRANE 4■ ················ 3 Battery■and■Charging ■ Battery■and■Charging■·················· 4 Mounting■and■Balancing ■ Mounting■the■Tripod■ ·················· 5 Mounting■the■Camera■ · ················· 5 Installing■TransMount■Wrist■Rest■2S■and■TransMount■Extendable■ Sling■Grip■2S■(hereinafter■referred■to■as■ “Sling■Grip” ■and■ “Wrist■ Rest” ■)■ ························ 10 Balancing■······················· 13 How■to■Use■CRANE 4 ■... - Page 4 How■to■Use■the■App ■ Downloading■the■App■ · ················· 33 How■to■Connect■ ···················· 33 ZY■Play■Feature■Description■ ··············· 35 Firmware■Upgrade■&■Calibration ■ Circumstances■When■Calibration■Is■Needed■ ········ 36 Six-side■Calibration■··················· 36 Motor■Fine-Tuning■ ··················· 38 Firmware■Upgrade■ ··················· 38 Product■Specifications ■ Disclaimer■and■Warning ■ Reading■Tips■ ····················· 43 WARNING■······················· 43 Safe■Operation■Guidelines■················ 44 Warranty■Card ■ Warranty■Period■ ···················· 45 Warranty■Exclusions■...
- Page 5 Product List Before using this product, please check carefully that all the following items are included in the product package. In case that any item is found missing, please contact ZHIYUN or your local selling agent. Lower-layer Quick Release Plate x1...
- Page 6 Product List Type-C to Mini USB LN-NBUC-A01 Type-C to Micro USB LN-MBUC-A02 Camera Control Cable x1 Camera Control Cable x1 Type-C to Type-C USB LN-UCUC-A02 Type-C to Multi USB LN-UCUS-A03 Camera Control Cable x1 Camera Control Cable x1 Fill Light Reflector x1 Storage Case x1 Sling Grip x1 * 1/4"...
- Page 7 Product List Wrist Rest x1* Items marked“*” are included in CRANE 4 COMBO.
-
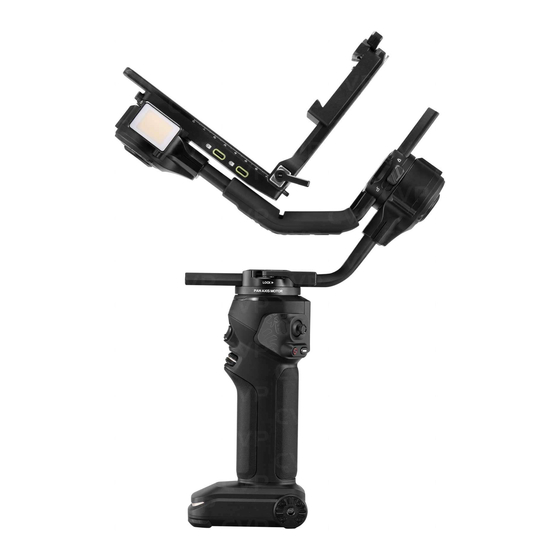
Page 8: Get To Know Crane 4
Get to Know CRANE 4 Get to Know CRANE 4 1.Upper-layer Quick Release Plate 16.Gimbal Base Lock Switch 17.Sling Grip/Phone Clamp 2.Lower-layer Quick Release Plate Installation Screw Hole 3.Upper-layer Quick Release Plate 18.Tilt Axis Motor Latch 19.Camera/Image Transmission 4.Upper-layer Quick Release Plate Control Port 5.Quick Release Plate Latch... - Page 9 Get to Know CRANE 4 37.Quick Release Plate Leveling 31. Power Button Base Latch 38.Lens Support Lock Screw 32. Wrist Rest Screw 39.Level Mount Lock Screw Hole 40.Trigger Button 33. Firmware Upgrade/ 41.Adjustment Wheel Charging Port 34. Fill Light 35.1/4" Threaded Hole...
-
Page 10: Battery And Charging
Battery and Charging Battery and Charging CRANE 4 adopts built-in battery. When using CRANE 4 for the first time, please activate the gimbal by fully charging the battery to ensure the proper function of the gimbal. Charging method: Use provided USB Type-C cable to connect the USB charger (not included in the package) to charge CRANE 4. -
Page 11: Mounting And Balancing
Mounting and Balancing Mounting the Tripod Mount the tripod to the bottom of the WEEBILL 3S handle, then unfold the tripod and place the WEEBILL 3S on a flat surface. Mounting the Camera Each axis of the gimbal is equipped with a lock switch. You can use these lock switches to lock the axes for convenient installation and storage. - Page 12 Mounting and Balancing · Please mount the camera before powering on CRANE 4 and balance the gimbal. Do not power on CRANE 4 when there’s no camera mounted on it. · Before mounting the camera, make sure it is prepared ahead of time. Remove the lens cap and make sure the camera’s battery and memory card are already in place.
- Page 13 Mounting and Balancing If installing the camera with a dual-layer quick-release plate does not allow for balancing, you can use a camera backing base and a lower quick-release plate to install the camera. First, mount the camera onto the camera backing base and tighten screw ①. Then, install the camera backing base and camera assembly onto the quick-release plate ②...
- Page 14 Mounting and Balancing 4. Installation for Portrait Orientation Unlock the quick release plate leveling base latch ①. Hold the leveling base safety lock and push it to the left until it is detached from level mount②. Install the leveling base onto the tilt axis arm ④, then lock the leveling base latch⑤. Install the camera and dual-layer quick-release plate assembly onto the leveling base ⑥, and finally, lock the quick release plate latch⑦.
- Page 15 USB / Type-C to Micro USB / Type-C to Mini USB. Choose the correct cable corresponding to the USB port type of the camera. For the compatibility details, please visit the official website of ZHIYUN (www.zhiyun-tech.com) and check the CRANE 4 Camera Compatibility List.
- Page 16 Mounting and Balancing Installing a Fill Light Reflector Align the opening of the fill light reflector with the fill light of CRANE 4, then cover the reflector over the fill light to complete installation.
-
Page 17: Installing■Transmount■Wrist■Rest■2S■And■Transmount■Extendable
Mounting and Balancing Installing TransMount Wrist Rest 2S and TransMount Extendable Sling Grip 2S (hereinafter referred to as “Sling Grip” and “Wrist Rest” ) Installing Sling Grip Align the installation screw of the sling grip with the installation screw hole ①, adjust the sling grip to the appropriate position and tighten the screw ②. - Page 18 Mounting and Balancing Installing Wrist Rest Align the installation screw of the wrist rest with the installation screw hole ①, adjust the wrist rest to the appropriate position and tighten the screw ②, and the installation is completed. According to usage needs, adjust the position of the screw by rotating the wrist rest angle ③.
-
Page 19: Balancing
Mounting and Balancing Balancing 1. Horizontal Balance of the Tilt Axis Unlock the tilt axis lock switch ① and loosen the quick release plate latch ② . Push the camera to move forward or backward ③ until the camera can stay still and almost level with its lens facing front ④...
Need help?
Do you have a question about the CRANE 4 and is the answer not in the manual?
Questions and answers