Advertisement
Quick Links
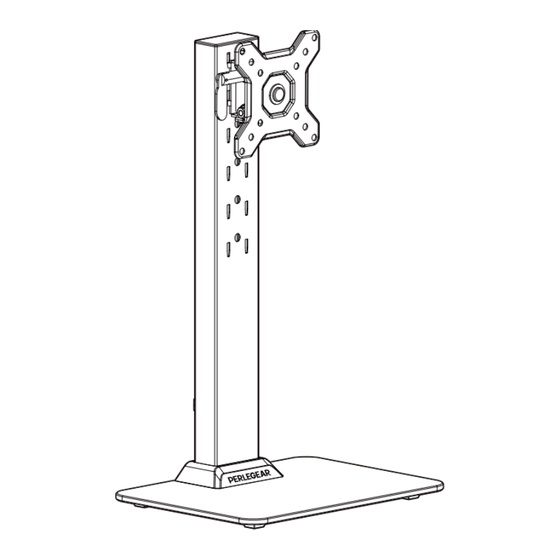
TABLETOP TV STAND
INSTRUCTION MANUAL
MODEL
PGTVS29
Thank you for choosing this Perlegear product. We strive to provide you with the best
quality products and service in the industry. If you have any installation questions or issues
with the product, please contact us at the number below.
1-800-456-5231 (US/CA) Mon–Fri, 8am–8pm (CST)
44-808-196-4165 (UK)
Mon–Fri, 2pm–10pm (UTC)
Rev01
support@perlegear.com
www.perlegear.com
Advertisement

Subscribe to Our Youtube Channel
Related Manuals for Perlegear PGTVS29


Summary of Contents for Perlegear PGTVS29
- Page 1 MODEL PGTVS29 Thank you for choosing this Perlegear product. We strive to provide you with the best quality products and service in the industry. If you have any installation questions or issues with the product, please contact us at the number below.
- Page 2 Tempered Glass Base End Cap Support Pillar Faceplate Plastic Cover Knob Cable Clip Bolt Plastic Washer Steel Washer Foot Pad...
- Page 3 Compatibility Maximum: 100 x 100mm (3.9 x 3.9″) If this stand is not compatible, please contact our Technical Support line as listed above or Customer Service at support@perlegear.com. WARNING DO NOT exceed the Max load 44 lbs indicated. Use with products heavier...
- Page 4 SUPPLIED PARTS AND HARDWARE Washer Spacer M4/M5 L2.5mm L10mm TV Bolt M4 x 12mm M4 x 30mm M5 x 16mm M5 x 25mm M6 x 15mm M6 x 25mm NOTE: The washers, spacers, and bolts shown above are displayed in accordance with actual size. Tempered Glass Base End Cap Support Pillar...
-
Page 5: Installation
INSTALLATION ATTACHING THE FACEPLATE TO YOUR TV STEP 1 SELECT TV BOLTS Only one bolt size fits your TV. Hand thread bolts into the threaded inserts on the back of your TV to determine which bolt (M4, M5 or M6) to use. We recommend screwing in at least five turns. Do not turn past the bottom of the hole. - Page 6 ATTACH THE FACEPLATE TO YOUR TV CAUTION: • The lever should be positioned toward the top of the TV. CHOOSE THE COMBINATION THAT APPLIES TO YOUR VESA HOLE PATTERN 50 x 50mm (2 x 2″) 75 x 75mm (3 x 3″) 100 x 100mm (3.9 x 3.9″) OPTION A: FOR FLAT BACK TVS Add spacers, if needed, to fit the bolt length and TV back.
- Page 7 OPTION B: FOR CURVED BACK TVS Spacers must be tall enough so that the curved back of the TV does not interfere with the mounting plate. TV Bolt B2 | C2 | D2 Washer A1 | A2 Spacer E | F Alternative Spacer Combinations OPTION C: FOR TVS WITH A BUMP...
- Page 8 OPTION D: FOR TVS WITH PROTRUDING CABLES Use spacers to create extra space between the TV and faceplate. Spacer E | F TV Bolt B2 | C2 | D2 Washer A1 | A2 Alternative Spacer Combinations OPTION E: FOR TVS WITH RECESSED HOLES Spacers need to fill in the recessed holes on the back of the TV, while keeping the faceplate as close to the TV as possible.
- Page 9 CONNECTING THE SUPPORT PILLAR TO THE BASE STEP 2 Attach the foot pads [W] to the matte side of the tempered glass base [01]. TIP: Leave a small gap between the edge of the glass and the foot pads. Secure the support pillar [02b] to the tempered glass base [01]. (Steel Washer) (Steel Washer) Desktop...
- Page 10 ATTACHING THE TV TO THE SUPPORT PILLAR STEP 3 The support pillar has five height options. Choose the best height position for your TV before moving on to attach your TV to the pillar. Examples Highest TV position Lowest TV position Highest TV position Lowest...
- Page 11 Hang the TV on the support pillar [02b]. HEAVY! You may need assistance with this step Secure the TV to the support pillar [02b] using the knob [K].
-
Page 12: Cable Management
CABLE MANAGEMENT STEP 4... -
Page 13: Swivel Adjustment
SWIVEL ADJUSTMENT STEP 5 The TV can be swivelled manually. Only swivel the TV by the TV edges. Do not press on the screen. TIP: If the TV is difficult to swivel, remove the TV, then slightly loosen the preassembled nut. Do not overloosen. - Page 14 ADJUSTING THE TILT ANGLE OF THE TV STEP 6 Slightly loosen the lever [T]. Adjust the TV to your desired tilt angle. Retighten the lever [T] to lock the tilt angle. Tilt Loosen Loosen Tighten Tighten CAUTION: DO NOT overtighten or overloosen the lever.
- Page 15 LEVELING THE TV STEP 7 Level the TV to your desired angle by hand. Level ROTATION STEP 8 If the VESA holes on the back of your display are perfectly centered, you may rotate the display 360 degrees for portrait mode. CAUTION: Only use portrait mode if the VESA holes on the back of your TV are perfectly centered.
- Page 16 THANK YOU FOR CHOOSING THIS PERLEGEAR PRODUCT 1-800-456-5231 (US/CA) Mon–Fri, 8am–8pm (CST) support@perlegear.com www.perlegear.com 44-808-196-4165 (UK) Mon–Fri, 2pm–10pm (UTC) 860-01866-00 Rev01...
Need help?
Do you have a question about the PGTVS29 and is the answer not in the manual?
Questions and answers