Sinocare iCan i3 User Manual
Hide thumbs
Also See for iCan i3:
- Quick start manual (2 pages) ,
- Startup manual (2 pages) ,
- User manual (101 pages)
Table of Contents
Advertisement
Advertisement
Table of Contents

Related Manuals for Sinocare iCan i3


Summary of Contents for Sinocare iCan i3
- Page 1 User Guide CGM User Guide LEGAL DISCLAIMER...
-
Page 2: Table Of Contents
2.3 Pair Your Sensor with the Transmitter ...........30 2.4 Apply Your Sensor .................33 2.5 Sensor Warmup ................38 Section 3: Understand Your iCan i3 CGM Results ......39 3.1 Home Screen Overview..............40 3.2 Glucose Information ..............40 3.3 Navigation and Status Bar .............46 3.4 Events....................49... - Page 3 3.5 Alerts....................51 3.6 Access ...................57 Section 4: Treatment Decisions ............60 4.1 Talk with your Healthcare Professionals (HCPs) ......61 4.2 When to Use Your Blood Glucose Meter ........61 4.3 Using Your CGM to Help for Your Treatment Decisions ....61 Section 5: End a Session ..............63 5.1 End Your Sensor Session ..............64 5.2 Remove Sensor ................66 5.3 Start New Sensor Session.............66...
-
Page 4: Legal Disclaimer
® The Bluetooth word mark and logos are registered trademarks owned by Bluetooth SIG, Inc. and any use of such marks by Sinocare Inc. is under license. Other trademarks and trade names are those of their respective owners. Apple, the Apple logo, iPhone and iPod touch are trademarks of Apple Inc., registered in the U.S. -
Page 5: Important Safety Information
(low blood glucose) or hyperglycemia (high blood glucose) occurrence and/or making a treatment decision that may result in injury. If your glucose alerts and result from the iCan i3 CGM do not match your symptoms or expectations, use a fingerstick blood glucose (BG) value from your blood glucose meter to make diabetes treatment decisions. -
Page 6: Getting Started With Ican Continuous Glucose Monitoring System (Cgm)
Getting started with iCan Continuous Glucose Monitoring System (CGM) Continuous Glucose Monitoring System (hereafter referred as CGM) gives you a more complete picture of your glucose control than blood glucose (BG) monitoring alone. Using a sensor allows you to receive up to 480 sensor glucose (SG) readings every 24 hours, filling the gaps between your BG checks. -
Page 7: Resources
Resources Tutorial: Our tutorial walks you through your first sensor session, including picking a display device, inserting the sensor, and using alerts. The tutorial is available at: iCan-cgm.com In-App Videos: There is an in-App Videos can help you learn: • Overview: See how your CGM shows where your sensor glucose is now, where it is going, and where it has been •... - Page 8 Sinocare provides Customer Care email for assistance. If you experience problems, report the issue to support@icancgm.com. When you send the request, please make sure the serial number of your device is included in your email. The serial number is listed on your sensor kit package.
-
Page 9: Section 1: System Overview
Section 1: System Overview • System Description • Intended Purpose • User Safety CGM User Guide Section 1: System Overview... -
Page 10: System Description
Sensor Pack, a Bluetooth Low Energy (BLE) Transmitter Pack, and a mobile application (APP). The iCan i3 CGM provides real-time glucose levels and allows you to continuously view your sensor glucose values on your selected mobile device. - Page 11 1.1.1 Device Components What it’s What you see What it does called This is a sterile package where Sens or Pack the Sensor is stored. The Sensor Pack is designed for single use. The Sensor-Applicator helps you Button insert the Sensor under your Safety Switch skin.
- Page 12 1.1.2 The iCan CGM APP The iCan CGM APP serves as the display for the iCan i3 CGM and supports Android and iOS devices (mobile devices). The APP is available on Google Play (Android) and the APP Store (iOS). To see a list of compatible mobile devices, visit iCan-cgm.com...
-
Page 13: Intended Purpose
1.3.1 Contraindications • Do not use the iCan i3 CGM if you are pregnant, on dialysis, implanted with a pacemakers or critically ill. It is not known how different conditions or medications common to these populations may affect performance of the system. - Page 14 Bring your Blood Glucose Meter with you when you go to your procedure. MR UNSAFE • Do not use iCan i3 CGM, if you are suffering from coagulation disorders or taking anticoagulant drugs. CGM User Guide Section 1: System Overview...
- Page 15 • No Treatment Decision if…. If your iCan i3 CGM does not show a number or arrow, or your results do not match your symptoms, use your Blood Glucose Meter to make diabetes treatment decisions.
- Page 16 • Do not use the device if you see any cracking, flaking, or damage to the transmitter. A damaged transmitter could cause injuries from electrical shocks and may make the iCan i3 CGM not work correctly. • Do not allow children or pets to put small parts in their mouth. This product poses a choking hazard for young children and pets.
- Page 17 Seek for professional medical help or contact our Customer Care Email. • Store your iCan i3 CGM between 2°C and 30°C. Do not store Sensors Pack in the freezer.
- Page 18 7 cm (3 inches) from the bleeding site. 1.3.3 Precautions 1.3.3.1 General Precautions • Avoid exposing your iCan i3 CGM to insect repellent and sunscreen. Contact with these skin care products may cause damage to your CGM. • Do not wear the iCan i3 CGM in a hot tub.
- Page 19 • Monitoring results of the product can only be used as a reference for the auxiliary diagnosis of diabetes, not as the basis for clinical diagnosis. • If there is a burning sensation, or any discomfort, please remove the CGMS immediately 1.3.3.2 Testing Your Blood Glucose Glucose levels in the interstitial fluid can be different to blood glucose levels and may mean that sensor glucose results are different to blood...
- Page 20 1.3.3.4 Potential Risks Related to Sensor Use • Going Through Security Check Point ■ When wearing your iCan i3 CGM, ask the Transportation Security Administration (TSA) for a full-body pat-down with a visual inspection of your sensor and transmitter. Don’t put your iCan i3 CGM System components through x-ray machines.
- Page 21 • Hyperglycemia or hypoglycaemia Failure to use the iCan i3 CGM according to the instructions for use and all indications, contraindications, warnings, precautions, and cautions may result in you missing a severe hypoglycemia (low blood glucose) or hyperglycemia (high blood glucose) occurrence.
-
Page 22: Section 2: Start Your Sensor
Section 2: Start Your Sensor • Prepare the Sensor • Choose a Site • Pair Your Sensor with the Transmitter • Apply Your Sensor • Sensor Warmup CGM User Guide Section 2 Start Your Sensor... -
Page 23: Prepare The Sensor
Whether you're new to CGM or experienced, you must review the Quick Start Guide and complete the In-APP tutorials before using. User Requirement: Adult diabetes user who can read, understand and follow the iCan i3 CGM Instruction of Use and Quick Start Guide could use the device safely. CGM User Guide... - Page 24 2.1.2 APP Installation and Set up Step 1: APP Setup Tap CGM APP to open the APP. Step 2: Enable notification and location access Tap “Allow” to enable Bluetooth, Location access, and allow notifications on your mobile device, so you will not miss the alerts or being denied of Bluetooth service.
- Page 25 Recommended Mobile Device Settings See your mobile device instructions to learn how to change its settings. Use the following with your CGM system: • Bluetooth on: Your transmitter and APP communicate via Bluetooth. If it is not on, you will not get alerts and CGM results. •...
- Page 26 • Time: If you are crossing various time zones, DO NOT change your smart device time manually, wait until you have arrived at your final destination to let your smart phone switch the time automatically. Note that CGM APP displays all the glucose readings of the on-going session with their testing time in the current time zone.
- Page 27 Or, if you need to create a new iCan account, follow the onscreen instructions below. CGM User Guide Section 2 Start Your Sensor...
- Page 28 Step 4: Review Tutorials Next, the App will prompt you to review safety instruction including a tutorial video that guides you on using your iCan system. Note: This in-APP overview of iCan system does not replace this Instruction for Use. Read all of the information in this Instruction for Use before using CGM APP.
- Page 29 2.1.3 System Settings The “System Settings” option under “Settings” button is where you can change your account profile, such as password and email. Changing the glucose unit of measurement used throughout the APP (mg/dL or mmol/L) Tap the “System Settings” button, select “Unit of Measurement”. If you decide to use a different unit of measurement from the default setting, you will see a confirmation message notifying that the unit of measurement has been changed.
- Page 30 Changing your email Your email address is used to log in to your account, as well as for important communications about your CGM. In the APP, tap the “System Settings” button, select “Change Email Address”. Enter the new email address you want to use, and press “Next”.
- Page 31 Data Consents Please Review and revise data consents. In the APP, tap the “System Settings” button, select “Data Consents” CGM User Guide Section 2 Start Your Sensor...
-
Page 32: Choose A Site
2.2 Choose a Site Choosing a comfortable, effective place for your sensor is important. Discuss ideal sensor insertion sites with your Healthcare Professionals (HCP). WARNING: Do not choose other sites. As the other sites have not been clinically evaluated, your sensor glucose results could be inaccurate. TIPS: •... -
Page 33: Pair Your Sensor With The Transmitter
Clean the insertion site with alcohol. Let the area air dry. 2.3 Pair Your Sensor with the Transmitter The iCan i3 CGM transmitters communicate with the APP via Bluetooth, so it must be connected with the APP before using the system. This process is also called “Pairing”. - Page 34 Transmitter, make sure you enter the correct code. If you enter the wrong code or code from another Sensor Pack, you will not be able to use the iCan i3 CGM or your glucose result could be incorrect. CGM User Guide...
- Page 35 Step 4: Pairing After clicking the "Next", the APP will instruct you how to attach Sensor to the Transmitter. You can follow the in-APP instructions below to apply your CGM. The Paring will start automatically. CGM User Guide Section 2 Start Your Sensor...
-
Page 36: Apply Your Sensor
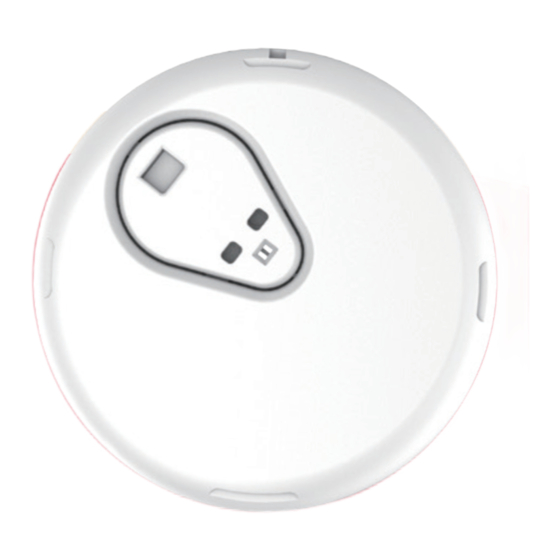
2.4 Apply Your Sensor The sensor probe is inside the Sensor-Applicator. Before applying the sensor, get familiar with the Sensor-Applicator. Button Insert sensor under your skin Sensor Sensor probe inserts through this hole Transmitter Send your glucose information from the sensor to the APP Adhesive Tape Keeps the sensor and transmitter on skin... - Page 37 Step 2: Apply the Sensor • Line up the blue arrow mark on the Sensor-Applicator with the matching blue arrow mark on the Transmitter Tray. On a hard surface, press down firmly until it comes to a stop and hear a click. •...
- Page 38 CAUTION: Do not press the white button in the middle once the Safety Switch is fully released to prevent unintended results or injury • Lift the Sensor-Applicator out of the Transmitter Tray • Now it’s ready to apply the sensor. CGM User Guide Section 2 Start Your Sensor...
- Page 39 Step 3: Apply the sensor • Place the Sensor Applicator over the prepared site and push down firmly. • Press down the button in the middle to apply the CGM Sensor. You will hear a click sound, that means the insertion is completed. •...
- Page 40 CAUTION: Discard the used Applicator according to local regulations. • Smooth down the sensor adhesive tape with a finger to ensure the sensor stays on the body for the entire duration of wear. CAUTION: Once inserted, the sensor is waterproof up to 2.5 meters, but the smart phone may not.
-
Page 41: Sensor Warmup
2.5 Sensor Warmup After inserting your sensor, the transmitter will automatically pair with your iCan CGM APP. You need to press “Start Sensor” to initiate the 2-hour sensor warmup period. During the warmup period, you will not receive alerts or CGM results. Your first results begin after the 2-hour sensor warmup has passed. -
Page 42: Section 3: Understand Your Ican I3 Cgm Results
Section 3: Understand Your iCan i3 CGM Results • Home Screen Overview • Glucose Information • Navigation and Status Bar • Events • Alerts CGM User Guide Section 3 Understand Your iCan i3 CGM Results... -
Page 43: Home Screen Overview
Graph Change from last glucose reading Current Landscape View Glucose High Glucose Alert Level Glucose Graph Low Glucose Alert Level Insulin Note Sport Note Add Note 3.2 Glucose Information CGM User Guide Section 3 Understand Your iCan i3 CGM Results... - Page 44 Glucose is changing but less than 3 mg/dL (0.16mmol/L) per 3 minutes. Trend Arrow: Rising or Falling slowly Glucose is changing slowly, more than 3 mg/dL (0.16mmol/L) or up to 6 mg/dL (0.33mmol/L) per 3 minutes. CGM User Guide Section 3 Understand Your iCan i3 CGM Results...
- Page 45 CAUTION: If you are crossing various time zones, the CGM APP displays all the glucose readings of the on-going session with their testing time in the current time zone. CGM User Guide Section 3 Understand Your iCan i3 CGM Results...
- Page 46 When the transmitter reconnects with the display device after a Signal Loss or similar issue, up to 360 hours of missed CGM results can fill in on the graph. CGM User Guide Section 3 Understand Your iCan i3 CGM Results...
- Page 47 APP, tap “Multiple Days” in the landscape view menu. The white hollow dot indicates a selected result in 1 of the days, the glucose result shows up on the top left panel. CGM User Guide Section 3 Understand Your iCan i3 CGM Results...
- Page 48 E. Time below Range (TBR) is the percentage of time that your glucose levels are low, below target ranges. CGM APP default low range is below 70 mg/dL(3.9 mmol/L). CGM User Guide Section 3 Understand Your iCan i3 CGM Results...
-
Page 49: Navigation And Status Bar
• In the APP, tap the “Events” button on the status bar at the bottom. • Tap “History Report” and select the date range for which you want to view. CGM User Guide Section 3 Understand Your iCan i3 CGM Results... - Page 50 • Tap “Event History” and you can review all Alerts information. • Tap the “SHARE” button to email the report to whom you want to share with. CGM User Guide Section 3 Understand Your iCan i3 CGM Results...
- Page 51 3.3.2 Help Guide The “Help” section provides a digital version of the iCan i3 CGM System user’s instructions including the “Quick Start Guide”, “Product Tutorials”, “Instruction for Use” and other device information. CGM User Guide Section 3 Understand Your iCan i3 CGM Results...
-
Page 52: Events
3.4 Events An event is an action or situation that affects your glucose levels. With the iCan i3 CGM System you can track your daily events so you can reflect on their effect on your glucose trends. Once entered into the APP, events can be viewed in the home screen as well as in the reports. - Page 53 For your convenience, there is no need to stop everything and enter your events as they are happening. When you have a moment, you can enter past events. Events are meant to be entered as individual occurrences. CGM User Guide Section 3 Understand Your iCan i3 CGM Results...
-
Page 54: Alerts
• Until confirmed: Vibrates and beeps 4 times every 5 minutes Otherwise, as long as your mobile device is getting CGM results and notifications, you will get your alert at 55 mg/dL (3.1 mmol/L) or lower. CGM User Guide Section 3 Understand Your iCan i3 CGM Results... - Page 55 This notifies you when your CGM results are above your target glucose range. What you hear, feel, and see: • Initial alert: Vibrates and beeps with APP notification. • Until confirmed: Vibrates and beeps 2 times every 3 minutes. CGM User Guide Section 3 Understand Your iCan i3 CGM Results...
- Page 56 Wait 10 minutes, if this still does not work, restart the mobile device and reopen the CGM APP. During signal loss, use your BG meter to check your glucose and make any treatment decisions. CGM User Guide Section 3 Understand Your iCan i3 CGM Results...
- Page 57 To change the default glucose alert levels: a. Tap “Settings” at the bottom of the Sensor Warmup screen or the home screen. b. Select “Personal Settings.” c. Tap the alert level to be changed. CGM User Guide Section 3 Understand Your iCan i3 CGM Results...
- Page 58 55 mg/dL (3.1 mmol/L) and 99 mg/dL (5.5 mmol/L). Choose the sound and message for this alert. Volume and vibration will match your mobile device settings. CGM User Guide Section 3 Understand Your iCan i3 CGM Results...
- Page 59 117 mg/dL (6.5 mmol/L) and 450 mg/dL (25.0 mmol/L). Choose the sound and message for this alert. Volume and vibration will match your mobile device settings. CGM User Guide Section 3 Understand Your iCan i3 CGM Results...
-
Page 60: Access
Settings > iCan ACCESS. Then follow the instructions on the APP screens. You can invite them by entering their name and email. CGM User Guide Section 3 Understand Your iCan i3 CGM Results... - Page 61 This shows what your “Care Partner” can see. To customize it, you can switch between “On/Off” to enable or disable an item, then tap “Send Invitation” CGM User Guide Section 3 Understand Your iCan i3 CGM Results...
- Page 62 3.6.2 Edit Status The Access screen shows the status of your “Care Partner” and lets you invite new ones. CGM User Guide Section 3 Understand Your iCan i3 CGM Results...
-
Page 63: Section 4: Treatment Decisions
Section 4: Treatment Decisions • Talk with your Health Care Professionals (HCPs) • When to Use Your Blood Glucose Meter • Using Your CGM for Treatment Decisions CGM User Guide Section 4 Treatment Decisions... -
Page 64: Talk With Your Healthcare Professionals (Hcps)
4.1 Talk with your Healthcare Professionals (HCPs) Working with your HCP, define your target glucose range and your alert settings. Discuss how to stay within your target using the iCan i3 CGM System. Let your HCP guide you through the system features,... - Page 65 Steady Arrow Actions to consider: • Low: Eat • High: Watch and wait if you took insulin recently. Otherwise, adjust insulin dose up • In target range: No action needed Arrows Going Up Actions to consider: • Low: Watch and wait •...
-
Page 66: Section 5: End A Session
Section 5: End a Session • End Your Sensor Session • Remove a Sensor • Start New Sensor Session CGM User Guide Section 5 End a Session... -
Page 67: End Your Sensor Session
5.1 End Your Sensor Session Your iCan i3 CGM is intended to last for 15 days. The Sensor will automatically stop when the 15-day session is over. You can also end the sensor session early by manually stopping it. Before it ends, you will get notifications letting you know your sensor session is ending. - Page 68 5.1.2 Manually stopping a session If you choose to stop a session before the end of the 15 days, you will need to stop it manually. In the CGM APP, tap the “Setting” button and choose “End the Monitoring”, hold the button for 3 seconds to end the current session. CGM User Guide Section 5 End a Session...
-
Page 69: Remove Sensor
5.2 Remove Sensor Pull up the edge of the adhesive tape that keeps your Sensor attached to your skin. Slowly peel away from your skin in one motion. CAUTION: Any remaining adhesive residue on the skin can be removed with warm soapy water or isopropyl alcohol. Discard the used Sensor. -
Page 70: Attachment A: Troubleshooting
Attachment A: Troubleshooting Troubleshooting sections are categorized by function or system component. The solutions here are meant to be brief and not all- inclusive. References to specific Sections for more detailed answers or preventative measures there. Are you still not sure what to do after reading this Section? If your problem is not listed, or the recommended solution here does not fix issue, contact Customer Care Email: support@icancgm.com... - Page 71 Things to Examine / Solutions Questions to Ask If a sensor tip breaks off under your skin and you cannot see it, do not try to remove it. Contact your HCP. Also seek professional medical help Broken sensor if you have symptoms of infection or inflammation (such as redness, swelling, or pain at the insertion site).
- Page 72 A.2. Transmitter Issues Things to Examine/ Solutions Questions to Ask Check the following: -The QR code on the Transmitter matches the one on the Sensor Pack (see Section 2 for details) - The transmitter and the mobile device are within 6 meters of each other and Bluetooth is on Transmitter did not pair -If the transmitter was previously connected to your mobile device but...
- Page 73 Home screen shows Low treat your high or low blood glucose. When your result is between 36 or High instead of CGM and 450 mg/dL your iCan i3 CGM will display your result instead of Low result or High. CGM User Guide...
-
Page 74: Attachment B: Security And Air Travel
Attachment B: Security and Air Travel For help with your iCan i3 CGM System, contact Customer Care Email: support@icancgm.com. WARNING: In case of emergency, contact your HCP or emergency medical response. B.1. Security Check You can use any of the following methods to go through security when... -
Page 75: Attachment C: Take Care Of Your Cgm
Attachment C: Take Care of Your CGM C.1. Maintenance Components What you shall do……. Sensor-Applicator • Keep it in the sterile package until ready for use • Do not use if it has expired Transmitter • Keep it in kit box until ready for use. Check transmitter and do not use if damaged •... - Page 76 Here is the recommended mobile device setting for your iPhone and Android mobile device. Screen Time's Downtime and APP Limits can temporarily disable apps. Screen Time You can: Turn off Downtime and APP Limits or Add CGM APP to the Always Allowed APP list Do Not Disturb silences all alerts except for the Urgent Low alert.
- Page 77 Notifications let you get alerts on your phone. If notifications for the CGM APP are off, you will not get any alerts. We recommend turning CGM APP notifications on. On iOS 15 and above, do not add the APP Notifications to Scheduled Summary.
- Page 78 logging in, creating a new account, pairing the transmitter require your display devices online, or you cannot use the CGM, which may cause Make sure your display a treatment delay. devices is online Sharing your glucose data to others also requires your display devices online, or you cannot share, which may cause inconvenience.
-
Page 79: Attachment D: Technical Information
18 years and older. Accuracy The accuracy of the iCan i3 CGM is shown in the table below. Mean absolute relative difference (MARD) is a measure that shows on average how far away the glucose sensor reading is from a blood glucose reading The iCan i3 CGM MARD is 8.71%, meaning it may... - Page 80 *Reference is venous plasma glucose value measured on YSI glucose analyzer (Yellow Springs Laboratory Instrument) Potential Clinical benefits Some potential benefits of using your iCan i3 CGM System are • Improved management of glycemic control ■ Improved management of HbA1c/A1c value (denoting improvement of glycaemic control) ■...
- Page 81 • Potential for improved quality of life ■ Decreased fingerstick testing, Increased ease of glucose monitoring ■ Decreased manual record keeping ■ Increased ability to identify and treat hypoglycemia; ■ Increased reassurance for those fearful of hypoglycemia during sleep, sports, driving etc •...
- Page 82 Operating humidity 10% - 90% Relative humidity Applied part Type BF applied part Transmitter 1 non-serviceable, non-rechargeable button cell inside Transmitter battery type the transmitter, DC 1.5 V Applied part Type BF applied part Operation Mode Continuous operation TX Frequency 2.402 GHz–2.480 GHz Bandwidth 1.06 MHz...
- Page 83 (up to 360 hours) will be transmitted from the transmitter to the display device. The iCan i3 CGM System is designed to only accept radio frequency (RF) communications from recognized and paired display devices.
- Page 84 In addition to the security provided by the BLE connection, communication between the iCan transmitter and mobile applications is protected by additional levels of security and safety mitigations using an encrypted and proprietary data format. This format embeds various methods to verify data integrity and to detect potential instances of data tampering.
- Page 85 CGM to help manage your diabetes. Your healthcare professional can help you decide how you should best use this device.
-
Page 86: Attachment E: Label Symbols
Attachment E: Label Symbols Symbol Description Manufacturer Authorized representative in the European Community/European Union UK Responsible Person Date of manufacture Use-by date Serial number Batch code IP28 IP28: Protected from touch by fingers and objects greater than 12.5 millimeters. Protected from long term immersion up to a specified pressure. Type BF Applied Part Sterilized using irradiation User Guide CGM... - Page 87 Single sterile barrier system Temperature limit Humidity limitation MR Unsafe Do not re-use Do not use if package is damaged This product must not be disposed of via municipal waste collection. Separate collection for electrical and electronic equipment waste per Directive 2012/19/EC in the European Union is required.
- Page 88 Keep Away from sunlight Keep Dry Bluetooth This symbol suggests that the CGM has acquired European technical conformity in accordance with (EU) 2017/745 Medical device Indicates a carrier that contains unique device identifier information An item which poses unacceptable risks to the patient, medical staff or other persons within the MR environment Follow instructions for use Indicates the entity importing the medical device into the locale...
-
Page 89: Attachment F: Alerts Vibrations And Sounds
Attachment F: Alerts Vibrations and Sounds F.1 Glucose Alerts Screen Description Notify when the result is below the default low glucose level (default is 55 mg/dL) Rise rate alert. Notify when the glucose result is above the High Alert level and rising quickly. - Page 90 Notify when the glucose result is above the High Alert level Notify when the glucose result is below the Low Alert level. Notify when the glucose result is above result range (default is 450 mg/dL) Notify when the glucose result is below result range (default is 36 mg/dL) User Guide CGM Attachment F Alerts Vibrations and Sounds...
- Page 91 F.2 System Alerts Screen Description Notify when the transmitter and mobile device Bluetooth connection is off Notify when user cannot connect to network, unable to connect to server. User Guide CGM Attachment F Alerts Vibrations and Sounds...
- Page 92 Notify when an incorrect QR code is scanned. After the QR code scanning is completed, it will automatically connect between smartphone and transmitter. Notify if it has not been connected for 3 minutes. Notify when binding a device that has already been bound and the monitoring session has ended.
- Page 93 Notify when the equipment status is already at the end of detection, User repeatedly click the "End Monitoring" button. Notify when there is no data within the query time period User Guide CGM Attachment F Alerts Vibrations and Sounds...
- Page 94 F.3 Abnormal Alert Screen Description Notify when there is no sensor reading or glucose reading for a while. Replace it with a new device. Or use your BG meter during the transition period. If needed, please contact your Healthcare professional Notify when the sensor produces abnormal electrical signal for a while.
- Page 95 Notify when the sensor produces abnormal electrical signal for a while. Notify when the sensor produces abnormal low value. Notify when the sensor produces abnormal high value. User Guide CGM Attachment F Alerts Vibrations and Sounds...
- Page 96 Sensor start anomaly warning Low operating temperature alert High operating temperature alert User Guide CGM Attachment F Alerts Vibrations and Sounds...
- Page 97 Notify when unable to connect to server during uploading data (automatically or manually) Notify when user enter an incorrect verification code User Guide CGM Attachment F Alerts Vibrations and Sounds...
- Page 98 Notify when unable to connect to server while viewing personal details. User Guide CGM Attachment F Alerts Vibrations and Sounds...
-
Page 99: Glossary
Glossary Blood glucose meter A device used to measure the levels of glucose in the blood. Blood glucose result The concentration of glucose in the blood, measured as either milligrams of glucose per deciliter of blood (mg/dL) or millimoles of glucose per liter of blood (mmol/L). - Page 100 (sugar), if their pancreas is damaged and does not produce insulin. Limitations A safety statement outlining specific situations in which the iCan i3 CGM should not be used because it may be harmful to you or damage the system.
- Page 101 Changsha Sinocare Inc. 265 Guyuan Road, Hi-Tech Zone, Changsha, 410205, Hunan Province, P.R. China Email: support@icancgm.com Website: iCan-cgm.com OBELIS S.A Bd. Général Wahis, 53 1030 Brussels, Belgium mail@obelis.net SUNGO Certification Company Limited floor, 70 Gracechurch Street, London. EC3V 0HR ukrp@sungoglobal.com Publication Date: 2023-12-21 P/N: 36301426-A.7...
Need help?
Do you have a question about the iCan i3 and is the answer not in the manual?
Questions and answers
Датчик не работает
If a Sinocare i3 sensor is not working, follow these troubleshooting steps:
1. Ensure the transmitter and mobile device are within 6 meters and Bluetooth is on.
2. If previously connected but now not pairing:
- Go to the Bluetooth settings on your mobile device (not in the CGM app).
- Try pairing again.
3. Make sure the SN codes on the Sensor Pack and Transmitter Pack match.
4. Turn on Bluetooth, open the app, scan the QR code on the Sensor Pack, and tap “Bind” when it turns blue.
5. Keep the app open and within 20 feet of the transmitter during pairing.
6. If the current is abnormal, a warning will be shown. Contact Customer Care.
7. During the 2-hour warm-up, the CGM results won’t be displayed.
8. If the mobile device can’t download the app, check for compatibility or switch to a supported device.
If issues continue, contact Customer Care at support@icancgm.com.
This answer is automatically generated
What to do if white button is pressed before placing sensor on site
If the white button on the Sinocare i3 is pressed before placing the sensor on the site, it may cause unintended results or injury. The document advises not to press the white button once the Safety Switch is fully released. If this occurs, the sensor may need to be discarded and a new one used.
This answer is automatically generated
Я как наблюдатель тоже должна отсканировать датчик, потому что система на этом этапе дальше не пускает?
Я не могу подключиться как наблюдатель, код приглашения приходи на почту , но при введении на шаге 2 система пишет что код неверный!!!