Table of Contents
Advertisement
Available languages
Available languages
Quick Links
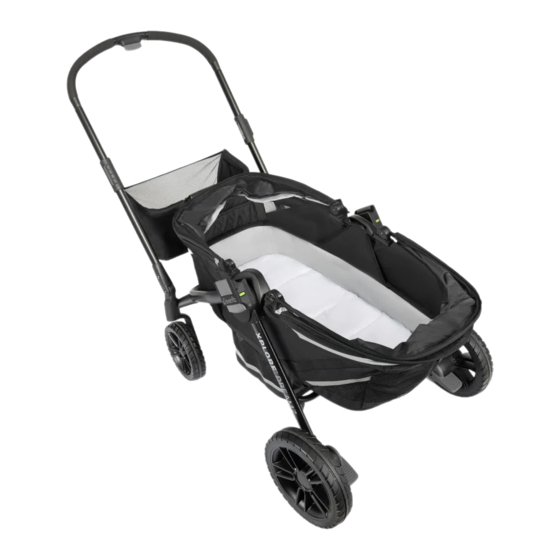
CARRIOLA VAGONETA TODO TERRENO CON MOISÉS
Wagon
Up to 55 lbs (25 kg) / Seat
Up to 33 lbs (14.9 kg) / Bassinet
Up to 39 in. (99 cm) / Seat
Minimum age: 6 months / Bassinet
Vagoneta Hasta 25 kg (55 lb) / Asiento
Hasta 14,9 kg (33 lb) / Moisés
Hasta 99 cm (39 in) / Asiento
Edad mínima: 6 meses / Moisés
Read all instructions before assembly and use of product.
KEEP INSTRUCTIONS FOR FUTURE USE.
Lea todas las instrucciones antes de ensamblar y usar el
producto.
GUARDE LAS INSTRUCCIONES PARA USO FUTURO.
©2023 Evenflo Company, Inc.
US PATENT NUMBER / NÚMERO DE PATENTE ESTADOUNIDENSE
25701779 05/23
11001289B2
Advertisement
Chapters
Table of Contents

Related Manuals for Evenflo PIVOT XPLORE DREAMZ


Summary of Contents for Evenflo PIVOT XPLORE DREAMZ
- Page 1 Read all instructions before assembly and use of product. KEEP INSTRUCTIONS FOR FUTURE USE. Lea todas las instrucciones antes de ensamblar y usar el producto. GUARDE LAS INSTRUCCIONES PARA USO FUTURO. 25701779 05/23 ©2023 Evenflo Company, Inc. US PATENT NUMBER / NÚMERO DE PATENTE ESTADOUNIDENSE 11001289B2...
-
Page 2: Table Of Contents
TABLE OF CONTENTS Warnings ..........4–5 Important Information . - Page 3 FEATURES 1. Parent’s Handle 14. Fold Release Levers 2. Adjustable Handle Button 15. Footwell 3. T-slot Brackets 16. Easy Entry Release Lever 4. Bassinet Insert 17. 3-Point Child’s Harness 5. Basket Cupholder 18. Child’s Tray 6. Storage Basket 19. Bassinet Attachment Zipper 7.
-
Page 4: Warnings
WARNING READ AND FOLLOW ALL WARNINGS AND INSTRUCTIONS! FAILURE TO DO SO COULD RESULT IN SERIOUS INJURY OR DEATH! • NEVER leave children unattended. ALWAYS keep children in view while in the product. • Adult assembly required. Take care when unpacking and assembling; contains small parts and some items with sharp edges. - Page 5 • Sharp or heavy objects placed in pockets may cause damage to the product, or injury to the child. • Contact Evenflo ParentLink at 1-800-233-5921 (USA) or 800-706-1200 (Mexico) with any questions regarding use of your product. • To avoid product instability and tip-overs, DO NOT load storage pockets with over 1 lb (0.45 kg), and storage basket with over 10 lbs (4.5 kg).
-
Page 6: Important Information
It is very important to assemble the product according to these instructions. If you are missing parts, do not use product and call Evenflo ParentLink at 1-800-233-5921 (U.S.A.) or 800-706-1200 (Mexico) to order replacement parts. For additional use configurations with optional accessories, you can refer to the manuals that are provided with the Pivot Xplore Accessories, which are sold separately. -
Page 7: Identification Of Parts
IDENTIFICATION OF PARTS Left Front Wheel Right Front Wheel (2) Rear Wheel Assembly Assembly (Green Indicator) (Yellow Indicator) (2) Nuts & Bolts (1 Spare Included) (2) Hex Wrench (2) Canopy Child’s Tray Bassinet Insert Storage Basket Parent’s Handle Frame * styles may vary... -
Page 8: Choosing Mode Of Use
CHOOSING MODE OF USE YOUR PRODUCT CAN BE USED IN THREE DIFFERENT MODES: STROLLER MODE, WAGON MODE OR BASSINET MODE. After the frame and the wheels have been assembled, you can choose to set the product up in Stroller Mode, Wagon Mode or Bassinet Mode. Follow instructions on pages 9–16. -
Page 9: Assembling Your Product
ASSEMBLING YOUR PRODUCT Note: To protect flooring, place a protective covering (cardboard, towel, small rug or blanket) beneath the product during assembly. A. Align parent’s handle and slide it into handle mounts. CHECK to ensure holes are aligned. If holes do not align, flip handle and reas- semble. - Page 10 ASSEMBLING YOUR PRODUCT WARNING To avoid injury to fingers or hands, care must be taken when opening CLICK! and closing the product to prevent injury in hinge areas. 1. Lock parent’s handle onto handle mount by pushing on both sides until each side clicks into place.
- Page 11 ASSEMBLING YOUR PRODUCT 4. Locate left and right front wheel assemblies. The left wheel will be marked with a green colored dot. To attach front left wheel, match green colored dot with green colored dot on frame. Line up metal pin with hole in front wheel mount and push on to frame as CLICK! shown until it clicks into place.
- Page 12 ASSEMBLING YOUR PRODUCT 6. While holding the parent’s handle with your right hand, squeeze fold release lever with your left hand. Holding fold release lever in, press down with your right hand. 7. Lift back of product frame until both sides click in place and the lock indicators show GREEN.
- Page 13 ASSEMBLING YOUR PRODUCT 8. Next, lift front of frame until both sides click in place. Press CLICK! on frame to make sure it is securely locked in place. 9. Check that the top rail is fully latched. Check both sides to ensure that the red indicators are not visible.
- Page 14 ASSEMBLING YOUR PRODUCT 10. Squeeze adjustable handle button and pull to fully extend parent handle until it CLICKS into place at your most comfortable position. CLICK! 11. To attach storage basket, lift seatback flaps. Align locator teeth on basket and basket mount and push down on sides of basket until storage basket is securely in...
- Page 15 ASSEMBLING YOUR PRODUCT 13. To attach child tray, align t-slots on both sides. Push tray until both sides CLICK in place. Pull up on tray to make sure it is locked into place. CLICK! CLICK! To remove, press down on gray buttons on either side of child’s tray and lift tray 14.
-
Page 16: Using Your Canopy
ASSEMBLING YOUR PRODUCT To remove canopy, press on tab and slide canopy back as shown. Repeat on other side. USING YOUR CANOPY 1. To extend canopy, pull it up as shown. To close, push canopy down as shown. 2. The canopy can be used as 2 or 3 panels. -
Page 17: Converting From Stroller To Wagon Mode
CONVERTING FROM STROLLER TO WAGON MODE WARNING To avoid injury to fingers or hands, care must be taken when opening and closing the product to prevent injury in hinge areas. 1. To convert from stroller to wagon mode, lock both rear wheels (See p. -
Page 18: Attaching The Bassinet Insert
ATTACHING THE BASSINET INSERT WARNING Use in bassinet mode only when child is lying down and sleeping. Only use bassinet mode with children at least 6 months old. Discontinue use of bassinet mode when infant has reached 33 lbs (14.9 kg). Follow the instructions to unfold stroller wagon (pg. -
Page 19: Removing The Bassinet Insert
ATTACHING THE BASSINET INSERT 5. Attach the bassinet brackets to the t-slots on both sides of the stroller wagon. Push bassinet brackets into slots until both sides CLICK into place. CLICK! NOTE: Child tray cannot be installed when bassinet is in place. REMOVING THE BASSINET INSERT 1. -
Page 20: Using Your Brakes
USING YOUR BRAKES WARNING To avoid serious injury, always lock brakes. Make sure brakes are on by trying to push the product. To lock, push lever DOWN at bottom of brake as shown. CLICK! To unlock, push lever UP at top of brake as shown. -
Page 21: Using Parent's Handle
USING PARENT’S HANDLE To extend parent’s handle, squeeze button on handle and pull handle out until it locks into one of the three height positions. To lower parent’s handle, squeeze button and push handle down until it locks into position. NOTE: In wagon mode, it is recommended the parent’s handle is used all the way down. -
Page 22: Securing Your Child
SECURING YOUR CHILD WARNING To avoid serious injury from falling or sliding out, ALWAYS use waist restraint. For easy entry into CLICK! stroller wagon, stand in front of product and squeeze easy entry release lever. Lower front of stroller wagon down. Once child enters stroller wagon, lift front of stroller wagon back up until it... -
Page 23: Folding Your Product
FOLDING YOUR PRODUCT WARNING To avoid injury to fingers or hands, care must be taken when opening and closing the product to prevent injury in hinge areas. CLICK! 1. Make sure parent’s handle is in stroller mode position by pushing it into frame lock until it clicks into place. - Page 24 FOLDING YOUR PRODUCT 4. Lower front of stroller wagon down using easy entry release lever. 5. Standing in front of product, squeeze fold release lever on both sides of frame and pull up into self-standing position. Walk around to the back, lean the stroller wagon on its rear wheels,...
-
Page 25: Care And Maintenance
FOLDING YOUR PRODUCT 6. Next, lift front of stroller wagon frame until both sides click in place. Press on frame to make sure it is securely locked in place. CLICK! CARE AND MAINTENANCE • Clean minor spills and stains on cloth or plastic surfaces with cold water and mild soap. -
Page 26: Limited Warranty
Product (including any accessories) against defects in material or workmanship. Evenflo’s sole obligation under this express limited warranty shall be, at Evenflo’s option, to repair or replace any Product that is determined to be defective by Evenflo and determined to be covered by this warranty. - Page 28 ÍNDICE Advertencias ..........4–5 Información importante .
- Page 29 CARACTERÍSTICAS 1. Asa para los padres 14. Palancas de desbloqueo del 2. Botón para ajustar el asa plegado 3. Soportes para ranura en T 15. Espacio para los pies 4. Inserto para moisés 16. Palanca de desbloqueo de 5. Portavasos de la canasta entrada fácil 6.
-
Page 30: Advertencias
ADVERTENCIA ¡LEA Y SIGA TODAS LAS ADVERTENCIAS E INSTRUCCIONES! ¡NO HACERLO PODRÍA OCASIONAR LESIONES GRAVES O LA MUERTE! • NUNCA deje a los niños desatendidos. SIEMPRE mantenga a los niños a la vista mientras estén en el producto. • Se requiere que un adulto ensamble el producto. Tenga cuidado al desempacar y ensamblar el producto;... - Page 31 • Los objetos afilados o pesados colocados en los bolsillos pueden causar daños al producto o lesiones al niño. • Póngase en contacto con Evenflo ParentLink llamando al 1-800-233- 5921 (EE.UU.) o al 800-706-1200 (México) con cualquier pregunta sobre el uso de su producto.
-
Page 32: Información Importante
Guarde estas instrucciones para referencia futura. Es muy importante que ensamble el producto de acuerdo con estas instrucciones. Si le faltan pie- zas, no utilice el producto y llame a Evenflo ParentLink al 1-800-233-5921 (EE.UU.) o 800-706-1200 (México) para solicitar piezas de repuesto. -
Page 33: Identificación De Las Partes
IDENTIFICACIÓN DE LAS PARTES Ensamblado de la rueda Ensamblado de la (2) Rueda trasera delantera izquierda rueda delantera (Indicador verde) derecha (Indicador amarillo) (2) Tornillos y tuercas (1 Recambio incluido) (2) Llave hexagonal (2) Capota Charola infantil Inserto para moisés Canasta de almacena Asa para los padres Armazón... -
Page 34: Cómo Elegir El Modo De Uso
CÓMO ELEGIR EL MODO SU PRODUCTO PUEDE UTILIZARSE EN TRES MODOS DIFERENTES: MODO CARRIOLA, MODO VAGONETA O MODO MOISÉS. Una vez montados el bastidor y las ruedas, puede elegir montar el producto en Modo de carriola, Modo vagoneta o modo moisés. Siga las instruccio- nes de las páginas 9-16. -
Page 35: Cómo Ensamblar El Producto
CÓMO ENSAMBLAR SU PRODUCTO Nota: Para proteger el suelo, coloque una cubierta protectora (cartón, toalla, tapete pequeño o manta) debajo del producto durante el montaje. A. Alinee el asa de los padres y deslícela en los soportes del asa. COMPRUEBE que los orificios estén alineados. - Page 36 CÓMO ENSAMBLAR SU PRODUCTO ADVERTENCIA Para evitar lesiones en los dedos o las manos, debe ¡CLIC! tenerse cuidado al abrir y cerrar el producto para evitar lesiones en las zonas de las bisagras. 1. Bloquee el asa de los padres en el soporte del asa empujando en ambos lados hasta que cada lado encaje en su sitio.
- Page 37 CÓMO ENSAMBLAR SU PRODUCTO 4. Localice los módulos de las ruedas delanteras izquierda y derecha. La rueda izquierda se marcará con un punto de color verde. Para fijar la rueda delantera izquierda, haga coincidir el punto de color verde con el punto de color verde del armazón.
- Page 38 CÓMO ENSAMBLAR SU PRODUCTO 6. Mientras sujeta el asa de los padres con la mano derecha, apriete la palanca de desbloqueo del plegado con la mano izquierda. Manteniendo la palanca de desbloqueo del plegado hacia dentro, presione hacia abajo con la mano derecha.
- Page 39 CÓMO ENSAMBLAR SU PRODUCTO 8. A continuación, levante la parte delantera del armazón ¡CLIC! hasta que ambos lados encajen en su sitio. Presione sobre el armazón para asegurarse de que está bien bloqueado en su sitio. 9. Compruebe que el riel superior esté...
- Page 40 CÓMO ENSAMBLAR SU PRODUCTO 10. Apriete el botón del asa ajustable y tire para extender completamente el asa de los padres hasta que ENCAJE en su posición más cómoda. ¡CLIC! 11. Para fijar la cesta de almacenamiento, levante las solapas del respaldo. Alinee los dientes localizadores de la cesta y el soporte de la cesta y...
- Page 41 CÓMO ENSAMBLAR SU PRODUCTO 13. Para fijar la charola infantil, alinee las ranuras en T de ambos lados. Empuje la charola hasta que ambos lados ENCAJEN en su lugar. Tire de la charola hacia ¡CLIC! ¡CLIC! arriba para asegurarse de que esté...
-
Page 42: Cómo Usar La Capota
CÓMO ENSAMBLAR SU PRODUCTO Para retirar la capota, presione sobre la lengüeta y deslice la capota hacia atrás como se muestra. Repita el procedimiento en el otro lado. USO DE LA CAPOTA 1. Para extender la capota, tire de ella hacia arriba como se muestra. -
Page 43: Cómo Pasar Del Modo Carriola Al Modo Vagoneta
CONVERSIÓN DE MODO CARRIOLA A MODO VAGONETA ADVERTENCIA Para evitar lesiones en los dedos o las manos, debe tenerse cuidado al abrir y cerrar el producto para evitar lesiones en las zonas de las bisagras. 1. Para pasar del modo carriola al modo vagoneta, bloquee las dos ruedas traseras (Ver pág. -
Page 44: Cómo Fijar El Inserto Del Moisés
MONTAJE DEL INSERTO DEL MOISÉS ADVERTENCIA Use el modo moisés sólo cuando el niño esté acostado y durmiendo. Utilice el modo moisés sólo con niños de al menos 6 meses. Deje de utilizar el modo moisés cuando el bebé haya alcanzado los 14,9 kg (33 lb). Siga las instrucciones para desplegar la carriola (pág. -
Page 45: Cómo Quitar El Inserto Del Moisés
MONTAJE DEL INSERTO DEL MOISÉS 5. Coloque los soportes del moisés en las ranuras en T a ambos lados de la carriola. Empuje los soportes del moisés en las ranuras hasta que ambos lados encajen en su sitio. ¡CLIC! NOTA: La charola para niños no puede instalarse cuando el moisés está... -
Page 46: Cómo Usar Los Frenos
CÓMO USAR LOS FRENOS ADVERTENCIA Para evitar lesiones graves, bloquee siempre los frenos. Intente empujar el producto para asegurarse de que los frenos estén puestos. Para bloquear, empuje la palanca hacia ABAJO en la parte inferior del freno como se muestra. ¡CLIC! Para desbloquear, empuje la palanca hacia ARRIBA en la... -
Page 47: Uso Del Asa De Los Padres
USO DEL ASA DE LOS PADRES Para extender el asa de los padres, apriete el botón del asa y tire de ella hacia fuera hasta que se bloquee en una de las tres posiciones de altura. Para bajar el asa de los padres, apriete el botón y empuje el asa hacia abajo hasta que se bloquee en su posición. -
Page 48: Cómo Sujetar A Su Niño
CÓMO ASEGURAR SU NIÑO ADVERTENCIA Para evitar lesiones graves causadas por una caída o deslizamiento, SIEMPRE use el cinturón de seguridad para la cintura. Para facilitar la entrada en ¡CLIC! la carriola, párese frente al producto y apriete la palanca de desbloqueo de entrada fácil. -
Page 49: Plegado De Su Producto
PLEGADO DE SU PRODUCTO ADVERTENCIA Para evitar lesiones en los dedos o las manos, debe tenerse cuidado al abrir y cerrar el producto para evitar lesiones en las zonas de las bisagras. ¡CLIC! 1. Asegúrese de que el asa de los padres está... - Page 50 PLEGADO DE SU PRODUCTO 4. Baje la parte delantera de la carriola vagoneta usando la palanca de liberación de entrada fácil. 5. Parado frente al producto, apriete la palanca de desbloqueo del plegado a ambos lados del armazón y tire hacia arriba hasta la posición autónoma.
-
Page 51: Cuidado Y Mantenimiento
PLEGADO DE SU PRODUCTO 6. A continuación, levante la parte delantera del armazón de la carriola hasta que ambos lados encajen en su sitio. Presione sobre el armazón para asegurarse ¡CLIC! de que está bien bloqueado en su sitio. CUIDADO Y MANTENIMIENTO •... -
Page 52: Garantía Limitada
Garantía limitada Durante un período de 90 días a partir de la fecha de compra original de este Producto, Evenflo garantiza al usuario final original (“Comprador”) que este Producto (incluido cualquier accesorio) está libre de defectos de materiales o mano de obra. La única obligación de Evenflo bajo esta garantía limitada expresa será, a...
Need help?
Do you have a question about the PIVOT XPLORE DREAMZ and is the answer not in the manual?
Questions and answers