Advertisement
Quick Links
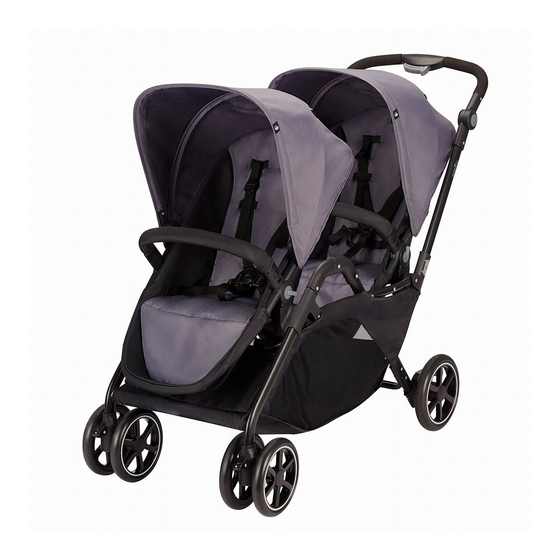
Parallel
Tandem
Stroller
Up to 40 lbs.
per seat
Up to 43 in.
Cochecito
Tándem
Hasta 18 kg (40 lb)
por asiento
Hasta 109 cm.
Poussette
Tandem
Jusqu'à 18,14 kg
(40 lb) par siège
Jusqu'à 109 cm.
Read all instructions before use
and keep them for future reference.
detenidamente antes de usarlo y
guárdelas como referencia futura.
Il est recommandé de lire avec soin ces
directives avant d'utiliser ce produit et de les
conserver pour éventuellement s'y référer.
Lea todas las instrucciones
© 2017 Even o Company, Inc. IM0163A 4/2017
TM
Advertisement

Related Manuals for Evenflo Parallel


Summary of Contents for Evenflo Parallel
- Page 1 Parallel Tandem Stroller Up to 40 lbs. per seat Up to 43 in. Cochecito Tándem Hasta 18 kg (40 lb) por asiento Hasta 109 cm. Poussette Tandem Jusqu’à 18,14 kg (40 lb) par siège Jusqu’à 109 cm. Read all instructions before use and keep them for future reference.
- Page 2 WARNING ADVERTENCIA Failure to follow these warnings and the AVERTISSEMENT instructions increases the risk of serious injury or death. PLEASE FOLLOW ALL TO AVOID STRESS AND TO INSTRUCTIONS AND KEEP PREVENT A HAZARDOUS, USER GUIDE FOR FUTURE UNSTABLE CONDITION ON USE.
- Page 3 INFANT CARSEATS* WITH THE YOUR CHILD FROM FALLING INFANT CAR SEAT ADAPTER: OR SLIDING OUT OF THE INFANT CAR SEAT : • EVENFLO LITEMAX™ Always snugly secure your child • EVENFLO SAFEMAX™ in the car seat with the harness. NEVER use any other Make sure the infant car seat manufacturer’s car seats...
- Page 4 WARNING ADVERTENCIA AVERTISSEMENT NO OBSERVAR ESTAS ADVERTENCIAS Y LAS INSTRUCCIONES AUMENTA EL RIESGO DE SUFRIR LESIONES SERIAS O LA MUERTE. POR FAVOR, CUMPLA TODAS EL COCHECITO DEBE LAS INSTRUCCIONES Y UTILIZARSE con el niño que GUARDE LA GUÍA DEL puede sentarse por sí solo. El USUARIO PARA USO FUTURO.
- Page 5 DE ASIENTO INFANTIL PARA Asegúrese que el adaptador COCHE: de asiento infantil para coche • EVENFLO LITEMAX™ esté fijado de forma segura en ambos lados del armazón del • EVENFLO SAFEMAX™ cochecito antes de fijar el NUNCA utilice un asiento para asiento para coche al cochecito.
- Page 6 WARNING ADVERTENCIA AVERTISSEMENT LE NON-RESPECT DE CES AVERTISSEMENTS ET INSTRUCTIONS PEUT ENTRAÎNER DES BLESSURES GRAVES OU LA MORT. VEUILLEZ SUIVRE TOUTES LES CESSER D’UTILISER CETTE INSTRUCTIONS ET POUSSETTE si celle-ci est CONSERVER LE MODE endommagée ou cassée. D’EMPLOI À TITRE DE NE PAS soulever la poussette RÉFÉRENCE.
- Page 7 GRAVEMENT EN TOMBANT AVEC L’ADAPTATEUR DE SIÈGE OU EN GLISSANT DU POUR ENFANT : SIÈGE-AUTO : • EVENFLO LITEMAX™ Veiller à toujours attacher votre • EVENFLO SAFEMAX™ enfant avec le harnais lors de NE JAMAIS utiliser des l’utilisation du siège-auto.
- Page 8 Parts / Piezas / Pièces Please check that you Prière de s’assurer d’avoir Por favor, verifique que have all the parts shown toutes les pièces illustrées tenga todas las piezas below before avant de procéder au ilustradas abajo antes assembling product. montage de ce produit.
- Page 9 Assembly / Ensamblaje / Montage Place flattened carton down on floor to protect surface before assembling stroller. Unlock the storage latch. Coloque la caja aplanada sobre el piso para proteger la superficie antes de ensamblar el cochecito. Desbloquee el cerrojo de almacenamiento.
- Page 10 Front Wheels / Ruedas delanteras / Roues avant To attach front wheels, push wheel onto front leg tube until it clicks into place. Repeat on other side. Pull on wheels to make sure both of them are attached. Para instalar las ruedas delanteras, CLICK! ¡CLIC! empuje la rueda en el tubo de la pata...
- Page 11 Rear Wheels / Ruedas traseras / Roues arrière Remove the hairpin (A) and one washer (B) from the axle assembly. Attach wheel, then re-attach washer (B). Retire el pasador (A) y una arandela (B) del ensamblaje del eje. Fije la rueda, luego vuelva a fijar la arandela (B). Retirer la bague de retenue (A) et une rondelle (B) de l’ensemble d’essieu.
- Page 12 Attach hubcaps to both wheels once the washer and hairpin are attached. CLICK! ¡CLIC! Coloque los tapacubos en ambas ruedas una vez que se fijen la arandela y el pasador. Fixer les enjoliveurs aux roues une fois la rondelle et la bague de retenue fixées.
- Page 13 Attaching Rear Seat / Colocando el asiento trasero / Fixation du siège arrière To attach rear seat, insert sides of stroller seat into the mounts on the stroller frame. The rear seat is marked with the words “REAR” and it will not attach to the front seating position.
- Page 14 Attaching Front Seat / Colocando el asiento delantero / Fixation du siège avant To attach front seat, insert sides of stroller seat into the mounts on the stroller frame. until it clicks into place. The front seat is marked with the words “FRONT”...
- Page 15 Bumper Bar / Barra amortiguadora / L’arceau de sécurité To attach bumper bar, push bar into holes until it clicks into place on both sides of stroller seat. Para fijar la barra amortiguadora, empújela en los agujeros hasta haga clic en el lugar en ambos lados del asiento del cochecito.
- Page 16 Toddler Seat Locations / Ubicaciones del asiento para niños pequeños / Positions du siège enfant ALWAYS PLACE THE CHILD IN THE front seat before placing another in the rear seat. When removing children, always remove the child in the rear seat first before removing the child in the front.
- Page 17 Seats facing rear of stroller. Asiento mirando hacia atrás del cochecito. Les sièges sont tournés vers l’arrière. Rear seat faces forward. Front seat faces rear. El asiento trasero mira hacia adelante. El asiento delantero mira hacia atrás. Le siège arrière est tourné vers l’avant. Le siège avant est tourné...
- Page 18 Cupholder / Posavasos / Porte-gobelet To attach cup holder, rotate cup holder and slide down on the mount as shown. Para fijar el posavasos, girar el posavasos y deslice sobre la montura como se muestra. Pour fixer le porte-gobelet, l’insérer sur la tête de montage, le faire pivoter puis l’accrocher comme indiqué.
- Page 19 Brakes / Frenos / Freins Always lock both brakes. Make sure brakes WARNING are on by trying to push the stroller. WARNING ADVERTENCIA ADVERTENCIA Trabe siempre ambos frenos. WARNING AVERTISSEMENT Asegúrese que los frenos estén AVERTISSEMENT ADVERTENCIA activados tratando de empujar el cochecito. Toujours verrouiller les deux AVERTISSEMENT freins.
- Page 20 Canopy / Capota / Capote To open or close canopy, push towards the front or the rear of the stroller. Para abrir o cerrar la capota, empújela hacia el frente o la parte de atrás del cochecito. Pour ouvrir ou fermer la capote, la pousser vers l’avant ou l’arrière de la poussette.
- Page 21 Adjusting Harness / Ajuste de arnés / Ajuster le harnais To attach the harness and waist straps to the crotch buckle, insert the buckles A into the crotch strap as shown. Para sujetar el arnés y las correas para la cintura a la hebilla de la entrepierna, inserte las hebillas A en la correa de la entrepierna como CLICK!
- Page 22 To unlock harness, push the button on the crotch buckle then slide the shoulder straps off the waist buckles. Para destrabar el arnés, empuje el botón en la hebilla de la entrepierna y luego deslice las correas para el hombro fuera de las hebillas para la cintura.
- Page 23 Swivel Wheels / Ruedas giratorias / Roulettes pivotantes Swivel wheels lock for use on rough surfaces, such as gravel or stones. To lock front wheels push the lever DOWN. To unlock front wheels push lever CLICK! ¡CLIC! Las ruedas giratorias se bloquean para uso en superficies ásperas, como piedras o grava.
- Page 24 Reclining Seat / Reclinación del asiento / Incliner le siège ONLY the REAR seat is designed to recline. The FRONT seat does not recline. SOLO el asiento trasero está diseñado para reclinarse. El asiento delantero no se reclina. SEUL le siège arrière est conçu pour être incliné.
- Page 25 Folding Stroller / Cómo plegar el cochecito / Plier la poussette Before folding, remove the infant car seat if it is attached. To fold, slide button to left (1), then squeeze button (2). Next, locate (3) on the side of the frame and pull it up as shown.
- Page 26 ONLY USE THE FOLLOWING INFANT CARSEATS* WITH THE INFANT CAR SEAT ADAPTER: AVERTISSEMENT • EVENFLO LITEMAX™ • EVENFLO SAFEMAX™ NEVER use any other manufacturer’s car seats with this stroller. ALWAYS CHECK to make sure the car seat is securely latched into the infant car seat adapter by lifting up on it.
- Page 27 ADVERTENCIA AVERTISSEMENT USE SOLO LOS SIGUIENTE ASIENTOS INFANTILES PARA COCHE* CON EL ADAPTADOR DE ASIENTO INFANTIL PARA COCHE: • EVENFLO LITEMAX™ • EVENFLO SAFEMAX™ NUNCA utilice un asiento para coche de otro fabricante con este cochecito. SIEMPRE REVISE para asegurarse de que el asiento para coche está...
- Page 28 ADVERTENCIA AVERTISSEMENT N’UTILISER QUE LES MODÈLES DE SIÈGES-AUTO SUIVANTS* AVEC L’ADAPTATEUR DE SIÈGE POUR ENFANT : • EVENFLO LITEMAX™ • EVENFLO SAFEMAX™ NE JAMAIS utiliser des sièges-auto d’autres marques avec cette poussette. TOUJOURS VÉRIFIER que le siège-auto est fermement fixé à...
- Page 29 Infant Car Seat Adapter / Adaptador de asiento infantil / L’adaptateur de siège pour enfant Insert the infant car seat adapter into the mounts on both sides of the stroller until they click into place as shown. The infant car seat adapter is only to be used in the rear seat mounts as shown.
- Page 30 Car Seat Locations / Ubicaciones del asiento para coche / Positions du siège-auto Once you have your car seat attached to the infant car seat adapter in the REAR position, you can place your toddler seat marked with the words “FRONT”...
- Page 31 TO REMOVE ADAPTER, push buttons in on the adapter and pull adapter off of stroller frame. PARA RETIRAR EL ADAPTADOR, presione los botones en el adaptador y jale el adaptador fuera del armazón del cochecito. POUR RETIRER L’ADAPTATEUR, pousser les boutons vers l’intérieur et dégager l’adaptateur du cadre de la poussette.
-
Page 32: Cuidado Y Limpieza
Cuidado y limpieza PARA OBTENER LAS INSTRUCCIONES PARA EL LAVADO, CONSULTE SU ETIQUETA DE CUIDADO en la almohadilla del asiento. NUNCA use BLANQUEADOR. PARA LIMPIAR EL ARMAZÓN DEL COCHECITO, use un trapo húmedo con jabón de uso doméstico y agua tibia. NUNCA use BLANQUEADOR ni detergente. -
Page 33: Warranty Information
Warranty Information For a period of 90 days from the original purchase of this Product, Evenflo warrants to the original end user (“Purchaser”) this Product (including any accessories) against defects in material or workmanship. Evenflo’s sole obligation under this express limited warranty shall be, at Evenflo’s option, to repair or replace any Product that is determined to be defective by Evenflo and determined to be covered by this warranty. -
Page 34: Renseignements Sur La Garantie
à sa discrétion, tout Produit qui sera jugé être défectueux et qui sera déterminé par Evenflo être couvert sous les termes de cette garantie. -
Page 35: Información Sobre La Garantía
Producto, Evenflo garantiza al usuario final original (“Comprador”) que este Producto (incluido cualquier accesorio) está libre de defectos de material o mano de obra. La única obligación de Evenflo bajo esta garantía limitada expresa será, a opción de Evenflo, reparar o reemplazar un Producto que Evenflo haya determinado que es defectuoso y que esté... - Page 36 For customer service, warranty information or replacement parts, please call us at ParentLink 1-800-233-5921 or visit us online at www.evenflo.com Pièces de rechange et renseignements sur la garantie Pour communiquer avec le service à la clientèle ou encore obtenir des renseignements sur la garantie ou des pièces, composer le ParentLink 1-937-773-3971...
Need help?
Do you have a question about the Parallel and is the answer not in the manual?
Questions and answers