Table of Contents
Advertisement
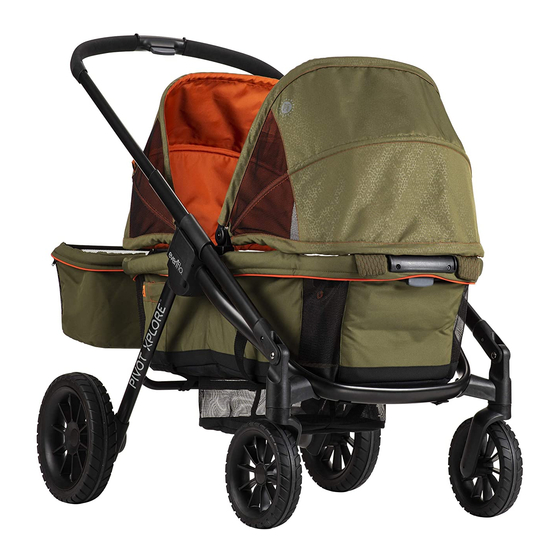
All-Terrain Stroller Wagon
Carriola vagón todo terreno
Wagon
Up to 55 lbs (25 kg) / Seat
Up to 39 in. (99 cm) / Seat
Vagón
Hasta 25 kg (55 lb) / Asiento
Hasta 99 cm (39 in) / Asiento
Lea todas las instrucciones y etiquetas antes de ensamblar y usar el producto.
U.S. Patent Pending/ Patente estadounidense pendiente.
©2019
25701529 6/19
Advertisement
Table of Contents

Related Manuals for Evenflo PIVOT XPLORE All-Terrain Stroller Wagon


Summary of Contents for Evenflo PIVOT XPLORE All-Terrain Stroller Wagon
- Page 1 All-Terrain Stroller Wagon Carriola vagón todo terreno Wagon Up to 55 lbs (25 kg) / Seat Up to 39 in. (99 cm) / Seat Vagón Hasta 25 kg (55 lb) / Asiento Hasta 99 cm (39 in) / Asiento Lea todas las instrucciones y etiquetas antes de ensamblar y usar el producto. ©2019 25701529 6/19 U.S.
-
Page 2: Table Of Contents
TABLE OF CONTENTS ÍNDICE Warnings . . . . . . . . . . . . . . . . . . . . . . . . . . . . . . . . . . . . . . . . . . . . . . . . . . . . . . . . . . . . . . . . . . . . . . . . . . . . . . . . . . . . . 4-7 Important Information . - Page 3 FEATURES CARACTERÍSTICAS 1. Canopy / Capota 11. Airflow Window / Ventana para flujo de aire 2. Parent’s Handle / Asa para los padres 12. All Terrain Rear Wheels / Ruedas traseras para todo terreno 3. Adjustable Handle Button / Botón del asa ajustable 13.
-
Page 4: Warnings
• The canopy is not intended to provide UV protection . • Sharp or heavy objects placed in pockets may cause damage to the product, or injury to the child . • Contact Evenflo ParentLink at 1-800-233-5921 (USA), or 01-800-706-12-00 (Mexico) with any questions regarding use of your product . - Page 5 WARNING READ AND FOLLOW ALL WARNINGS AND INSTRUCTIONS! FAILURE TO DO SO COULD RESULT IN SERIOUS INJURY OR DEATH! • To avoid product instability and tip-overs, DO NOT load storage pockets with over 1 lb (0 .45 kg), and storage basket with over 10 lbs (4 .5 kg) .
- Page 6 • Colocar objetos afilados o pesados en los bolsillos puede causar daños a la carriola o lesiones al niño . • Comuníquese con ParentLink de Evenflo al 1-800-233-5921 (EUA) o 01-800-706-12-00 (México) si tiene alguna pregunta relacionada con la carriola .
- Page 7 ADVERTENCIA LEA Y SIGA TODAS LAS ADVERTENCIAS E INSTRUCCIONES. NO HACERLO PODRÍA OCASIONAR LESIONES GRAVES O LA MUERTE. • Para evitar inestabilidad y volcaduras de la carriola, NO coloque más de 0 .45 kg (1 lb) en los bolsillos de almacenamiento, ni más de 4 .5 kg (10 lb) en la canasta de almacenamiento .
-
Page 8: Important Information
IMPORTANT: Read instructions carefully before use . Save these instructions for future reference . It is very important to assemble the product according to these instructions . If you are missing parts, do not use product and call Evenflo ParentLink at 1-800-233-5921 (U.S.A.) or 01-800-706-12-00 (Mexico) to order replacement parts . -
Page 9: Identification Of Parts
IDENTIFICATION OF PARTS / IDENTIFICACIÓN DE LAS PARTES Left Front Wheel Assembly Right Front Wheel Assembly (2) Rear Wheel (Green Indicator) (Yellow Indicator) / (2) Rueda trasera / Ensamblado de la rueda / Ensamblado de la rueda delantera izquierda (indicador delantera derecha (indicador verde) amarillo) -
Page 10: Choosing Mode Of Use
CHOOSING MODE OF USE CÓMO ELEGIR EL MODO DE USO YOUR PRODUCT CAN BE USED IN TWO DIFFERENT MODES: STROLLER MODE OR WAGON MODE. After the frame and the wheels have been assembled, you can choose to set the product up in Stroller Mode or Wagon Mode. -
Page 11: Assembling Your Product
ASSEMBLING YOUR PRODUCT CÓMO ENSAMBLAR LA CARRIOLA Note: To protect flooring, place a protective covering (cardboard, towel, small rug or blanket) beneath the product during assembly. A. Align parent’s handle and slide it into handle mounts. CHECK to ensure holes are aligned. If holes do not align, flip handle and reassemble. - Page 12 ASSEMBLING YOUR PRODUCT CÓMO ENSAMBLAR LA CARRIOLA WARNING To avoid injury to fingers or hands, care must be taken when opening and closing the product to prevent injury CLICK! ¡CLIC! in hinge areas . ADVERTENCIA Se debe tener cuidado al plegar o desplegar el producto para evitar lesiones en los dedos o las manos causadas por las áreas con bisagras .
- Page 13 ASSEMBLING YOUR PRODUCT CÓMO ENSAMBLAR LA CARRIOLA Locate left and right front wheel assemblies. The left wheel will be marked with a green colored dot. To attach front left wheel, match green colored dot with green colored dot on frame. Line up metal pin with hole in front wheel mount and push on to frame as shown until it clicks into place.
- Page 14 ASSEMBLING YOUR PRODUCT CÓMO ENSAMBLAR LA CARRIOLA While holding the parent’s handle with your right hand, squeeze fold release lever with your left hand. Holding fold release lever in, press down with your right hand. Mientras sostiene el asa para los padres con la mano derecha, oprima la palanca de liberación de plegado con la mano izquierda.
- Page 15 ASSEMBLING YOUR PRODUCT CÓMO ENSAMBLAR LA CARRIOLA CLICK! ¡CLIC! Next, lift front of frame until both sides click in place. Press on frame to make sure it is securely locked in place. Luego, levante la parte delantera del armazón hasta que ambos lados encajen en su lugar con un clic.
- Page 16 ASSEMBLING YOUR PRODUCT CÓMO ENSAMBLAR LA CARRIOLA CLICK! ¡CLIC! Squeeze adjustable handle button and pull to fully extend parent handle until it CLICKS into place at your most comfortable position. Oprima el botón del asa ajustable y jale para extender completamente el asa para los padres hasta que encaje en la posición más cómoda con un CLIC.
- Page 17 ASSEMBLING YOUR PRODUCT CÓMO ENSAMBLAR LA CARRIOLA To attach child tray, align t–slots on both sides. Push tray until both sides CLICK in place. Pull up on tray to make sure it is locked into place. Para acoplar la charola infantil, alinee las ranuras en T en ambos lados.
-
Page 18: Converting From Stroller To Wagon Mode
CONVERTING FROM STROLLER TO WAGON MODE CÓMO CONVERTIR DE MODO DE CARRIOLA A MODO DE VAGÓN WARNING To avoid injury to fingers or hands, care must be taken when opening and closing the product to prevent injury in hinge areas . ADVERTENCIA Se debe tener cuidado al plegar o desplegar el producto para evitar lesiones en los dedos o las manos causadas por las... -
Page 19: Using Your Canopy
USING YOUR CANOPY CÓMO USAR LA CAPOTA To extend canopy, pull it up as shown. Para extender la capota, jale hacia arriba, como se muestra. To close, push canopy down as shown. Para cerrar, empuje la capota hacia abajo, como se muestra. - Page 20 USING YOUR CANOPY CÓMO USAR LA CAPOTA The canopy pattern is reversible. You can switch between two patterns by closing the canopy together. El patrón de la capota es reversible. Puede intercambiar entre dos patrones juntando las capotas. Then pass bottom end under the top. Luego pase el extremo inferior por debajo de la parte superior.
-
Page 21: Using Your Brakes
USING YOUR BRAKES CÓMO USAR LOS FRENOS WARNING To avoid serious injury, always lock brakes. Make sure brakes are on by trying to push the product. ADVERTENCIA Para evitar lesiones graves, bloquee siempre los frenos. Intente empujar la carriola para asegurarse de que los frenos están activados. CLICK! To lock, push lever DOWN at bottom of brake as shown. -
Page 22: Using Your Parent's Handle
USING PARENT’S HANDLE CÓMO USAR EL ASA PARA LOS PADRES CLICK! ¡CLIC! To extend parent’s handle, squeeze button on handle and pull handle out until it locks into one of the three height positions. To lower parent’s handle, squeeze button and push handle down until it locks into position. -
Page 23: Securing Your Child
SECURING YOUR CHILD CÓMO AFIANZAR AL NIÑO WARNING To avoid serious injury from falling or sliding out, ALWAYS use waist restraint . ADVERTENCIA Para evitar lesiones graves causadas por una caída o deslizamiento, use SIEMPRE el cinturón de seguridad . For easy entry into wagon, stand in front of product and squeeze easy entry release lever. -
Page 24: Folding Your Product
FOLDING YOUR PRODUCT CÓMO PLEGAR EL PRODUCTO WARNING To avoid injury to fingers or hands, care must be taken when folding or unfolding product to prevent injury in hinge areas . ADVERTENCIA CLICK! ¡CLIC! Se debe tener cuidado al plegar o desplegar la carriola para evitar lesiones en los dedos o las manos causadas por las áreas con bisagras . - Page 25 FOLDING YOUR PRODUCT CÓMO PLEGAR EL PRODUCTO Adjust handle to lowest position. Ajuste el asa a la posición más baja. Lower front of wagon down using easy entry release lever. Baje la parte delantera del vagón usando la palanca de liberación de la función de entrada fácil.
- Page 26 FOLDING YOUR PRODUCT CÓMO PLEGAR EL PRODUCTO Standing in front of product, squeeze fold release lever on both sides of frame and pull up into self-standing position. For ultimate compact storage, lay product down. To unfold, stand product up in self-stand mode. While holding the handle with your right hand, squeeze fold release lever with your left hand.
-
Page 27: Care And Maintenance
LIMITED WARRANTY GARANTÍA LIMITADA For a period of 90 days from the original purchase of this Product, Evenflo warrants to the original end user (“Purchaser”) this Product (including any accessories) against defects in material or workmanship. Evenflo’s sole obligation under this express limited warranty shall be, at Evenflo’s option, to repair or replace any Product that is determined to be defective by... - Page 28 • • USA: 1-800-233-5921 8 AM – 5 PM E .T . • México: 01-800-706-12-00...
Need help?
Do you have a question about the PIVOT XPLORE All-Terrain Stroller Wagon and is the answer not in the manual?
Questions and answers