
Related Manuals for Life Fitness Discover SE4 Console


Summary of Contents for Life Fitness Discover SE4 Console
- Page 1 Discover SE4 Console Manual Treadmill, Cross-Trainer, Upright and Recumbent Lifecycle® Exercise Bikes, PowerMill™ Climber, Arc Trainer™ Owner's Manual 1019598-0001 REV AA...
- Page 3 Latin America and Caribbean* Germany, Austria, and Switzerland Hong Kong Life Fitness, LLC Life Fitness Europe GMBH Life Fitness Asia Pacific LTD 10601 W Belmont Ave Neuhofweg 9 26/F, Global Trade Square Franklin Park, IL 60131 U.S.A. 85716 Unterschleißheim...
- Page 4 User and Service Documents Link https://lifefitness9512.zendesk.com/hc/en-us https://www.lftechsupport.com/web/document-library/documents Additional information is available online using the links above. أ علاه إل ر إبط باستخدإم إ لإ ن تر نت على إضافية معلومات تتوفر 点击上面的链接可在线获取更多信息。 Flere oplysninger er tilgængelige online gennem linket ovenfor. Bijkomende informatie is online beschikbaar via bovenstaande link.
-
Page 5: Table Of Contents
Copyright 2023, Life Fitness, LLC. All Rights Reserved. Life Fitness, Hammer Strength, Cybex, ICG and SCIFIT are registered trademarks of Life Fitness, LLC and its affiliated companies and subsidiaries. Disclaimer: Images and specifications are current as of the date of publication and are subject to change. -
Page 6: Safety Instructions
• Life Fitness Family of Brands does not warrant nor guarantee that component parts used in the manufacture of products offered under the Life Fitness Family of Brands are latex-free. Users of these products must take all necessary precautions to prevent accidental contact that could lead to an adverse latex reaction. - Page 7 • When the product is not in use, Life Fitness recommends unplugging the product. Disconnect from the electrical outlet when not in use, and before putting on or taking off parts. To disconnect, turn power OFF at the ON/OFF switch, then remove plug from electrical outlet.
- Page 8 • Handrails may be held to enhance stability as needed, but are not for continuous use. • When the product is not in use, Life Fitness recommends unplugging the product. Disconnect from the electrical outlet when not in use, and before putting on or taking off parts. To disconnect, turn power OFF at the ON/OFF switch, then remove plug from electrical outlet.
- Page 9 ANATEL Compliance Information - Brazil This equipment incorporates the products approved by ANATEL under the following numbers: MODULE ANATEL NUMBER WIFI / BLUETOOTH 08437-23-09600 WIRELESS CHARGER 01535-21-13620 RFID 18033-20-07558 13389-21-14239 ANT+ 00127819 This equipment is not entitled to protection against harmful interference and may not cause interference in duly authorized systems.
-
Page 10: Before Use
Before Use Before using this product, it is essential to read this ENTIRE operation manual and ALL assembly instructions. It describes equipment setup and instructs members on how to use it correctly and safely. Any service, other than cleaning or user maintenance, must be performed by an authorized service representative. CAUTION: Any changes or modifications to this equipment could void the product warranty. -
Page 11: Functional Information
• Life Fitness Arc Trainer Statements of Purpose: • The Life Fitness Treadmill is an exercise machine that enables users to walk or run, in place, indoors on a moving surface. • The Life Fitness Cross-Trainer is an exercise machine that combines low-impact elliptical pedaling with push / pull arm motion to provide an efficient, effective total body workout indoors. -
Page 12: Immobilization Method - Discover Se4 Console
Immobilization Method - Discover SE4 Console The purpose of immobilizing the unit is to prevent unauthorized use. The system causes immobilization of the unit when activated. 1. Tap the LANGUAGE icon on the ATTRACT SCREEN to access the SELECT LANGUAGE screen. (Language Icon position may vary on consoles.) - Page 13 6. UNIT IMMOBILIZED BY MANAGER message appears on screen. 7. Tap the upper part of the ATTRACT SCREEN in the following sequence: Upper-Left, Upper-Right, Upper-Left, and Upper-Right to enter SYSTEM OPTIONS. 8. Tap the Immobilize Unit icon to disable. Page 11 of 96...
-
Page 14: Getting Connected
• Wireless-AC Access Point (802.11ac) Cabling Requirements • CAT 5e or CAT 6 cabling can be used to connect your wireless access points to your wired network. Life Fitness recommends using CAT 6 cable for this purpose. Network Equipment Placement and Power Requirements Network equipment such as modems, wired routers and switches will require power;... -
Page 15: Port Configuration
Port Configuration All traffic initiated from our consoles is outbound (i.e. data only flows out from our consoles). If you do not block outbound traffic and the associated return traffic, then no additional configuration is needed. Otherwise, if your network restricts outbound traffic, you need to open outbound connections on these specific ports: •... -
Page 16: Getting Started
3. Getting Started Console Features 1. Touch Screen Display • Use to select, set up, monitor and save workouts. • Access entertainment options. 2. NFC (Near Field Communication) / Optional RFID (Radio Frequency Identification) : • NFC: Connect to NFC enabled mobile devices, Apple Watch and Samsung Galaxy Watch for seamless pairing and data share. -
Page 17: Qi ® Wireless Induction Charger
® Wireless Induction Charger How to use: 1. Place your device in landscape position on the slanted rubber charging station indicated with the charging symbol. 2. If your device supports Qi Wireless Charging, the blue indicator light on the bottom of the console will turn blue along with a notification on your mobile phone that the device is charging. -
Page 18: Device Connection
Device Connection Bluetooth ® Devices Bluetooth Device menu offers two scanning options: • Headphone • Heart rate chest strap 1. Headphone Press to scan for available Bluetooth Devices. NOTE: Make sure your headphones are in pairing mode. Headphones using a low energy Bluetooth signal or single ear headphones are not compatible. - Page 19 Apple Watch ® Press the Connect to Apple Watch button to learn more about connecting your Apple Watch device. 1. At any time prior to the workout summary screen, place your Apple Watch at the bottom left-hand corner of the wireless charger station near the NFC reader.
- Page 20 Samsung Galaxy Watch ® Press the Samsung Galaxy Watch button to learn more about connecting your Samsung Galaxy watch device. 1. At any time prior to the workout summary screen, place your Samsung Galaxy Watch at the bottom left-hand corner of the wireless charging station near the NFC reader. The side of the watch must be facing the tablet holder to connect.
- Page 21 These electrodes are attached to a Polar telemetry heart rate chest strap that the user wears during the workout. The Polar telemetry heart rate chest strap is optional. Contact Life Fitness Customer Support Services to order.
-
Page 22: The Lifepulse ™ System
The Lifepulse ™ System The patented Lifepulse system sensors are the built-in heart rate monitoring system on this product. For the most accurate reading possible, during a workout: • Grasp the sensors firmly. • Hold each sensors at the midpoint. •... -
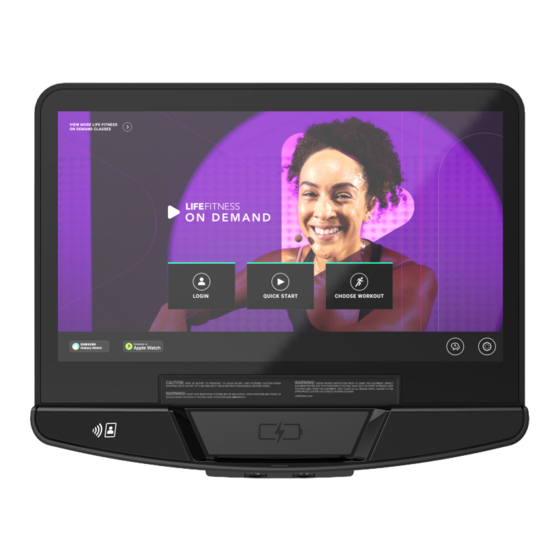
Page 23: Operation
4. Operation Home Screen The intuitive LCD touch screen allows users to: • Select, set up, monitor, and save workouts. • Access Entertainment options. 1. Log In: Press to log in to your LFconnect or Halo account. 2. Quick Start: Press to begin a workout immediately without setup or selecting a goal. 3. - Page 24 8. Access On-Demand Workouts Library: Press to view the On-Demand Workouts library. Page 22 of 96...
- Page 25 General Settings Choose settings for your workout. These settings can also be accessed within a workout. 1. Language: Select a language to use during a workout. 2. Devices: Scan for Bluetooth enabled headphones or Heart Rate devices. 3. Login: Log in to your LFconnect or Halo account. 4.
- Page 26 Select Language 1. Press the Select Language Icon on Home screen. 2. Choose desired language from the Select Language screen. Users can select a language to use during a workout. NOTE: Only the specific languages enabled by the manager will be displayed. After a selection is made, the language is saved, the Select Language screen is closed and the Home screen appears in the selected language.
- Page 27 Choose Workout Scroll the Choose Workout screen to view available workout options. NOTE: Available workouts vary by base type. 1. Scroll through the Workout Options: • Popular Workouts - Select a workout that is frequently chosen by exercisers. • On-Demand Workouts - Select an instructor-led class streamed through the internet. •...
-
Page 28: In-Workout Views And Entertainment Choices
In-Workout Views and Entertainment Choices Users can select various views and entertainment options during workouts. 1. TV View: Choose to watch TV during a workout. 2. Terrain View: Choose to workout watching a video course, shot in first person perspective through landscapes, cityscapes, and events. - Page 29 TV View Users must be in a workout to access TV View. 1. Press TV View to watch TV. 2. Channel List Press to access a list of all available channels. NOTE: Shown in image. 3. Channel Keypad Press to access a numeric keypad to input channel number. 4.
- Page 30 Terrain View Users can select Terrain View to enjoy working out to a video course Page 28 of 96...
- Page 31 Stats View Users can view and toggle between workout stats during a workout. NOTE: Time goal on a treadmill is selected workout shown in image as an example. 1. Press Stats View. 2. Workout Profile is shown in the center tile. •...
- Page 32 3. Swipe for additional workout profiles. NOTE: Available workout profiles vary depending on base type and selected workout. Laps View 4. Stats and Additional Stats NOTE: Stats available vary depending on base type and selected workout. Stats are shown across the top bar and on the side tiles. Additional stats are available: •...
-
Page 33: Pause Workout
Pause Workout 1. Press the Pause / Stop button to pause a workout. Choose one of the following options while in Pause mode: 2. Resume Press to continue current workout. 3. End Workout Press to end current workout and view workout summary. Page 31 of 96... -
Page 34: Cool Down
Cool Down 1. Press the Cool Down button anytime during a workout to start a Cool Down mode. 2. Time Display • Time will change to Cool Down when the Cool Down mode is entered. • The time display initially shows the amount of time in minutes that a specific workout is required to be in Cool Down mode. -
Page 35: Hybrid Mode
Hybrid Mode NOTE: Hybrid Mode exists on non-powered equipment (arcs, cross-trainers and bikes) only! Hybrid Mode (if enabled) shows the light bulb on the bottom bar of the In-Workout view. The light bulb will animate to show its filling up as the user pedals to produce electricity reducing the power draw. The workout summary screen will show a message about the workout reducing an amount of energy to power this equipment. -
Page 36: Workouts
5. Workouts Workouts List Treadmill Cross-Trainer Bikes PowerMill Arc Trainer Quick Start Quick Start Quick Start Quick Start Quick Start Standard Goals Standard Goals Standard Goals Standard Goals Standard Goals • Time • Time • Time • Time • Time •... -
Page 37: Workout Descriptions
Workout Descriptions NOTE: Available workouts vary depending on base type. See Workouts List. Quick Start Manual workout that skips workout setup and goes straight to workout. Standard Goals Time Goal Workout that only has a requirement to end at a specific time duration. Distance Goal Workout that only has a requirement to end at specific distance traveled. - Page 38 Fit Tests A 5-minute submaximal test to predict VO max. Estimates cardiovascular fitness and Life Fitness Fit Test can be used to monitor improvements in endurance every 4 - 6 weeks. See Life Fitness Fit Test for more information. A 5-minute distance goal test based on the time needed to complete the required U.S.
-
Page 39: Workout Setup - Data Inputs
Workout Setup - Data Inputs Treadmill Standard Goals User Input • 3 preset values or use keypad to input desired time • Terrain (Flat, Hill Interval, Rolling Hills, Random, Kilimanjaro) Time • Level (if Hill Interval, Random, Rolling Hills or Kilimanjaro is chosen) •... - Page 40 Cross-Trainer and Bikes Standard Goals User Input • 3 preset values or use keypad to input desired time • Terrain (Flat, Hill Interval, Rolling Hills, Random, Kilimanjaro) Time • Level • Weight • 3 preset values or use keypad to input desired distance •...
- Page 41 Arc Trainer Standard Goals User Input • 3 preset values or use keypad to input desired time • Terrain (Flat, Hill Interval, Rolling Hills, Random) Time • Resistance (if Flat is chosen) • Level (if Hill Interval, Random or Rolling Hills is chosen) •...
- Page 42 Arc Trainer Muscle Focus User Input • Time Glute Camp • Level • Weight • Time Strength Burst • Level • Weight • Time Total Leg • Level • Weight Page 40 of 96...
- Page 43 PowerMill Climber Standard Goals User Input • 3 preset values or use keypad to input desired time • Terrain (Flat, Hill Interval, Rolling Hills, Random, Kilimanjaro) Time • Level (if Hill Interval, Random, Rolling Hills or Kilimanjaro is chosen) • Speed •...
- Page 44 User Input Ranges Time 1 - 60 minutes Weight 75 - 400 lbs. (34 -181 kg) Incline 0.0 - 15.0 Speed 0.5 - 14.0 MPH (0.5 - 23 KPH) (commercial units) 0.5 - 12.0 MPH (0.5 - 19 KPH)(home units) 20 - 160 SPM (PowerMill only) 10 - 99 years Height...
- Page 45 Theoretical Maximum Heart Rates and Target Heart Rates Reference the chart below for Theoretical Maximum Heart Rates and Target Heart Rates. Listed as BPM (Beats per Minute). Theoretical Maximum 65% (Moderate Burn) 80% (Vigorous Burn) Heart Rate Wear the optional Polar ®...
-
Page 46: Quick Start
Quick Start Users have two ways to select a Quick Start workout. • Press the Quick Start button on the Home Screen. • Press the Green Arrow Quick Start button at the top of the Choose Workout screen. • A workout countdown 3, 2, 1 screen appears. •... -
Page 47: Lfod
Configuration to access the full library of streaming workouts. Internet Bandwidth Requirements Life Fitness On Demand+ requires a strong internet connection for optimal user experience. At least 2.5 Mbps per machine is recommended. Internet bandwidth, otherwise known as your network connection speed, is measured in Megabits per second (Mbps). - Page 48 If your facility has low bandwidth we recommend that you enable Life Fitness On Demand+ only on a select number of units. You may experience lagging internet connectivity if you do not have the appropriate bandwidth. Use this chart as a guide:...
- Page 49 Selecting and Using a Video 1. Access On-Demand Workouts via these options: • Home Screen: Press View More Life Fitness On Demand Classes. • Choose Workout Screen: • Scroll to the On-Demand Workout category and press View All to view complete On-Demand Workouts library.
- Page 50 2. The On-Demand Workouts library allows users to filter workouts by the following categories: • Language • Difficulty • Duration • Instructor 3. Tap on an On-Demand Workout tile to display more details about the selected class. Exercisers can pair their Bluetooth headphones by tapping Connect Headphones and following the prompts.
- Page 51 4. Use the quick-touch buttons to adjust workout settings such as speed, incline and resistance. NOTE: Quick-touch buttons vary depending on workout. Image shown is a treadmill workout. 5. Press the Music Note to access volume options for the song playing and the music/instructor balance. Page 49 of 96...
- Page 52 NOTE: The incline of the treadmill automatically increases or decreases to correspond with the virtual hills on the course. Press VIEW ALL to access the Interactive Terrains workout library and choose desired course. NOTE: Life Fitness On Demand+ can be enabled through Halo.Fitness Accessing System Options.
-
Page 53: Standard Goals
Standard Goals Choose desired goal. NOTE: Available Goal Workouts vary by base type. NOTE: Reference Workouts List, Workout Descriptions Workout Setup - Data Inputs. Page 51 of 96... -
Page 54: Fit Tests
Fit Tests Choose desired fit test. NOTE: Available fit test workouts vary depending on base type. NOTE: Reference Workouts List, Workout Descriptions Workout Setup - Data Inputs. Page 52 of 96... - Page 55 Life Fitness Fit Test • The Life Fitness Fit Test estimates cardiovascular activity and can be used to monitor improvements in endurance every 4 - 6 weeks. • The Fit Test is considered to be a submax VO (volume of oxygen) test and gauges how well the heart supplies oxygenated blood to the exercising muscles and how efficiently those muscles receive oxygen from the blood.
- Page 56 22 - 23 20 - 21 <20 Life Fitness developed this rating scale based on VO max percentile distributions referenced in American College of Sports Medicine’s Guidelines for Exercise Testing and Prescription (8th E. 2010). It is designed to provide a qualitative description of a user’s VO...
-
Page 57: Maintenance And Troubleshooting
6. Maintenance and Troubleshooting NOTE: Safety of the equipment can be maintained only if the equipment is examined regularly for damage or wear. Keep the equipment out of use until defective parts are repaired or replaced. The following preventive maintenance tips will keep the product operating at peak performance: •... - Page 58 Make sure the chest strap transmitter is within 3 ft. heart rate receiver. (0.9 m) of the heart rate receiver. Polar telemetry heart rate chest strap battery is Contact Life Fitness Customer Support Services for depleted. instructions on how to have the Polar telemetry heart rate chest strap replaced.
- Page 59 Troubleshooting - Life Fitness On Demand+ Malfunction Probable Cause Corrective Action Activate On-Demand Workouts / Streaming On-Demand Workouts / Streaming Interactive Interactive Terrains via Manager’s Configuration or Terrains has not been activated. On-Demand Workouts / on Halo.Fitness. Streaming Interactive Check network connectivity in Manager’s Terrains library is not Configuration.
-
Page 60: Manager's Configuration
7. Manager's Configuration Access Systems Options 1. Select Language icon from Attract Screen to access the Select Language screen. 2. Tap the bottom part of the Select Language screen in the following sequence: Lower-Left, Lower-Right, Lower- Left, Lower-Right. NOTE: Make sure you tap INSIDE the black square! Page 58 of 96... - Page 61 3. Navigate through the System Options menu to Configuration > Manager. Page 59 of 96...
-
Page 62: Default Settings
Default Settings Cardio Bases with SE4 Console Setting Default Description This option sets a new default language. Options include: English US, English UK, Spanish, German, Japanese, Dutch, Simplified Chinese, Default Language English U.S. Traditional Chinese, Portuguese, Italian, French, Russian, Korean, Turkish, Polish, Finnish, Hungarian, Arabic, Catalan, Basque, Welsh, Hebrew, Danish and Swedish. - Page 63 3 mph increments before needing to let go and press and hold again. When disabled, the user will not be able to press and hold to increase speed. Turns off all Fit Tests except for the Life Fitness Fit Tests Fit Test Plus when "Off".
- Page 64 Setting Default Description The rate at which the treadmill accelerates to the selected speed. Acceleration Rate Range from 1 (slowest) to 5 (fastest). The rate at which the treadmill decelerates to the selected speed. Deceleration Rate Range from 1 (slowest) to 5 (fastest). PowerMill Climber Only Setting Default...
- Page 65 1. Select Tuner Type. • DTV is the default selection for PRO:IDIOM, DVB and ISDB configurations. • STB SYNC is the default selection for STB SYNC and STB Connector Kit configurations. • Open IPTV is the default selection for streaming media on IP using RTP, UDP, and similar protocols. 2.
- Page 66 PMode Set Picture Mode. Press + and - to change channels. Zoom Picture Size. Display Current channel information is shown. EPG ( Lists current and upcoming programs for Up and Press to navigate the TV Setup menu options. available ) selected channels.
- Page 67 TV Channel Scan for Pro:Idiom Tuner over Coax 1. Press to navigate to Channel. 2. Press to navigate to Air/Cable, and press to select your configuration. NOTE: • Cable scans for Pro:Idiom encrypted digital, clear digital, and analog channels. • Air scans for digital ATSC channels from local terrestrial antenna. •...
- Page 68 TV Channel Scan for DVB Tuner 1. Press to navigate to Channel. 2. Press to navigate to Auto Tuning. 3. Press Enter. 4. Press to navigate to Country, then press to select your country. 5. Press to navigate to Digital Type, then press to select your digital TV standard.
- Page 69 TV Channel Scan for ISDB-T Tuner Select Scan from the TV Setup Menu options. 1. Select All Regions to pull up a list of regions. Choose applicable region. 2. Set the CATV Pass Through Option to OFF. 3. Choose Auto for Scan Type selection. 4.
- Page 70 Channel List Management for ISDB-T Tuner Select Channel List from the TV Setup Menu options. 1. Select Upload Channel List to upload a channel list to Halo Fitness Cloud (if connected). Page 68 of 96...
- Page 71 2. Select Edit to edit the channel list. Uncheck channels to hide the channels from the user. Hidden channels will not be options during workouts. Page 69 of 96...
- Page 72 Prerequisite requirements. Facility will need to provide: • Access to their IPTV network through a CAT-5e/CAT-6 wired connection for each and every Life Fitness cardio product containing the Pro:Idiom IPTV DTB. Do not support Pro:Idiom over a WLAN connection. • Static IP address (IPv4 – 32-bit) assignment for every piece of cardio equipment containing the Pro:Idiom IPTV DTB.
- Page 73 Static IP Address Every Pro:Idiom IPTV DTB needs to be programmed with a Static IP address. The Static IP address assignment or range should be provided by the facility manager or A/V integrator. First Time Setup menu: Follow the instructions to setup the tuner setup parameters. During this First Time Setup, enter this Static IP address.
- Page 74 5. Enter the Static IP address under Device IP section. Each of the 4 boxes (the first is in green) needs to be filled out using the numeric keypad and right and left arrows for navigation. In the example below, the static IP address for this unit is 192.168.0.100.
- Page 75 3. Enter in the Port VLAN ID (or PVID for short) which is a default VLAN ID that is assigned to designate the VLAN segment to which this port is connected. Any additional VLANs that are needed to access the IPTV traffic can be placed in the adjacent boxes starting left to right.
- Page 76 2. Press to navigate to Input Channel IP Address. Press Enter or . 3. Input the first channel's IP multicast address and port number using to navigate to each cell. Press Enter to save channel. Repeat for every channel within the channel list. NOTE: •...
- Page 77 4. Press to navigate to Auto Channel Scan. Press Enter or . 5. A prompt to confirm you selection will appear. Press to select No or Yes. Press Enter. After the scan, all channels with the correct address and port assignment parameters will play back content. 6.
- Page 78 Create Channel List After all the channels have been verified, use the Create Channel List function to import the channel list to the console GUI. A dialog box will appear and show progress. Exit System Options and launch a workout to verify the TV channels show up properly. Console Settings Export / Import Feature Console settings can be Exported and Imported between local consoles using the front panel USB port.
- Page 79 2. Navigate to System Options > Configuration > Export / Import Settings. 3. Select Export Settings to USB stick. A prompt will show progress. 4. After a successful Export, insert the USB flash drive into a console that does not have the settings, and navigate to System Options >...
- Page 80 NOTE: Tuner channel lists will only import if the tuner is the same tuner type and on the same software version. Upload Channel List Feature to push a channel list to Halo for channel management and sending the channel list to other Halo connected Discover consoles within the facility that share the same tuner type and tuner software version.
- Page 81 The update will happen in two stages, transmission of the data from the console to the DTB and the actual update. This process can take up to 2 minutes. If the update process is not observed during the console update, this is typically because the tuner firmware is already up to date.
- Page 82 Tuner Type and Tuner Firmware Version Check To check the tuner type or firmware version, navigate to System Options > Information > Software Version > Tuner to see the tuner type and firmware version. Page 80 of 96...
- Page 83 STB SYNC NOTE: Select the IPTV Setting at installation to match the Set Top Box (STB) brand / model in the facility’s AV closet. Page 81 of 96...
- Page 84 These commands are sent to the corresponding STB. The STB determine the actions. See the STB manufacturer’s documentation for detailed functionality and descriptions. 1. IPTV Setting Select Change. Search for the STB brand and model. a. Scroll through the list of brands and models, or type the name of the brand or model in the Search Brand or Model box.
- Page 85 Open Channel Setup After scanning for channels or installing a STB, press Open Channel Setup to customize your channel list for the Workout Screen. The Open Channel Setup menu has four options: • Edit Current - Edit titles, add titles, remove titles, and save titles. •...
- Page 86 Edit Current Press Edit Current to access the following menu options: • Add Channel - Add one or many channels and edit channel titles. • Remove - Remove unwanted channels. Add Channel 1. Press Add Channel. Page 84 of 96...
- Page 87 2. Type the channel number in the Major number* box. 3. Type the channel sub-number or program number in the Minor number box. 4. Type the channel name in the Channel name* box. 5. Choose one of the following: • Press Add + New if you have more channels to add to your channel list. •...
- Page 88 Reorder Selected Channel 1. Press on the channel you want to reorder on your channel list. NOTE: The order of the channel list that you create will appear within the workout menu. 2. Press to rearrange the channel on your channel list. 1.
- Page 89 Remove 1. Press on the channel you want to remove from your channel list. 2. Press Remove. 1. Press Save when you are finished removing channels. 2. Press Close Channel Setup if you are finished with your channel list. Page 87 of 96...
- Page 90 Clear Current Press Clear Current to delete an existing list of channels, and create a new list of channels. Import New The Import New feature requires a channel list on a different unit and a USB flash drive. You will use the Export Current feature on another unit before using the Import New feature.
- Page 91 7. Verify that your unit has imported the channel list from the other unit. Export Current The Export Current feature is used when you want to save your current channel list on multiple machines. You will use the Import New feature after using the Export Current feature. To export a unit's current channel list: 1.
- Page 92 Open IPTV Open IPTV allows custom channel creation. 1. Tuner Type The Open IPTV tuner type only shows when the console is configured for Open IPTV. 2. TV Setup Press to access the Open IPTV TV Setup menu. 3. Custom Channel •...
- Page 93 9. Export Channels Export channel list to an inserted USB stick. 10. Upload Channel List Uploads your channel list to Halo Fitness Cloud (if connected) and instantly to all units in the facility if units are connected to the internet. 11.
-
Page 94: Specifications
8. Specifications Console Specifications Console Screen Type: LCD with integrated projected capacitive touch screen Discover SE4 LCD Touch 23.8 in. (60.5 cm) diagonal or 15.6 in. (39.6 cm) diagonal Screen Size: LCD Touch Screen Power 20.5 -25.5 VDC @ 3.5 A Requirement: CSAFE: Type RJ45, interchangeable Network ready connection and Fitness Entertainment port Ports:... -
Page 95: Console Dimensions
Console Dimensions Physical Dimensions (Unboxed) Shipping Dimensions (Boxed) Depth Width Height Weight Depth Width Height Weight Discover SE4 5.21 in 22.83 in 18.36 in 20 lbs 8.9 in 21.7 in 27.9 in 25.45 lbs Console 13.23 cm 58 cm 46.63 cm 9 kg 22.6 cm 54 cm... -
Page 96: Copyrights And Trademarks
9. Copyrights and Trademarks List of Copyrights and Trademarks Life Fitness Life Fitness ® , All Rights Reserved. Life Fitness is a registered trademark. Discover ™ , FitPower ™ , Heart Rate+ ™ , LFconnect ™ , Lifepulse ™ , Lifescape ™... -
Page 97: Warranty
Who Pays Transportation and Insurance For Service If the Product or any covered part must be returned to a service facility for repairs, We, Life Fitness Family of Brands, will pay all transportation and insurance charges for the first year. You are responsible for transportation and insurance charge after the first year. -
Page 98: Changes In Warranty Not Authorized
Changes in Warranty Not Authorized No one is authorized to change, modify or extend the terms of this limited warranty. Effects of State Laws This warranty gives you specific legal rights, and you may have other rights which vary from state to state and country by country.
Need help?
Do you have a question about the Discover SE4 Console and is the answer not in the manual?
Questions and answers