Table of Contents
Advertisement
Quick Links
Advertisement
Table of Contents

Related Manuals for VESTEL AO-6470 S


Summary of Contents for VESTEL AO-6470 S
- Page 1 Hob / User Manual AO-6470 S-K...
- Page 2 Thank you for choosing this product. This User Manual contains important safety information and instructions on the operation and maintenance of your appliance. Please take the time to read this User Manual before using your appliance and keep this book for future reference. Icon Type Meaning...
-
Page 3: Table Of Contents
CONTENTS 1.SAFETY INSTRUCTIONS ....................4 1.1 General Safety Warnings ....................4 1.2 Installation Warnings ......................6 1.3 During Use 7 1.4 During Cleaning and Maintenance .................8 2.INSTALLATION AND PREPARATION FOR USE ............10 2.1 Instructions for the Installer ..................10 2.2 Installation of the Hob ....................10 2.3 Electrical Connection and Safety..................12 3.PRODUCT FEATURES ....................13 4.USE OF PRODUCT ......................14... -
Page 4: Safety Instructions
1. SAFETY INSTRUCTIONS • Carefully read all instructions before using your appliance and keep them in a convenient place for reference when necessary. • This manual has been prepared for more than one model therefore your appliance may not have some of the features described within. - Page 5 WARNING: Danger of fire: Do not store items on the cooking surfaces. WARNING: If the surface is cracked, switch off the appliance to avoid the possibility of electric shock. • For induction hobs, metallic objects such as knives, forks, spoons and lids should not be placed on the hob surface because they can get hot.
-
Page 6: Installation Warnings
frequency) and the specifications of the appliance are compatible. The specifications for this appliance are stated on the label. CAUTION: This appliance is designed only for cooking food and is intended for indoor domestic household use only. It should not be used for any other purpose or in any other application, such as for non-domestic use, in a commercial environment or for heating a room. -
Page 7: During Use
• When the appliance is unpacked, make sure that it is has not been damaged during transportation. In the case of a defect do not use the appliance and contact a qualified service agent immediately. The materials used for packaging (nylon, staplers, Styrofoam, etc.) may be harmful to children and they should be collected and removed immediately. -
Page 8: During Cleaning And Maintenance
1.4 DurinG CleaninG anD MaintenanCe • Make sure that your appliance is turned off at the mains before carrying out any cleaning or maintenance operations. • Do not remove the control knobs to clean the control panel. • To maintain the efficiency and safety of your appliance, we recommend you always use original spare parts and to call our authorised service agents in case of need. - Page 9 please contact your local city office, your household waste disposal service or the retailer who you purchased this product from. EN - 9...
-
Page 10: Installation And Preparation For Use
2. INSTALLATION AND PREPARATION FOR USE WARNING: This appliance must be installed by an authorised service person or qualified technician, according to the instructions in this guide Minimum Minimum 42 cm 42 cm and in compliance with the current local regulations. - Page 11 Separator Separator • Apply the supplied one-sided self- Worktop mounting adhesive sealing tape all the way bracket around the lower edge of the cooktop. Do not stretch it. Self-adhesive sealing tape • Screw the 4 worktop mounting brackets in to the side walls of product. EN - 11...
-
Page 12: Electrical Connection And Safety
• Insert the appliance into the aperture. 2.3 eleCtriCal ConneCtion anD Safety WARNING: The electrical connection of this appliance should be carried out by an authorised service person or qualified electrician, according to the instructions in this guide and in compliance with the current local regulations. -
Page 13: Product Features
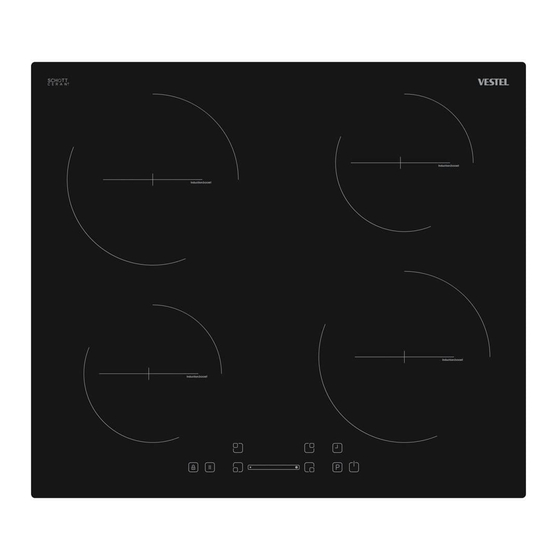
3. PRODUCT FEATURES Important: Specifications for the product vary and the appearance of your appliance may differ from that shown in the figures below. List of Components 1. Induction zone 2. Control Panel EN - 13... -
Page 14: Use Of Product
4. USE OF PRODUCT • If a suitable pan is placed on the cooking zone symbol will disappear and cooking continues at the selected 4.1 hob ControlS power level. Induction Zone • To obtain best energy transferring the The information given in the following table diameter of the cookware base should is for guidance only. - Page 15 9- Sliding Buttons that is dangerous to touch. 10- Boost After switching off the cooking zone, the respective display will show “H” until the 11- On/Off corresponding cooking zone temperature is Use the induction cooking zones with at a safe level. suitable cookware.
- Page 16 be displayed and the hob will switch off. sound, the timer display will show “00” and the assigned cooking zone timer LED will Key Lock blink. The programmed cooking zone will The key lock function is used to set switch off and “H” will be displayed if the ‘safe mode’...
- Page 17 using the left side of the sliding button, turn the keep-warm function, press the heater the level down to “0”. If the bridge cooking selection button four times. When the zone is hot, “H” will be displayed. keep-warm function has been activated, the corresponding display will show ‘u’.
-
Page 18: Cleaning And Maintenance
5. CLEANING AND Supply voltage is other than the rated values. MAINTENANCE Switch the hob off by pressing ,wait until “H” disappears for all zones, switch the hob on by pressing and continue to use. If 5.1 CleaninG the same error is displayed again, call an authorised service agent. - Page 19 • Dust on the surface must be cleaned with a wet cloth. • Any changes in colour to the ceramic glass will not affect the structure or durability of the ceramic and is not due to a change in the material. Colour changes to the ceramic glass may be for a number of reasons: 1.
-
Page 20: Troubleshooting&Transport
6. TROUBLESHOOTING&TRANSPORT 6.1 troubleShootinG If you still have a problem with your appliance after checking these basic troubleshooting steps, please contact an authorised service person or qualified technician. Problem Possible Cause Solution Check the household fuse for the Hob control card’s display is appliance. - Page 21 52202020...
Need help?
Do you have a question about the AO-6470 S and is the answer not in the manual?
Questions and answers