Waterpik Cordless Pulse Water Flosser - WF-20, WF-21 Series Manual
- Instruction manual (28 pages) ,
- Manual (28 pages) ,
- Manual (22 pages)
Advertisement
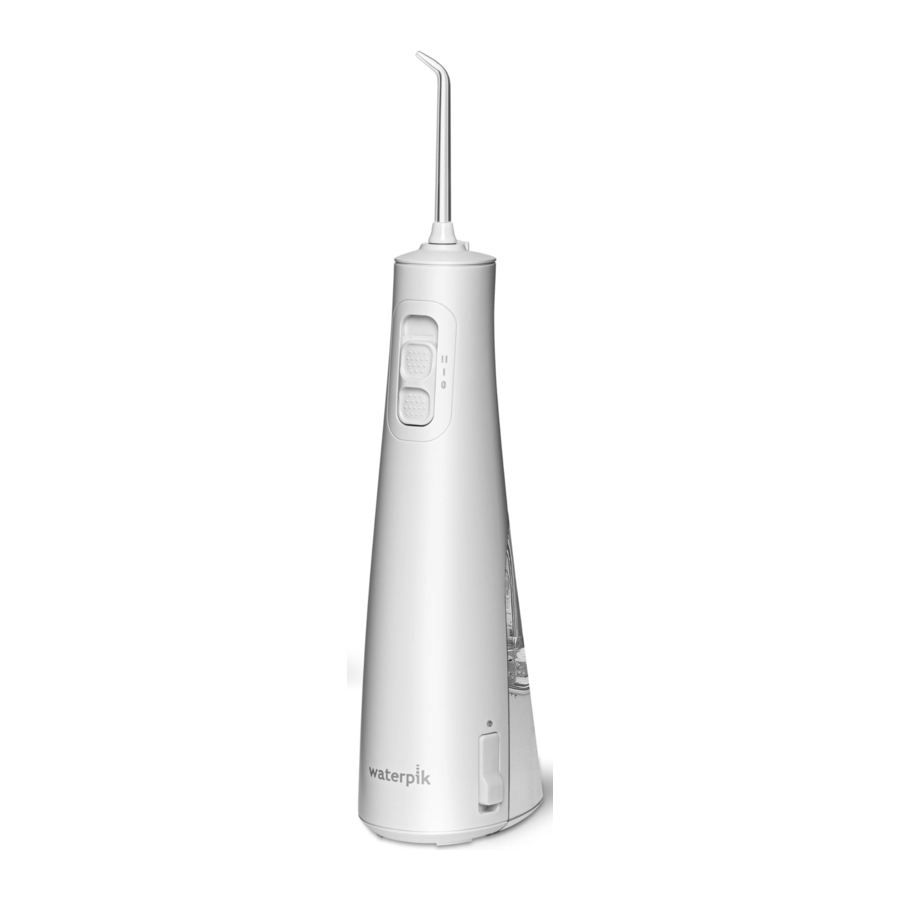
PRODUCT DESCRIPTION

- Power handle
- Power/pressure switch
- Battery charge indicator
- Charge port/cover
- Tip
- Tip eject button
- Reservoir fill door
- Reservoir
TIPS
NOT ALL TIPS INCLUDED IN ALL MODELS
- Orthodontic Tip*
Braces/General use
![]()
- Pik Pocket™ Tip*
Periodontal Pockets/Furcations
![]()
- Plaque Seeker™ Tip*
Implants/Crowns/Bridges/ Retainers/General use
![]()


- Toothbrush Tip*
General use
![]()
- Classic Jet Tip**
General use
![]()
- Tongue Cleaner**
Fresher breath
![]()
- Travel Plug
Keeps excess water from draining out while traveling
![]()


*Replace Every 3 months
**Replace Every 6 months
Replacement tips/attachments may be purchased online at www.waterpik.com, or by phone from Water Pik, Inc. at 1-800-525-2774 (USA). To find detailed information about tips, other accessories, and product usage please visit our website at www.waterpik.com.
GETTING STARTED
Charging Unit Prior to First Use

Connect the USB charging cable to the unit (USB-C) and then to the USB wall charger (USB-A).
Then plug the USB wall charger into the power outlet and charge unit for approximately 4 hours.
 Note: Refer to the IMPORTANT SAFEGUARDS section for required USB wall charger specifications.
Always ensure USB plugs and USB ports are clean and dry before connecting.
LED will glow as it charges. LED stays lit when fully charged until USB cable is unplugged from the device. LED blinks 8 times once you are finished flossing and if the battery is below 30%.
NOTE: Make sure unit is dry before opening weathercap and connecting the charger. Replace the weathercap after charging and ensure it's fully seated (flush with the outside surface of the handle).
Filling the Reservoir

Before filling, disconnect charging cable and replace charging port cover.
Lift flip top on reservoir and fill with lukewarm water.
Inserting and Removing Tips

Insert tip into the center of the knob at the top of the Water Flosser handle. Press firmly until the tip clicks into place. To remove the tip from the handle, press the tip eject button and pull tip from the handle.

Do not press tip eject button while unit is running.
Adjusting the Pressure Setting

You can adjust the pressure setting on your Water Flosser by simply sliding the pressure/power switch on the handle.
Slide power switch up 1 click for Low (l) pressure and 2 clicks for High (ll) pressure.
Start with the lowest setting and increase to your liking.
Recommended Technique

Lean low over sink and place tip in mouth. Aim the tip toward gumline, and turn the unit ON (I).
For best results, start with the back teeth and work toward the front teeth. Glide tip along gumline and pause briefly between teeth. Continue until you have cleaned the inside and outside of both the upper and lower teeth.

Direct the jet stream at a 90-degree angle to your gumline. Slightly close lips to avoid splashing but allow water to flow freely from mouth into the sink. Keep unit upright during use for best results.
When Finished

Turn the unit OFF (O). Empty any liquid left in the reservoir.
If desired, the reservoir may be removed from the power handle by simply pulling down on the reservoir to remove.
NOTE: NOT ALL TIPS INCLUDED WITH ALL MODELS.
TIP USAGE
Pik Pocket™ Tip

The Pik Pocket™ tip is specifically designed to deliver water or anti-bacterial solutions deep into periodontal pockets.
To use the Pik Pocket™ tip, set the unit to the lowest pressure setting. Place the soft tip against a tooth at a 45-degree angle and gently place the tip under the gumline, into the pocket.
Tongue Cleaner Tip

Set to lowest pressure setting, place tip in the center/middle of your tongue about half way back. Pull forward with light pressure. Increase pressure as you prefer.
Orthodontic Tip

To use the orthodontic tip, gently glide tip along gumline, pausing briefly to lightly brush area between teeth and all around orthodontic bracket, before proceeding to the next tooth.
Toothbrush Tip

Place the toothbrush tip in mouth with the brush head on the tooth at the gumline. The toothbrush tip can be used with or without toothpaste. Using a light pressure (bristles should not bend) massage the brush back and forth with very short strokes – much like you would with a manual toothbrush.
Plaque Seeker™ Tip

To use the Plaque Seeker™ tip, place the tip close to the teeth so that the bristles are gently touching the teeth. Gently glide tip along gumline, pausing briefly between teeth to gently brush and allow the water to flow between the teeth.
CLEANING AND TROUBLESHOOTING
Using Mouthwash and Other Solutions
Your Waterpik® Water Flosser can be used to deliver mouthwash and antibacterial solutions. For ease of adding other solutions remove the reservoir (see "When Finished" section) and add from top opening on reservoir. If you are adding additional water you may replace the reservoir and fill reservoir fully with the fill door. After using any special solution, rinse unit to prevent clogging by partially filling reservoir with warm water and running unit with tip pointed into sink until unit is empty.
Cleaning

Never immerse unit in water. Before cleaning, unplug from the electrical outlet. Clean the product when necessary by using a soft cloth and mild non-abrasive cleanser to wipe exterior.
The water reservoir is removable for easy cleaning and is top rack dishwasher safe. It is recommended that the reservoir is removed and cleaned weekly.
Removing Hard Water Deposits / General Cleaning
Hard water deposits may build up in your unit, depending on the mineral content of your water. If left unattended, it can hinder performance. Cleaning internal parts: add 1 tablespoon of white vinegar to a full reservoir of warm water. Point the handle and tip into sink. Turn unit ON and run until reservoir is empty. Rinse by repeating with a full reservoir of clean warm water.
This process should be done every 1 to 3 months to ensure optimal performance.
BATTERY CARE
If the Water Flosser is to be stored for an extended period of time (six months or more), be sure to fully charge it prior to storage. Do not expose the battery or appliance to excessive temperatures.
Note: The rechargeable battery is not replaceable, remove only at end of product life. This process is not reversible and voids the product warranty.
Service Maintenance
Waterpik® Water Flossers have no consumer-serviceable electrical items and do not require routine service maintenance. For all your service needs go to www.waterpik.com. You may also call our toll-free customer service number at 1-800-525-2774. Refer to the serial and model numbers in all correspondence. These numbers are located on the bottom of your unit.
Still have questions? Go to www.waterpik.com.
IMPORTANT SAFEGUARDS
READ ALL INSTRUCTIONS BEFORE USING.
- This product is for household use.
When using electrical products, especially when children are present, basic safety precautions should always be followed, including the following:

To reduce the risk of electrocution:
- Do not place or store product where it can fall or be pulled into a tub or sink.
- Do not handle the user supplied USB wall charger with wet hands.
- Do not place or drop the device or user supplied USB wall charger into water or other liquid.
- Check the charging cord and user supplied USB wall charger for damage before the first use and during the life of the product.

To reduce the risk of burns, electrocution, fire, or injury to persons:
- This appliance is not intended for use by persons (including children) with reduced physical, sensory or mental capabilities, or lack of experience and knowledge, unless they have been given supervision or instruction concerning use of the appliance by a person responsible for their safety.
- Children should be supervised to ensure that they do not play with the appliance.
- Use this product only as indicated in these instructions or as recommended by your dental professional.
- Only use tips and accessories recommended by Water Pik, Inc.
- Do not use this product if it has a damaged cord or plug, if it is not working properly, if it has been dropped or damaged, or dropped into any liquid. Contact Water Pik, Inc. at 1-800-525-2774 or visit www.waterpik.com.
- Keep the charging cord and user supplied USB wall charger away from heated surfaces.
- Never drop or insert any object into any opening or hose.
- Do not use outdoors or operate where aerosol (spray) products are being used or where oxygen is being administered.
- Do not expose the battery or appliance to excessive temperatures.
- A user supplied USB-A wall charger (power adapter), safety certified (IPX4, Class II) and with a rated output of 5.0 VDC, 1.0 A Max must be used to chart this device.
- Do not plug this device into a voltage system that is different from the voltage system specified on the device or charger.
- Unplug USB wall charger when not in use.
- Do not use the Water Flosser for more than five minutes in each two hour period.
- Do not direct water under the tongue, into the ear, nose or other delicate areas. This product is capable of producing pressures that may cause serious damage in these areas.
- Do not direct water into the nose or ear. The potentially deadly amoeba, Naegleria fowleri, may be present in some tap water or unchlorinated well water and may be fatal if directed into the nose or ear.
- If your physician advises you to receive antibiotic premedication before dental procedures, you should consult your dental professional before using this product or any other oral hygiene aid.
- Fill reservoir with warm water or other dental professional recommended solutions only.
- Do not use iodine, saline (salt solution), or water insoluble concentrated essential oils in this product. Use of these can reduce performance and will shorten the life of the product.
- If the Pik Pocket™ tip (not included in all models) separates from the shaft for any reason, discard tip and shaft and replace with a new Pik Pocket™ tip.
- Remove any oral jewelry prior to use of this product.
- Do not use if you have an open wound on your tongue or in your mouth.
- There are no consumer serviceable electrical parts in this product and it does not require maintenance.
- Remove charging cord from the unit and replace charging port cover prior to filling the reservoir.
- If the supply cord is damaged, it must be replaced by a special cord or assembly available from the manufacturer or its service agent.
SAVE THESE INSTRUCTIONS
SYMBOLS
The following symbols may appear on your product and/or packaging. Some of these symbols may not be relevant in your region and are listed for information purposes only.
| Symbol | Definition | Symbol | Definition | Symbol | Definition | Symbol | Definition |
 | Refer to instruction manual |  | Detachable Power Supply |  | Do not use this device in a shower, bathtub and do not immerse in any liquid. |  | Regulatory Compliance Mark |
 | Manufacturer |  | Direct Current (DC) Voltage |  | Authorized Representative in the European Community |  | Separate collection for waste electrical and electronic equipment. |
| IPX7 or IPX4 | Ingress Protection Code |  | Alternating Current (AC) Voltage |  | CE marking of conformity | ||
 | IEC Class II Equipment |  | Do not immerse this device in any liquid. |  | UK Conformity Assessed |

Documents / Resources
References
Download manual
Here you can download full pdf version of manual, it may contain additional safety instructions, warranty information, FCC rules, etc.
Download Waterpik Cordless Pulse Water Flosser - WF-20, WF-21 Series Manual
Advertisement


Need help?
Do you have a question about the WF-20 Series and is the answer not in the manual?
Questions and answers