La Crosse Technology C85845 - Wireless Color Weather Station Manual
- Instructional manual (12 pages) ,
- Instructional manual (12 pages) ,
- Setup manual (15 pages)
Advertisement
- 1 POWER UP
- 2 BUTTONS
- 3 SETTINGS MENU
- 4 WWVB ATOMIC TIME SIGNAL
- 5 TIME ALARM
- 6 FORECAST
- 7 FORECAST TREND ARROWS
- 8 ADJUSTABLE BACKLIGHT
- 9 COMFORT CHARTS
- 10 TEMPERATURE & HUMIDITY READINGS
- 11 TEMPERATURE & HUMIDITY RECORDS
- 12 TEMPERATURE & HUMIDITY TREND ARROWS
- 13 TEMPERATURE & HUMIDITY ALERTS
- 14 SEARCH FOR OUTDOOR SENSOR
- 15 LOW BATTERY INDICATOR
- 16 SENSOR WEATHER SHIELD
- 17 STAY IN TOUCH
- 18 SPECIFICATIONS
- 19 CARE AND MAINTENANCE
- 20 WE'RE HERE TO HELP
- 21 WARRANTY & PATENTS
- 22 Documents / Resources
POWER UP
- Insert 2-AA batteries into your Outdoor Sensor TX141TH-B (all versions).
![]()
- Insert the 5 volt power cord into an outlet, then into your station. Optional: Insert 2-AA batteries for backup.

- Enter the Settings Menu to adjust your time.
- Once the sensor is reading to your thermometer, place the sensor outside in a shaded location. View our sensor mounting video here: bit.ly/th_sensor_mounting


BUTTONS

SETTINGS MENU
- Hold the SET button until the display changes to enter the Settings Menu.
- Press and release the + or - button to adjust values. Press and release SET to confirm and move to the next item.
- Press the SNOOZE/BACKLIGHT button at anytime to exit the Settings Menu.
Settings Menu order:
- Language
- Beep ON/OFF
- Atomic ON/OFF
- Time Zone
- DST ON/OFF
- 12H/24H
- Hour
- Minutes
- Year
- Month
- Date
- Fahrenheit/Celsius
| Time Zone | |
| AST | Atlantic |
| EST | Eastern |
| CST | Central |
| MST | Mountain |
| PST | Pacific |
| AKT | Alaskan |
| HAT | Hawaiian |
Language: When Español is selected, the following instructions and weekday will be presented in that language.
Weekday: Weekday sets automatically when Year, Month and Date are set.
WWVB ATOMIC TIME SIGNAL
- The station will automatically search for the atomic time signal at UTC 7:00, 8:00, 9:00, 10:00, and 11:00.
- The Atomic Time Signal Icon
![]() will flash while searching, and be solid when connected.
will flash while searching, and be solid when connected. - Press and release the SET button anytime, to manually search for the atomic time signal.
- For information about WWVB visit: bit.ly/atomic_time
TIME ALARM
Set Alarm:
- Hold the ALARM button to enter the Alarm Settings Menu.
- Use the +/- buttons to adjust the flashing values.

- Press the ALARM button to confirm and move forward.

Note: The alarm will activate after being set, indicated by the Alarm Icon 
Activate/Deactivate Alarm:
Press the ALARM button to activate or deactivate the alarm and view your alarm time. The Alarm Icon will show only when alarm is active.

Snooze:
- When alarm sounds, press the SNOOZE/BACKLIGHT button to silence alarm for 10 minutes. The Snooze Icon Zz will flash.
- Press any button except SNOOZE/BACKLIGHT to silence the alarm for 24 hours.
- This is a crescendo alarm. It will sound for two minutes with increased frequency, then shut off if no buttons are pressed.
FORECAST
Your station uses changing atmospheric pressure to predict weather conditions for the next 12-hours. When the outdoor temperature is below 32°F and the forecast is Rain or T-Storm, the station will show Snow. Please allow 7-10 days for barometric calibration. Note: Above 6,200 feet your forecast icons may not change.
![]()
FORECAST TREND ARROWS
The Forecast Trend Arrows indicate the change in pressure over the past 3 hours.
No arrow indicates the pressure is steady.
 Pressure is rising
 Pressure is falling
ADJUSTABLE BACKLIGHT
When operating with the power cable, the backlight is adjustable to:
High, Low, or Off.
- Press and release the SNOOZE/BACKLIGHT button to adjust backlight.
- When operating on batteries only, the backlight will come on briefly when the SNOOZE/BACKLIGHT button is pressed.
COMFORT CHARTS
- Indoor & Outdoor comfort charts keep you informed when the humidity is at a comfortable level.
- The bar over the chart will move to indicate the humidity level.


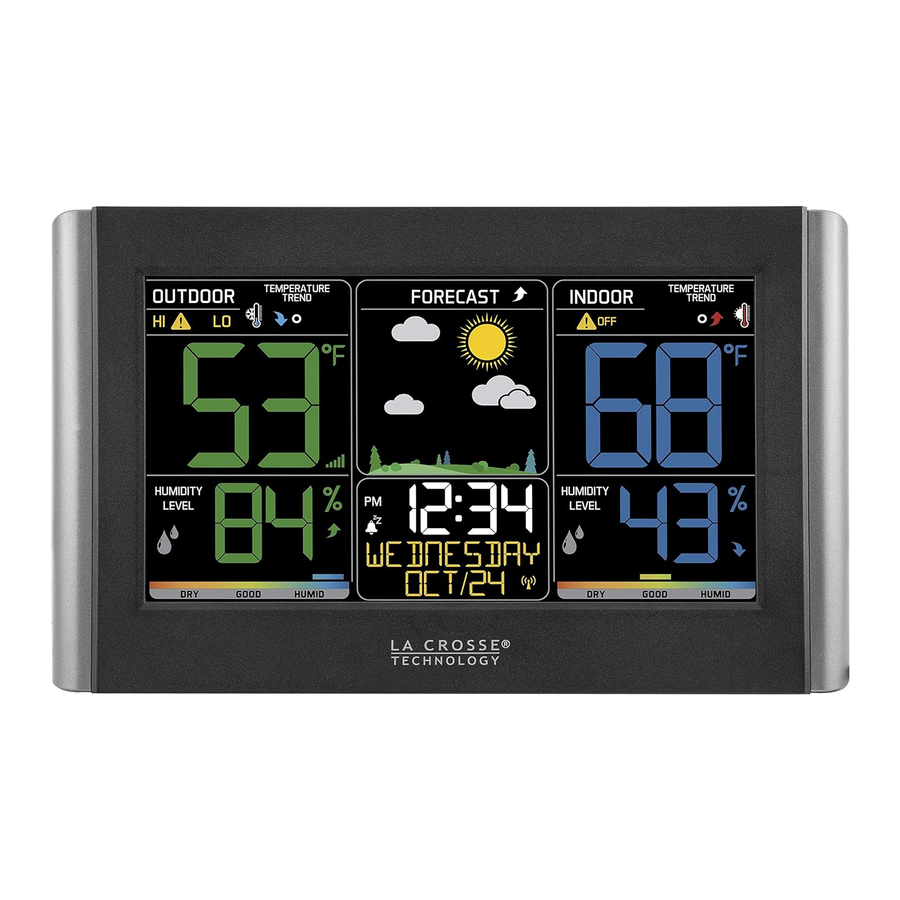
TEMPERATURE & HUMIDITY READINGS

- TEMPERATURE ALERT
Shows an Alert is armed. - TREND ARROW
Indicates rising and falling Temperature trends. - OUTDOOR TEMPERATURE
Current Outdoor Temperature. - RECEPTION ICON
![]()
Indicates if the station is receiving data from the sensor. - OUTDOOR HUMIDITY
Current Outdoor Humidity. - TREND ARROW
Indicates rising and falling Humidity trends. - TEMPERATURE ALERT
Shows an Alert is armed. - TREND ARROW
Indicates rising and falling Temperature trends. - INDOOR TEMPERATURE
Current Indoor Temperature. - INDOOR HUMIDITY
Current Indoor Humidity - TREND ARROW
Indicates rising and falling Humidity trends.
TEMPERATURE & HUMIDITY RECORDS
All HI/LO temperature/humidity records reset automatically at 12:00 (midnight).

- Press and release the TEMP button once to view HI indoor and outdoor temperature/humidity records.
- Press and release the TEMP button a second time to view LO indoor and outdoor temperature/humidity records.
- Press and release the TEMP button a third time to view outdoor Heat Index.
- Press and release the TEMP button a fourth time to view outdoor Dew Point.
- Press and release the TEMP button again to return to normal display.
TEMPERATURE & HUMIDITY TREND ARROWS
The temperature and humidity trend indicators update with every 15 minutes and look back over the past hour to reflect change in
Temperature (2°F / 1°C) or Humidity 3% RH). When no arrows show, the temperature or humidity remains steady.

Temperature or Humidity is falling

Temperature or Humidity is rising
TEMPERATURE & HUMIDITY ALERTS
To set alerts:
- Hold the ALERTS button to enter alert set mode. Outdoor HI ALERT OFF will show. To set this alert value, press and release the + or - button to arm this alert (ON).
- When the alert is armed (ON) the alert value will flash. Press and release the + or - button to change alert values.
- Press and release the ALERTS button to confirm and move to the next alert. If you do not wish to set an alert, press the ALERTS button again to move the next alert or to exit.
- Press the SNOOZE/BACKLIGHT button at anytime to exit the Alerts Menu.
Active Alert:
- The Alert Icon
![]() will only show when the alert is active, and indicate the HI or LO alert.
will only show when the alert is active, and indicate the HI or LO alert. - When armed alert value is reached, station will beep 5 times, once each minute, until out of alert range.
- The flashing alert icon will indicate whether it is a LO or HI alert.
- Press any button to stop the temp alert sound.
- The alert icon will still flash while value is in alert range.
 will only show when the alert is active, and indicate the HI or LO alert.
Disarm Alert:
- Hold the ALERTS button to enter alert setting menu.
- Press the ALERTS button until you see the alert you wish to disarm.
- Press and release the + or - button to disarm the alert. The alert will not sound.
- Press the SNOOZE/BACKLIGHT button to exit.

High Alert Active

Low Alert Active

Both Alerts are Off
SEARCH FOR OUTDOOR SENSOR
If you are seeing dashes for any sensor readings, please try the following steps:
- Hold the TEMP button to search for your outdoor sensor. The Reception Indicator
![]() will begin to animate.
will begin to animate. - If after 3 minutes the sensor still isn't connected, bring the sensor inside next to the display and remove power from the sensor and station.
- Press any button on the station 20 times and leave the parts sit for a few moments with the power off.
- Install a new set of alkaline batteries into the sensor, then power up your station again.
- If your sensor data is still not appearing after these steps, please contact our support staff. For additional help visit: bit.ly/basic_restart
 will begin to animate.
LOW BATTERY INDICATOR
- Low Battery Icon
![]() by Outdoor Temperature, replace batteries in the Outdoor Sensor.
by Outdoor Temperature, replace batteries in the Outdoor Sensor. - Low Battery Icon
![]() by the Indoor Temperature, replace batteries in the Station.
by the Indoor Temperature, replace batteries in the Station.
 by Outdoor Temperature, replace batteries in the Outdoor Sensor.
SENSOR WEATHER SHIELD
NOT INCLUDED
- The Sensor Weather Shield is designed to protect your outdoor sensor from rain and snow. Optional.
![]()
- This shield will offer limited protection from the sun's heat.
- Optional Purchase at:bit.ly/925-1418

STAY IN TOUCH
Ask questions, watch setup videos, and provide feedback on our social media outlets. Follow La Crosse Technology on YouTube, Twitter, Facebook and Instagram.

SPECIFICATIONS
C85845 (all versions):
Temperature Range: 32°F to 122°F (0°C to 50°C)
Humidity Range: 10% to 99% RH
Update Interval: About every 60 seconds
Power Requirements: AC6: GPU280500150WA00
Optional: 3 "AA" Batteries (not included)
Battery Life: Over 12 months with reputable batteries


TX141TH-B (all versions)
Temperature Range: -40°F to 140°F (-40°C to 60°C)
Transmission Range: over 330 feet (100 meters) in open air RF 433MHz
Power Requirements: 2 "AA" LR6 Batteries (not included)
Battery Life: Over 24 months with reputable batteries

CARE AND MAINTENANCE
When batteries of different brand or type are used together, or new and old batteries are used together, some batteries may be over-discharged due to a difference of voltage or capacity. This can result in venting, leakage, and rupture and may cause personal injury.
- Do not mix Alkaline, Lithium, standard, or rechargeable battteries.
- Always purchase the correct size and grade of battery most suitable for the intended use.
- Always replace the whole set of batteries at one time, taking care not to mix old and new ones, or batteries of different types.
- Clean the battery contacts and also those of the device prior to battery installation.
- Ensure the batteries are installed correctly with regard to polarity (+ and -).
- Remove batteries from product during periods of non-use. Battery leakage can cause corrosion and damage to this product.
- Remove used batteries promptly.
- For recycling and disposal of batteries, and to protect the environment, please check the internet or your local phone directory for local recycling centers and/or follow local government regulations.
WE'RE HERE TO HELP
If you require additional support, call our friendly customer support team based out of La Crosse, Wisconsin.
Self Help: https://www.lacrossetechnology.com/products/c85845v6
Phone: 1.608.782.1610
Online: bit.ly/contact_techsupport
Our knowledgeable customer support team is available: Monday-Friday, 8am-6pm CST.
 CA WARNING:
This product can expose you to chemicals including acrylonitrile, butadiene, and styrene, which are known to the State of California to cause cancer and birth defects or other reproductive harm. For more information, go to: www.P65Warnings.gov
WARRANTY & PATENTS
La Crosse Technology, Ltd, 2830 S. 26th St., La Crosse, WI 54601
Patents: www.lacrossetechnology.com/patents

Documents / Resources
References
![www.lacrossetechnology.com]() C85845V6 Wireless Color Weather Station – La Crosse Technology
C85845V6 Wireless Color Weather Station – La Crosse Technology![www.lacrossetechnology.com]() Patents – La Crosse Technology
Patents – La Crosse Technology![bit.ly]() How To Mount Your Temperature Sensor - YouTube
How To Mount Your Temperature Sensor - YouTubeHelp with WWVB Radio Controlled Clocks | NIST
![bit.ly]() 925-1418 Sensor Weather Shield – La Crosse Technology
925-1418 Sensor Weather Shield – La Crosse Technology![www.p65warnings.ca.gov]() http://www.p65warnings.ca.gov
http://www.p65warnings.ca.gov

Download manual
Here you can download full pdf version of manual, it may contain additional safety instructions, warranty information, FCC rules, etc.
Download La Crosse Technology C85845 - Wireless Color Weather Station Manual
Advertisement


Need help?
Do you have a question about the C85845 and is the answer not in the manual?
Questions and answers