Advertisement
BASICS
Initial Setup
Power Up
- Remove the Insulation Tab from the Battery Compartment of your Breeze Sensor, and make sure the power switch is turned ON.
![]()
- Insert the 5V Power Adapter into an outlet, and then plug it into the Power Jack on the back of the station. Next, insert 2 AA batteries for backup (optional).
![]()


Note: It may take up to 10 minutes for your sensor data to appear on your station's screen.
Station Settings
When the station is first powered on, a greeting will appear on the LCD display and then your station will move into the Settings Menu.
To enter the Settings Menu after the initial setup, hold the SET button on the side of your station.
Settings Menu Order
- Greeting
- Language
- 12/24 Hour Time
- Hour
- Minutes
- Year
- Month/Date
- Month/Date or Date/Month Order
- Fahrenheit/CeIsius
- Wind Speed Units (MPH or KMH)
- Wind Direction (Letters or Degrees)
- Rain Units (IN or MM)*

Use the +/- buttons on the side of the station to adjust the values.

Press the SET button to confirm your selection and move to next step.

You may exit the Settings Menu at any time by pressing the LIGHT button.
Notes: Weekday will set automatically after year, month, & date settings are adjusted.
*Rainfall data is only available when a compatible rain sensor is connected.
See "Add-On Rain Sensor" for more information.
Buttons

- LIGHT
Press to adjust backlight. Hold to enter Auto-Dim Settings. - WIND
Press to view Wind Speed History. While viewing, hold the MINUS button to reset the history reading. - RAIN*
When viewing Rain, Press RAIN to view rain history month, year etc. Hold RAIN to search for Rain sensor.
Hold RAIN and SET together to return to Time display. - SET
Hold to enter Settings Menu. Press to toggle full weekday or month/date/year. - PLUS (+)
Press to toggle indoor/outdoor temperature & humidity readings. Use to adjust values in Settings Menu. - MINUS (-)
Hold to reset history readings. Use to adjust values in Settings Menu. Hold to delete add-on TH sensor.** - TEMP
Press to view HI/LO temperature and humidity records. Hold to search for add-on TH sensor.** - ALERTS
Hold to enter the Alerts Settings. While viewing, use the +/- buttons to activate an alert and the ALERTS button to confirm and move to the next option.
*Rainfall data is only available when a compatible rain sensor is connected.
See "Add-On Rain Sensor" for more information.
*"Add-On Temperature & Humidity data is only available when a separate TH sensor is added.
See "Add-On Temperature & Humidity Sensor" for more information.
LCD Display
Adjusting the LCD Display Brightness
Press the LIGHT button to adjust the backlight intensity. There are 4 brightness evels, plus an off option.
Auto-Dim Settings
Program your display to automatically dim during preselected times.
- Hold the LIGHT button to enter the Auto-Dim Settings Menu.
- Press the +/- buttons to turn the Auto-Dim feature on or off. Press LIGHT to confirm.
- Press the +/- buttons to adjust the starting hour. Press LIGHT to confirm.
- Press the +/- buttons to adjust the stopping hour. Press LIGHT to confirm and exit.
The  icon will appear on the LCD when the Auto-Dim feature is activated.
Custom Calendar Display

Press the SET button to select either the Full Weekday or Month/Date/Year.
Positioning the Breeze Sensor

For Accurate Measurements
- Mount the Breeze Sensor horizontally and ensure it's level.
- The sensor should be mounted with the wind cups on top.
- Your Breeze Sensor should be the tallest object in the area to avoid reduced wind speed values.
- To optimize the use of the Breeze Sensor's Solar Panel, battery life, and wind direction readings, ensure that the sensor is mounted with the solar panel facing directly to the South.
- Make sure all of the screws on the mounting bracket, wind cups, wind vane, and battery compartment are securely fastened.
- Ensure the knob on the mounting bracket is secure and stays in your desired configuration.
Avoid areas that may obstruct wind gusts such as leaves, rooflines, or trees.

The Breeze Sensor should be the tallest object in the area. An unobstructed rooftop is an ideal location.

The sensor may be mounted on a pole away from any objects that may cause inaccurate readings.

For additional sensor information, visit: www.lacrossetechnology.com/support
The illustrations above are not to scale and are for informative purposes only.
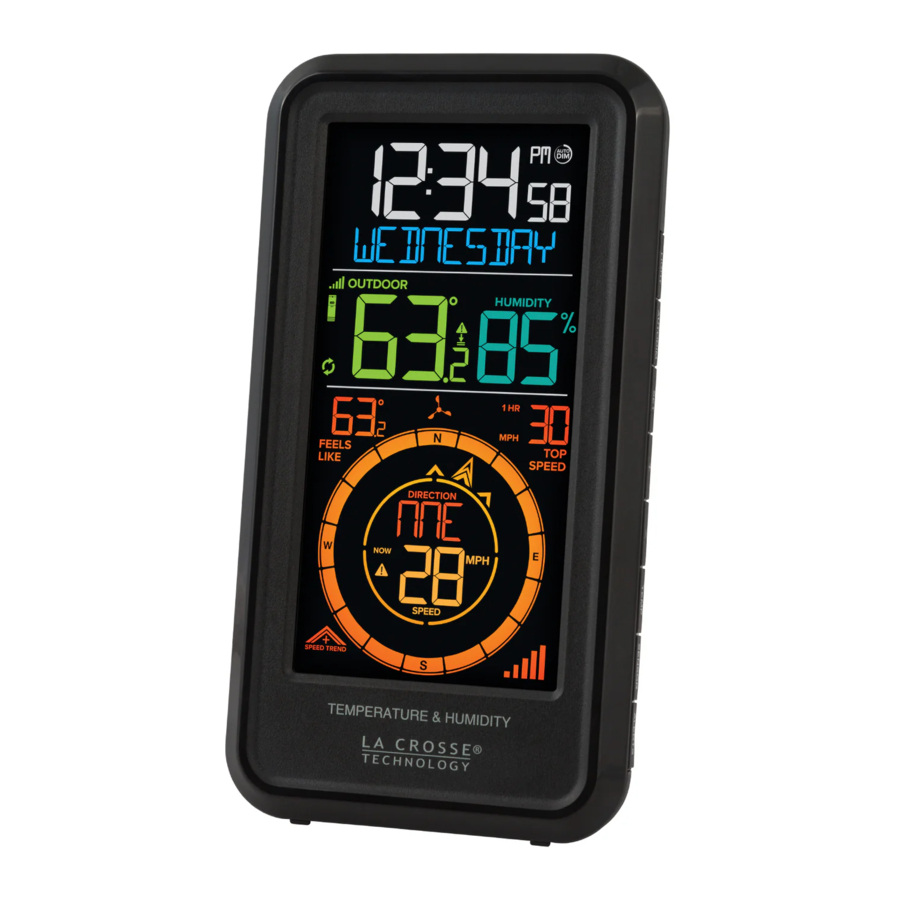
WIND
Viewing Your Wind Data

- COMPASS ROSE
Displays cardinal direction with animated arrows (16 directions total) - TOP WIND SPEED
The top wind speed in the past 60 minutes - WIND DIRECTION
Choose between cardinal points (letters) or degrees in the Settings Menu - LOW BATTERY ICON
Indicates if the sensor battery needs to be replaced - WIND SPEED ALERT
Appears if a wind speed alert is set & active - "NOW" WIND SPEED
The top wind speed in the past 31 seconds - WIND SPEED TREND INDICATOR
Shows wind speed trends over the past 60 minutes - RECEPTION INDICATOR
Indicates if the station is receiving data from the sensor
Wind Speed Records & Alerts
Viewing Wind Speed Records

Press the WIND button to toggle through wind speed records with time and date stamps.
The wind speed records include: past 24 hours, 7 days, 1 month, & 1 year.
Setting the Wind Speed Alert
- Hold the ALERTS button to enter the Alert Settings Menu.
- Use the +/- buttons turn alerts on/off and to adjust specific alert values. Press the ALERTS button to confirm your selection.
- Your wind speed alert is active when the
![]() icon is on.
icon is on.
Activate/Deactivate Wind Speed Alert
The  icon will appear in the compass rose section of the LCD.


- The alert is defaulted to be off
- When the armed alert value is reached, the station will beep and the icon will flash. Press any button to stop the alert sound.
- The Alert Icon will remain flashing until the current conditions are no longer within the set alert range.
TEMPERATURE & HUMIDITY
Viewing Your Temperature & Humidity Data
Indoor/Outdoor Readings

If you wish to see both indoor/outdoor data, press the PLUS (+) button until the Cycle Mode Icon  appears. Your display will now automatically alternate between indoor and outdoor data.
- OUTDOOR TEMPERATURE
Current Outdoor Temperature - TH SENSOR RECEPTION ICON*
Appears if readings are provided by an add-on TH sensor - Cycle Mode Icon
Indicates if the indoor/outdoor data is set to cycle - HI/LO OUTDOOR TEMPERATURE ALERTS
Appears if a temperature alert is set and active - OUTDOOR HUMIDITY
Current Outdoor Humidity - HI/LO OUTDOOR HUMIDITY ALERTS
Appears if a humidity alert is set and active - "FEELS LIKE" TEMPERATURE
Based on current outdoor temperature and wind speed (heat index & wind chill)
*An add-on Thermo-Hygro (TH) Sensor must be connected to view readings separate from you Breeze Sensor.
Feels Like Temperature
This reading indicates either Wind Chill or Heat index values when conditions have been met.
- Wind Chill: When temperature is below 50°F and there is 5+ MPH sustained wind speed.
- Heat Index: When temperature is above 80°F
- Current Temperature: When the temperature is between 41°F and 79°F, the reading will remain the same as the outdoor value regardless of humidity or wind speed.
Temperature & Humidity Records and Alerts
Viewing Records
Press the TEMP button to toggle through indoor/outdoor temperature & humidity records with time and date stamps.
Records Viewing Order
- Outdoor High Temperature
- Outdoor Low Temperature
- Outdoor High Humidity
- Outdoor Low Humidity
- Indoor High Temperature
- Indoor Low Temperature
- Indoor High Humidity
- Indoor Low Humidity
- "Feels Like" High Temperature
- "Feels Like" Low Temperature
- Dew Point
Resetting Individual Temperature and Records
- Press the TEMP button to view the individual temperature & humidity values you'd like to reset.
- Next, hold the MINUS (-) button.
- This reading is now reset to your current temperature or humidity value.
Setting the Temp & Humidity Alerts
- Hold the ALERTS button for to enter the Alert Settings Menu.
- Use the +/- buttons to turn alerts on/off and to adjust specific alert values. Press the ALERTS button to confirm your selection.
- Your alert is active when the
![]() icon (HI alert) and/or
icon (HI alert) and/or ![]() icon (LO alert) is on.
icon (LO alert) is on.
 icon (HI alert) and/or
  icon (LO alert) is on.
The alert icons will appear on the temperature & humidity section of the LCD when active.

- The alert is defaulted to be off
- When the armed alert value is reached, the station will beep and the icon will flash. Press any button to stop the alert sound.
- The Alert Icon will remain flashing until the current conditions are no longer within the set alert range.
EXTRA SENSORS
Add-On Temperature & Humidity Sensor
If you feel the temperature & humidity is not reading as desired from your Breeze Sensor, you can add a separate Thermo-Hygro (TH) Sensor to your system.

Purchase Your Add-On Sensor at (or scan QR Code): www.lacrossetechnology.com/sensor-finder
Search for compatible sensors using the station's model number (S81120).

Add-On Sensor TH Set Up
- Insert 2 "AA" Batteries into the sensor battery compartment.
- Press the MINUS (-) button on the station. The outdoor temperature/humidity readings will flash.
- Hold the MINUS (-) button to delete the temperature and humidity readings provided from the Breeze Sensor. The station will begin to search for the new TH Sensor.
- Press the TX button inside the sensor battery compartment to transmit a signal. Once connected, the TH Sensor Icon
![]() will appear on the LCD.
will appear on the LCD.
 will appear on the LCD.
 Note:
Your station will only show temperature/humidity readings from one sensor (either the Breeze Sensor or a separate TH Sensor). If readings are lost from one of the sensors, your station may pick up the readings from the other sensor on its own.
Lost Connection
- If the sensor loses connection for any reason, the station will show NO after 30 minutes of disconnection.
![]()
- The Sensor Reception Icon
![]() will disappear from the LCD and the station will search for up to 3 minutes every hour to try to reestablish the connection.
will disappear from the LCD and the station will search for up to 3 minutes every hour to try to reestablish the connection.
![]()
- Dashes will show while searching for the sensor and the
![]() icon will flash for up to 3 minutes or until the sensor is connected.
icon will flash for up to 3 minutes or until the sensor is connected. - If no signal is received, the
![]() icon will disappear. NO will again show in the sensor area.
icon will disappear. NO will again show in the sensor area.

 will disappear from the LCD and the station will search for up to 3 minutes every hour to try to reestablish the connection.
Low Battery
The  icon will appear when the sensor batteries needs to be replaced.

Add-On Rain Sensor
This station is also compatible with an add-on rain sensor.

Purchase Your Add-On Sensor at (or scan QR Code): www.lacrossetechnology.com/sensor-finder
Search for a compatible rain sensor using the station's model number (S81120).

Add-On Rain Sensor Set Up
- Insert 2 "AA" Batteries into the sensor battery compartment.
- Hold the RAIN button on the station. NO will appear on the LCD. Hold the RAIN button again to search for the rain sensor.
- Allow up to 5 minutes for station to receive the signal.
Viewing Your Rain Data
Your rain data will appear in the time section of the LCD.

Hold the RAIN button to view rain data.

To return to the time display, hold the RAIN and SET buttons together.
Rainfall Records
When viewing your rain data, press the RAIN button to view different rainfall records.

1 HOUR:
Represents the past hour of rainfall data

7 DAYS:
Running total from the last 7 consecutive 24 hour rainfall readings. This updates at midnight each day

1 YEAR:
Current month plus the past 11 monthly totals.

24 HOURS:
The accumulated tota from the last 24 hours. This value updates ever hour. Not a midnight to midnight total.

1 MONTH:
Accumulated total defined by the calendar month. Press the PLUS (+) button to view the past 1 individual monthly totals.

TOTAL:
Total rainfall since rain sensor was setup, or since history was previously reset.
Resetting Individual Rainfall Records
- Press the RAIN button to view the individual rain records you'd like to reset.
- Next, hold the MINUS (-) button until dashes appear on the LCD.
Specifications
STATION SPECIFICATIONS (S81120)
- Indoor Temp. Range: 32°F to 99°F (0°C to 37°C)
- Indoor Humidity Range: 10 to 99% RH
- Power Requirements:
- Primary Power: 5.0V AC Adapter (included)
- Battery Backup: 2 "AA" Batteries (sold separately)
- Station Dimensions: 3.77" L x 1.14" W x 7.01" H
(9.6cm L x 2.89cm W x 17.82cm H) - LCD Brightness: 4 Intensity Levels + OFF
(Programmable Auto-Dim Backlight Option) - Language Options:
English, Spanish, French, and German
(Translation Available for Menus & Calendar)

- This product contains a button battery.
![]()
- If swallowed, it could cause severe injury or death in just 2 hours.
- Seek medical attention immediately.

KEEP BATTERIES OUT OF REACH OF CHILDREN
![]()
Swallowing may lead to serious injury in as little as 2 hours or death, due to chemical burns and potential perforation of the esophagus.- If you suspect your child has swallowed or inserted a button battery, immediately seek urgent medical assistance.
- Examine devices and make sure the battery compartment is correctly secured, e.g. that the screw or other mechanical fastener is tightened.
- Do not use if compartment is not secure.
- Dispose of used button batteries immediately and safely. Flat batteries can still be dangerous
- Tell others about the risk associated with button batteries and how to keep their children safe.

SENSOR SPECIFICATIONS (TX145WSDTH)
- Wind Speed Range: 0 to 111 mph (0 to 178 kMh)
- Degrees of Direction: 360° with 16 Cardinal Directions
- Outdoor Temp. Range: -20°F to 140°F (-29°C to 60°C)*
- Outdoor Humidity Range: 10 to 99%RH
- Transmission Range: 330 Feet (100 Meters)
- Power Requirements: 1 Rechargeable ML 2032 Coin Cell Battery (included)**
- Update Interval: Every 31 Seconds*
- Sensor Dimensions:
- With Bracket: 6.21" L x 12.28" W x 9.87" H
(15.77cm L x 31.19cm W x 25.07cm H) - Without Bracket: 6.21" L x 8.25" W x 6.67" H
(15.77cm L x 20.96cm W x 16.94cm H)
- With Bracket: 6.21" L x 12.28" W x 9.87" H
*Please Note: The Breeze Sensor will operate accurately at temperatures down to -40"F. The solar panel needs to be exposed to maximum sunlight and clear of snow to maintain the internal super capacitor charge for severe cold weather operation. The transmission interval may be automatically reduced during low sunlight and extreme cold to extend operation time.
**Using a non-rechargeable coin cell battery can potentially ruin coin cell battery can potentially ruin the sensor. Ensure the replacement battery specifically states that it's a ML2032 Rechargeable Battery.
Warranty
For full warranty details, you can visit: www.lacrossetechnoloqv.com/support
La Crosse Technology, Ltd • 2830 S. 26th Street • La Crosse, WI 54601
Having Trouble?
We're here to help.
For detailed product videos, manuals, and more, visit our support website: www.lacrossetechnology.com/support
Make sure you have your product's model number handy (S81120)
If you need additional support, get in touch with our friendly customer support team:
Online: bit.ly/contact_techsupport
Phone Number: 1-855-605-6888
Representatives are available Monday Friday, 8:00am to 6:00pm CST
Factory Reset

If you're still experiencing issues, press and hold the LIGHT and ALERTS buttons down together until the display beeps.
Note: All alerts and history records will be reset as well.
Stay in Touch
Ask questions, watch set up videos, and provide feedback on our social media outlets.

FoIlow La Crosse Technology on Youtube, Facebook, Twitter, and Instagram.
Documents / Resources
References
Download manual
Here you can download full pdf version of manual, it may contain additional safety instructions, warranty information, FCC rules, etc.
Advertisement


Need help?
Do you have a question about the S81120 and is the answer not in the manual?
Questions and answers