Advertisement
Table of Contents
- 1 Table of Contents
- 2 FCC Information
- 3 Listening for a Lifetime
- 4 Safety Instructions
- 5 KJ-7808RV Features
- 6 Mounting
- 7 Getting Connected
- 8 Front Panel Descriptions and Functions
- 9 Microphone Panel
- 10 Middle Panel
- 11 Master Panel
- 12 Rear Panel
- 13 Operations
- 14 Troubleshooting
- 15 Specifications
- Download this manual
Advertisement
Table of Contents

Related Manuals for VocoPro KJ-7808RV


Summary of Contents for VocoPro KJ-7808RV
- Page 1 ������������������������������������ ��������������������������������������� ������� ������...
- Page 2 Club VocoPro for Karaoke news and events, chat rooms, club directories and even a Service directory! We look forward to hearing you sound like a PRO, with VocoPro, your ultimate choice in Karaoke entertainment. Please record the model number and serial number below, for easy reference, in case of loss or theft. These numbers are located on the rear panel of the unit.
-
Page 3: Table Of Contents
Before Getting Started FCC Information ... 2 Listening For A Lifetime ... 3 Safety Instructions ... 4 Getting Started KJ-7808RV Features ... 5 Mounting ... 5 Getting Connected ... 6 Front Panel Descriptions and Functions Microphone Panel ... 8 Middle Panel ... 9 Master Panel ... -
Page 4: Fcc Information
UNIT!: This product, when installed as indicated in the instructions contained in this manual, meets FCC requirements. Modifications not expressly approved by Vocopro may void your authority, granted by the FCC, to use this product. 2. IMPORTANT: When connecting this product to accessories and/or another product use only high quality shielded cables. -
Page 5: Listening For A Lifetime
Now it’s time to consider how you can maximize the fun and excitement your equipment offers. VocoPro and the Electronic Industries Association’s Consumer Electronics Group want you to get the most out of your equipment by playing it at a safe level. -
Page 6: Safety Instructions
Safety Instructions CAUTION RISK OF SHOCK CAUTION: To reduce the risk of electric shock, do not remove cover (or back). No user-serviceable parts inside. Only refer servicing to qualified service personnel. Explanation of Graphical Symbols The lightning flash & arrowhead symbol, within an equilateral triangle, is intended to alert you to the presence of danger. -
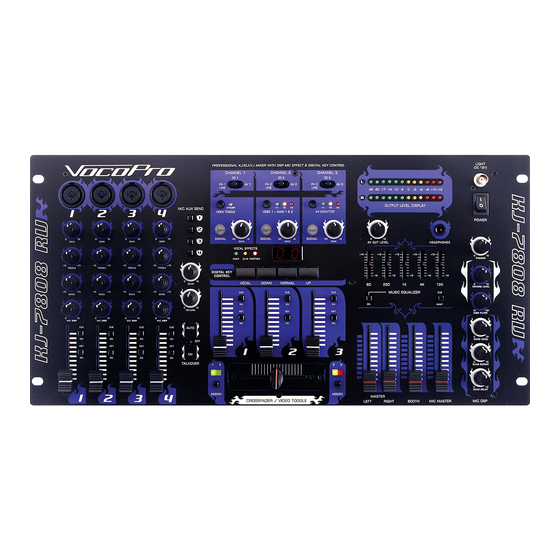
Page 7: Kj-7808Rv Features
• 19” rack mountable, requiring only 6 spaces Mounting To mount, carefully place the KJ-7808RV in the rack space of your case. The KJ-7808RV takes 4 screws to mount. Make sure holes are aligned evenly. Use an alternating “X” rotation when screwing to ensure even tension and alignment. -
Page 8: Getting Connected
Since the KJ-7808RV has numerous connectivity options, and there exist many variations in user needs, we illustrate a system where all possible connections are used. Note: This is a reference model only. Reference what you need from the diagram. - Page 9 2. Using two Unbalanced ¼” cables, connect one end of each to the L and R RETURN jacks on the KJ-7808RV and connect the other ends to the L and R outputs on the external effects unit.
-
Page 10: Front Panel Descriptions And Functions
Note: This feature only works with the Mic 1, as that channel is designed to be used by KJs, DJs and VJs. Other channels are not affected by the Talk Over function. Microphone Panel of the KJ-7808RV... -
Page 11: Middle Panel
Note: Adjusting this knob is not synonymous to adjusting the channel fader. The gain knob adjusts the input level from the source, while the channel fader adjusts the output level from the source. For best audio results, adjust GAIN until just before distortion is noticeable. Middle Panel of the KJ-7808RV... - Page 12 Note: If you cue more than one channel, those channels will be audible as well. 11. KEY - This assigns DIGITAL KEY CONTROL to the channel. If the button is pressed, DIGITAL KEY CONTROL will be applied to that channel. standard recordings, Middle Panel of the KJ-7808RV...
- Page 13 For example, a clean fade from one CDG to another is possible, automatically cueing the lyrics for each disc on your video monitor. The KJ-7808RV eliminates manual video cueing from the music source switching process. However, you have the choice of cueing manually if you prefer or the situation calls for it.
-
Page 14: Master Panel
1. LED METERS - These meters display system OUTPUT LEVELS. For maximum performance with a clean, undistorted signal, increase source output, as well as the KJ-7808RV’s GAIN, CHANNEL FADER and L/R MASTER FADERS until meter peaks in the yellow LED range (-2 to +4). Input should rarely cause meters to peak in the range of the red LEDs for best sound. - Page 15 17. ECHO DELAY Control - This control adjusts length of each time between ECHO intervals. As more DELAY is applied, there will be the illusion of more “space” between the starting and ending point of each echo. Master Panel of the KJ-7808RV...
-
Page 16: Rear Panel
7. AV INPUT 1, 2, 3 (audio) - These STEREO INPUT jacks are for connecting external components to the KJ-7808RV. You can connect any L/R RCA cables to these inputs, but there are dedicated inputs for CD or PHONO/LINE to provide optimal sound quality. Adjust the STEREO CHANNEL SOURCE toggle on the middle panel of the KJ-7808RV accordingly. - Page 17 Rear Panel Descriptions and Functions 10. VOLTAGE SELECTOR - This switch can change the voltage from 115V to 230V. Before your KJ-7808RV is shipped from the factory, the switch is set to 115V. If you live in an area that has different voltage requirements (230-240V), you MUST set it to 230V.
-
Page 18: Operations
Operations Setting the Main Video Output Channel The KJ-7808RV allows up to three A/V devices to be connected at one time. There are two ways to select which A/V channel will be output to the main video outputs: manually or automatically using the crossfader. - Page 19 Operations Assigning Digital Key Control to MIC and STEREO Channels You can assign the Key Control to any channel you desire. To ASSIGN, you simply press the KEY button located to the right of the fader on each channel you want the key changes to be applied to (both MIC and STEREO inputs) and the key changes will take immediate effect.
- Page 20 ECHO level control as you would a master level control. Setting the Digital Reverb (Figure 2) The KJ-7808RV allows you to set the amount of reverb that is present in the microphone signal. Turn the REVERB LEVEL control clockwise to increase the amount of reverb and counter-clockwise to decrease it.
- Page 21 This mode is commonly used when a solo singer wants to simulate a duet, with the KJ-7808RV as the “partner.” 3. VOCAL ELIMINATOR - Press the VOCAL button until the center, green LED illuminates. With standard recordings, you will be able to partially remove lead vocals to turn any recording into a Karaoke performance or for remixing possibilities.
- Page 22 Operations Graphic Equalizer Fine tuning music for precise room tuning To fine tune the sound of your musical output, we included the 5-Band Graphic EQ. This EQ makes adjusting the warmth or sharpness of your music a breeze. Frequency range settings are: 60, 250, 1k, 4k and 12k.
- Page 23 • To bypass the effects loop, depress the MIC AUX SEND button for that channel. Adjusting the Effects Loop Send and Return Levels The KJ-7808RV allows you to adjust the Send and Return levels of the effects loop. SEND - is the clean microphone signal that goes into the effects unit.
- Page 24 Operations Master Cueing Master Cueing will cue the MASTER OUTPUT to the headphones. This is commonly used to isolate the audio signal to the headphones. Master cueing makes it possible to practice when “audible” music is not permitted i.e. late night practicing at home. To MASTER CUE, make sure the CUE/ MASTER button is set to MASTER and adjust the CUE LEVEL control to...
-
Page 25: Troubleshooting
External device(s) either not connected or not working properly. Player source properly connected to the KJ-7808RV video in, or the KJ-7808RV out to the display monitor. Video cable(s) properly connected. Disk medium formatted for video. Disk is not multiplexed. - Page 26 Troubleshooting PROBLEM No Channels Or Volume Being Cued To Headphones No Audio Geing Routed Through Insert Channels No Echo Applied To Audio High-pitched Squealing Occurs When Using The Microphone POSSIBLE CAUSES(S) Cue buttons for channel(s) are not selected. Cue level is turned down too low.
-
Page 27: Specifications
Specifications Inputs Sensitivity: Mic 1, 2, 3, 4 ... Balanced XLR Jack 1.5mV/1K ohms CD/Line RCA Jack ... 150mV/10K ohms Phono RCA Jack ... 3.0mV/47K ohms Outputs: Master Output ... XLR Jack/Balance 1.5V/600 ohms ... RCA Jack/Unbalance 1.5V/600 ohms Booth Output ... 1/4” Jack/Unbalance 1.5V/600 ohms Record Output ... - Page 28 ��������� ������ ����� ������� ���������������...
Need help?
Do you have a question about the KJ-7808RV and is the answer not in the manual?
Questions and answers