
Related Manuals for Reolink Argus PT Lite


Summary of Contents for Reolink Argus PT Lite
- Page 1 M a y 2 02 3 Q S G 1 _ A _ E N Argus PT Lite Quick Start Guide @ R e o l i n kTe c h h t t p s ://re o l i n k . c o m...
- Page 2 Content What's in the Box What’s in the Box · · · · · · · · · · · · · · · · · · · · · · · · · · · · · · · · · · · · · · · · · · · · · · · · · · · · · · · · · · · · · · · · · · · · · · · · · · · · ·2 Camera Introduction ·...
-
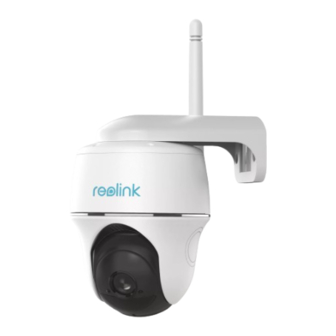
Page 3: Camera Introduction
Camera Introduction Set up the Camera Set up the Camera Using a Smartphone Lens 6 IR LEDs Step 1 Scan to download the Reolink App from the App Store or Google Play store. Daylight Sensor Built-in PIR Sensor Built-in Mic Status LED... -
Page 4: Charge The Camera
Step 1 Download and install the Reolink Client: Go to https://reolink.com > Support > App&Client. Step 2 Launch the Reolink Client, click the “ ” button, input the UID code of the camera to add it and follow the onscreen instructions to finish initial setup. -
Page 5: Install The Camera
Install the Camera Mount the Camera Notes on Camera Installation Position • The camera MUST be installed upside down for better waterproof performance and better PIR motion sensor’s efficiency. Mounting Height: 2-3 Meters • Install the camera 2-3 meters (7-10 ft) above the ground. This Drill holes in accordance with the Install the antenna to the camera. - Page 6 Mount the Camera to Ceiling Install the mount base to the ceiling. Align the camera with the mount base and turn the camera unit clockwise to lock it in position. Align the white hole on the camera top with the white hollow screw on the bracket. Use a wrench and a hex head screw provided to secure the camera into place.
- Page 7 1. Do not remove a built-in battery from the camera. 2. Charge the battery with a standard and high-quality DC 5V battery charger or Reolink solar panel. It’s not compatible with solar panels from any other brands. 3. Charge the battery only if in temperatures between 0°C and 45°C. The battery is intended for use only in temperatures between -10°C and 55°C.
-
Page 8: Troubleshooting
UKCA Declaration of Conformity in a particular installation. If this equipment lighting. does cause harmful interference to radio or Reolink declares that this product is in television reception, which can be determined Camera is Not Powering On compliance with Radio Equipment If these won’t work, contact Reolink Support. - Page 9 20 cm entre le Reolink Official Store or a Reolink authorized undesired operation of the device. radiateur et votre corps. Cet émetteur ne doit reseller.
Need help?
Do you have a question about the Argus PT Lite and is the answer not in the manual?
Questions and answers