Table of Contents
Advertisement
Advertisement
Table of Contents

Subscribe to Our Youtube Channel
Related Manuals for Abaxis VetScan i-STAT 1


Summary of Contents for Abaxis VetScan i-STAT 1
- Page 1 User Guide ©2014 Abbott Point of Care Inc. All rights reserved. Printed in USA. i-STAT is a registered trademark of the Abbott group of companies in various jurisdictions. Abaxis and VetScan are registered trademarks of Abaxis. For Veterinary Use Only.
- Page 2 Art: 723085-00K Rev. Date: 30-OCT-2014...
-
Page 3: Table Of Contents
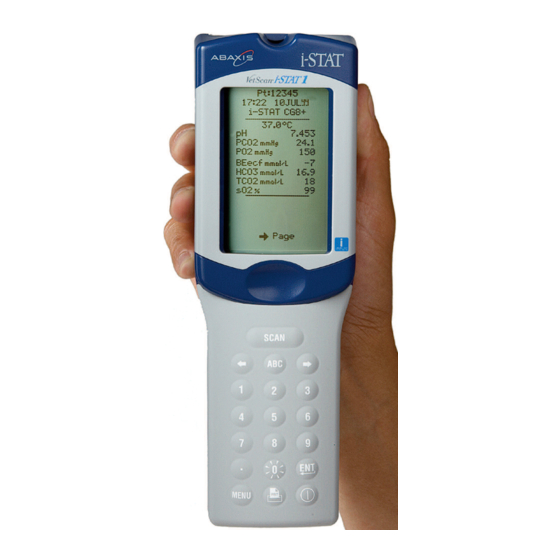
Table of Contents Overview of the VetScan i-STAT 1 System ..........2–3 Precautions....................4–5 Prepare the Analyzer...................6–7 Install/Change Batteries Check/Change Date and Time Check Software and Status Analyzer Customization Options ...............8–10 Shipment and Storage of Cartridges ...............11 Using a Cartridge for Patient Tests..............11 Perform a Patient Test ..12–15... - Page 4 VetScan i-STAT 1 Features Infrared Communication Window Display Laser Barcode Battery Scanner Compartment Window Scan Key Page Key Clear Key Numeric Keys (0-9) Enter Key Backlight ON/OFF Key and 0 Key Menu Key Cartridge Port Print Key Cartridge Features Fill Mark...
-
Page 5: Overview Of The Vetscan I-Stat 1 System
Where unavailability of results while awaiting replacement of analyzer or cartridges is unacceptable, Abaxis recommends maintaining both a backup VetScan i-STAT 1 Analyzer and cartridges from an alternate lot number. Art: 723085-00K Rev. Date: 30-OCT-2014... -
Page 6: Precautions
If the troubleshooting procedures found in this guide or requested by Abaxis Technical Service do not resolve the problem, the product must be returned for repair. - Page 7 Precautions A falling or dropped analyzer. Place analyzer and peripherals Potential Sources of on a stable surface. Harm to the Operator (continued) Barcode scanner: Do not look into laser beam coming from scanner, or point into eyes of someone else. Needles: take care to prevent needle sticks.
-
Page 8: Prepare The Analyzer
Prepare the Analyzer Caution: New analyzers or analyzers that have been repaired and returned or replaced will have standard CLEW and application software. If a different CLEW and/or application software is in use in your facility, it must be installed in new, repaired, or replaced analyzers before they are put into use. -
Page 9: Check/Change Date And Time
Check/Change Date and Time 13:26 18JUNyy Administration Menu 1. Press to turn on analyzer 1 - Analyzer Status 2 - Data Review 2. Press to change screen to Administration Menu 3 - Quality Tests MENU 4 - Customization 5 - Set Clock 6 - Transmit Data 3. -
Page 10: Analyzer Customization Options
Analyzer Customization Options Setting Units New analyzers or analyzers that have been repaired and returned or replaced will have standard unit sets installed. If a different unit of measurement for a particular analyte is in use in your facility, follow these instructions to change the unit in question: 15:26 18JUNyy Press to turn on the analyzer. - Page 11 Cartridge Testing Cartridge use requires operators to turn on the analyzer, enter an Operator ID and Patient ID, and then scan the cartridge lot number before inserting a cartridge into the analyzer for testing. To customize the analyzer: 1. Press to turn on the analyzer.
- Page 12 (MH-K 3 EDTA or MH-K 2 EDTA) currently in use at the facility and not the type of EDTA anticoagulant in the collection tube used to draw samples for the hematology analyzer. Instructions for Customizing the VetScan i-STAT 1 Analyzer for Hematocrit Options Press to turn on the analyzer.
-
Page 13: Shipment And Storage Of Cartridges
Shipments and Storage of Cartridges Required procedures for cartridge storage: Refrigerated Storage Store cartridges at 2 to 8˚C (35 to 46˚F). Refrigerated cartridges may be used until • date shown on cartridge box and pouch. Room Temperature Storage Refer to the cartridge box for room temperature storage requirements. •... -
Page 14: Perform A Patient Test
Perform a Patient Test CG4+, CG8+, G, Crea, E3+, 6+, CHEM8+, EC8+, or ACT Celite cartridges To perform a patient test you will need: VetScan i-STAT 1 Analyzer i-STAT cartridge • • Blood sample in green top tube, Gauze •... - Page 15 Collect the Sample (continued) For Venous or Arterial Samples for ACT Testing: Use a plain, plastic syringe or plastic evacuated tube with no anticoagulant, activators, • or serum separator. Test must be performed immediately upon sample collection. Prepare the Analyzer 1.
-
Page 16: Prepare The Sample And Cartridge
Prepare the Venous Sample and Cartridge 1. Remove cartridge from pouch. 2. Gently invert tube of blood 2–3 times. Proceed to next step without delay. 3. Remove stopper or cap from tube and insert pipette end below meniscus level. Draw sample into pipette. Note: An air bubble near tip of pipette must be removed - see step 4. -
Page 17: Fill And Insert The Cartridge
Fill and Insert the Cartridge 1. Hold syringe tip directly over sample well of cartridge and gently press plunger to deliver blood into cartridge. When blood reaches fill mark on cartridge, stop adding blood. Some blood must be in sample well – add blood to well if necessary. Put cap back on syringe (arterial samples). 2. -
Page 18: Perform A Patient Test
Perform a Patient Test CardiacTroponin I cartridges To perform a patient test you will need: VetScan i-STAT 1 Analyzer Gauze • • i-STAT cTnI cartridge 1 cc syringe with safety tip • • (for sample transfer from tubes) Heparinized whole blood or plasma sample •... - Page 19 5. Once “INSERT CARTRIDGE” is displayed, analyzer will remain active for 15 minutes before turning off. 6. Remove cartridge from pack just before testing. Note: Once cartridge is removed from the pack, it must be used within 15 minutes. If not used within 15 minutes, discard it and use a fresh cartridge.
- Page 20 4. With cartridge on flat surface, hold syringe tip or pipette tip over inlet port on cartridge. Gently press syringe plunger or pipette bulb to deliver a single drop of blood to the inlet port. Blood must reach fill mark on cartridge. Add a second small drop to inlet port if necessary.
-
Page 21: Review Results
Review Results The analyzer shows the numerical • Pt: 12345 Pt: 54321 values and units for chemistry and 16:10 25Augyy 18:22 25Augyy i-STAT G3+ i-STAT EG7+ blood gas test results. 37.0˚C mmol/L 7.461 mmol/L If any result is shown as ***, <, >, •... -
Page 22: Vetscan I-Stat Test Reference Ranges
Art: 723085-00K Rev. Date: 30-OCT-2014... -
Page 23: Quality Checks, Troubleshooting, Cartridge & Test Information
If FAIL occurs again, contact Technical Support. Cartridge and Test Information Detailed information on each test can be found in the Cartridge and Test Information sheets. These sheets are available on the Abaxis website: www.abaxis.com/support/package_inserts. This information includes: Intended Use Methodology •... -
Page 24: Reviewing Stored Results
Reviewing Stored Results A minimum of 1000 test results are stored by the analyzer, and can be reviewed by accessing the Data Review Function. Note: the oldest test records are overwritten when the memory becomes full. 1. Press to turn on analyzer 13:26 18JUNyy Administration Menu 1 - Analyzer Status... -
Page 25: Printing Results
Printing Results Results can be transmitted from the analyzer to either an i-STAT Printer or a Martel Printer. The printer can be recharged from a power adapter connected to an outlet. i-STAT Printer Power There are three options for powering the i-STAT Printer: •... - Page 26 Installing or Replacing the Rechargeable Battery in the i-STAT Printer: 1. Disconnect the printer from the AC adapter. 2. Turn the i-STAT Printer upside down and place it on a flat surface. Remove the battery door by sliding it off while pressing on the grooved section. Set the door aside. 3.
- Page 27 12VDC port on the back of the i-STAT Printer. 3. Plug the power cord into a wall outlet. Paper Paper may be ordered along with other supplies for the VetScan i-STAT 1 System. The STATUS indicator will illuminate to indicate the print status: ...
- Page 28 5. If printer is not powered from a wall outlet using the AC adapter, turn printer off. Caution Use only a Rechargeable Battery pack purchased from Abaxis. • Use only power adaptor and power supply provided with the i-STAT Printer kit.
- Page 29 Relocate the printer or fluorescent lamp to a greater distance from each other. • Turn off fluorescent lights within close proximity of the i-STAT 1 Printer when printing • records via a serial connection. Print directly from the handheld via an IR connection •...
- Page 30 Should this happen, turn the printer off and allow to recharge for 1 hour before attempting printing again. Printer Paper Paper may be ordered along with other supplies for the VetScan i-STAT 1 System or paper with the following specifications can be used: Black print thermal paper •...
- Page 31 Printer not printing and Status light flashing at rate of 0.25 seconds: print head temperature too hot. Printing will be suspended until print head temperature returns to normal level. Caution Use only batteries supplied by Abaxis. • Use power supply provided with printer.
-
Page 32: Downloader And Downloader/Recharger
Downloader/Recharger and, therefore, the socket outlet must be installed (or located) near the Downloader or Downloader/Recharger and must be easily accessible. Only Abaxis provided printers may be connected to the Downloader printer port. • An ethernet cable and serial (DB9) cable may NOT be connected to the Downloader (DRS •... - Page 33 Charging Batteries Put a new or fully discharged rechargeable battery in the Recharging Compartment for • 40 hours. Battery will be 100% charged and ready for use. To keep batteries charged, either keep the analyzer on the Downloader/Recharger when • not in use, or store a rechargeable battery in the Recharging Compartment.
-
Page 34: Deleting Results From The Analyzer
Deleting Results From Analyzer The Utility Function is used to delete stored results. This function can be password protected using the Customization function. To delete stored results: 15:26 18JUNyy 1. Press to turn on analyzer Administration Menu 1 - Analyzer Status 2. -
Page 35: Manufacturer's Quality System Instructions
Manufacturer’s Quality System Instructions Quality control procedures are used to ensure the continued accuracy of a test system. The quality control program for the VetScan i-STAT 1 System includes: Automatic quality checks: A series of automatic quality checks are performed •... -
Page 36: Checking Analyzer With The Electronic Simulator
Checking Analyzer with the Electronic Simulator The external Electronic Simulator is stored at room temperature in its box. When 24 hours has elapsed since the last Electronic Simulator test (internal or external), the internal test will automatically be performed when a cartridge is inserted. If the test passes, the analyzer proceeds with the measurement of the patient sample. -
Page 37: Periodic Procedures
15 days before the software expires, the analyzer will display “CLEW Expiring, Update Required” . If you see this message and you have not received the update packet, call Abaxis Technical Service at 1-800-822-2947 . Software updates require a VetScan i-STAT Serial Downloader or Serial Downloader/ Recharger and a PC with Windows 2000 or higher. -
Page 38: Symbols
Symbols The following symbols may be found on components of the VetScan i-STAT System. Attention: See instructions for use. Caution: Risk of electrical shock. Laser radiation hazard symbol. Biological Risks. Temperature limitations. The upper and lower limits for storage are adjacent to upper and lower arms. -
Page 39: Bibliography For Vetscan I-Stat Test Reference Ranges
Symbols (continued) Authorized representative in European Community Do not reuse. Battery: Low battery icon (flashes on lower left side of display screen). BODxxxx-xx Born On Date: the label BODxxxx-xx defines year and month of manufacture. 14 days room temperature storage at 18-30°C 2 months room temperature storage at 18-30°C Packaging contains cartridges with barcoded pouches. - Page 40 CO 2 , HCO 3 ,TCO 2 , Base Excess, Anion Gap 1. National Committee for Clinical Laboratory Standards. Definitions of Quantities and Conventions Related to Blood pH and Gas Analysis, Second Edition, Tentative Standard, NCCLS document C12-T2 (Villanova, PA: NCCLS, 1991) 2.
-
Page 41: Warranty
Abaxis product. In no event will Abaxis' liability exceed the price paid by the purchaser for the VetScan i-STAT 1 Handheld Analyzer. - Page 42 Abaxis Technical Service Abaxis Technical Service personnel can help with your questions about the VetScan i-STAT 1 Handheld Analyzer. Call Abaxis Technical Service, 24 hours a day, 7 days a week, at 1-800-822-2947 . 600-7015 600- 7015 Manufactured by Abbott Point of Care Inc.
Need help?
Do you have a question about the VetScan i-STAT 1 and is the answer not in the manual?
Questions and answers