Table of Contents
Advertisement
Quick Links
Technical Support and E-Warranty Certificate www.vevor.com/support
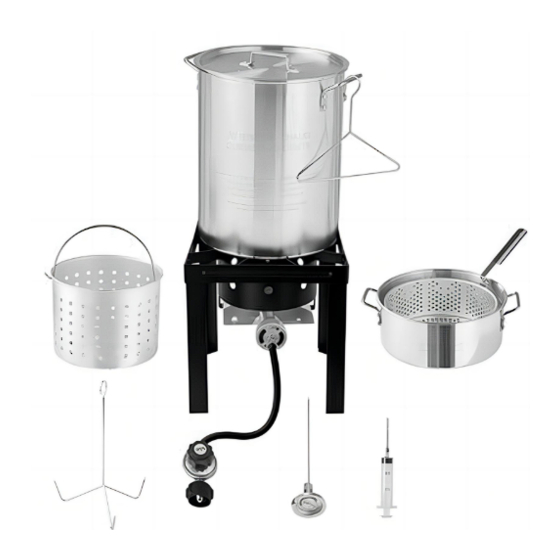
Turkey and Fish Fryer Kit
User Manual
We continue to be committed to provide you tools with competitive price.
"Save Half", "Half Price" or any other similar expressions used by us only represents an
estimate of savings you might benefit from buying certain tools with us compared to the
major top brands and doses not necessarily mean to cover all categories of tools offered by
us. You are kindly reminded to verify carefully when you are placing an order with us if you
are actually saving half in comparison with the top major brands.
Advertisement
Table of Contents

Subscribe to Our Youtube Channel
Related Manuals for VEVOR FCKIT-14


Summary of Contents for VEVOR FCKIT-14
- Page 1 Technical Support and E-Warranty Certificate www.vevor.com/support Turkey and Fish Fryer Kit User Manual We continue to be committed to provide you tools with competitive price. "Save Half", "Half Price" or any other similar expressions used by us only represents an...
- Page 2 CustomerService@vevor.com This is the original instruction, please read all manual instructions carefully before operating. VEVOR reserves a clear interpretation of our user manual. The appearance of the product shall be subject to the product you received. Please forgive us that we won't inform you again if...
-
Page 3: Technical Specifications
Technical Specifications Model N. W. G. W. Carton Size FCKIT-14 8.3kg 9.38kg±3% 365mm×365mm×475mm ±10mm SAFETY Note / Remark. Caution / Warning. Read the instruction manual. Read this material before using this product. Failure to do so can result in serious injury. SAVE THIS MANUAL Assembly precautions 1.Assemble only according to these instructions. -
Page 4: Use Precautions
Use precautions For Outdoor Use Only Read all Warnings and Operating Instructions before use and retain them for future reference. WARNING: Propane gas is highly flammable and under pressure in the cylinder or tank. Therefore, do not store or use gasoline or other flammable liquids or vapors near this stove. -
Page 5: For Your Safety
NOTE: Failure to follow these instructions could result in fire or explosion, which could cause property damage, personal injury, or death. If you smell gas: · Shut off gas supply to the appliance. · Extinguish any open flame. · If the odor remains, keep it away from the appliance and immediately call the fire department. - Page 6 ·Keep the fuel supply hose away from any heated surfaces. · Keep at least 24-inch distance between the appliance and cylinder. · This appliance is for outdoor use only and should only be operated in a well-ventilated space. · The use of alcohol, prescription, or non-prescription drugs might impair the user's ability to assemble or safely operate the appliance properly.
- Page 7 · If stored indoors, disconnect and leave the LP cylinder outdoors. · This appliance is not intended for and should never be used as a heater. · An oil thermometer MUST be used when cooking with oil or grease. · This appliance will be HOT during and after use. Use insulated oven mitts or gloves for protection from hot surfaces or splatter from cooking liquids.
- Page 8 (8). Avoid bumping into or impacting the appliance to prevent spillage or splashing of hot cooking liquid. (9). Never drop food or accessories into hot cooking liquid. Lower food and accessories slowly into the cooking liquid in order to prevent splashing or overflow.
-
Page 9: Tools Needed For Assembly
. Rack Lifter . 1 OZ. Marinade Injector . 12'' Probe Thermometer TOOLS NEEDED FOR ASSEMBLY • Adjustable Wrench INSTRUCTIONS (1) Unscrew the pr e -assembled lock nut and flange nut fr om the thr eaded pin of the cast ir on bur ner . Then inser t the thr eaded pin of bur ner thr ough the hole of the support bar of stove st and. -
Page 10: Lighting Instructions
LIGHTING INSTRUCTIONS 1 . Read instruction before lighting. 2 . When you are sure there are no leaks, turn the cylinder and regulator control valve on the hose to the closed position. 3 . Have a fireplace match or long -nosed lighter lit and over the burner from SIDE. -
Page 11: Burner Flame Check
CAUTION DO NOT attempt to connect your camp stove to a natural gas supply. Use only with propane, hose and regulator supplied with the stove and an approved bulk propane tank. Burner Flame Check Light the burner and adjust the flame with the regulator control valve until the desired flame is achieved. - Page 12 5.If the burner ignites, turn the regulator control valve to the desired heat setting. Operating Instructions 1.Check that your 20 lb.LP gas cylinder is not over filled and has the proper QCC type 1 connection. The maximum weight of a properly filled cylinder is approximately 38 lb.
-
Page 13: Temperature Accuracy
replacement thermometer. 11. Never overfill the cooking pot with oil, grease, or water. Instead, follow instructions in this Owner's Manual for establishing proper oil, grease, or water levels. Thermometer Test Instructions WARNING! Always use a thermometer when frying any food. A thermometer is a sensitive measuring device which may not work properly if dropped, bent, or twisted.Always check to be sure your thermometer is working properly before frying. -
Page 14: Cleaning The Burner
such as 225 °F, the thermometer is damaged and cannot be used. NOTE: DO NOT attempt frying if the thermometer is not working! Cleaning and Maintenance CAUTION: Allow the unit to cool down fully (100 °F or 38 ℃)before cleaning. Correct care and maintenance will keep your appliance operating smoothly. - Page 15 5. Reattach the brass connector to the burner. 6· Keep appliance area clear and free from combustible materials, gasoline, and other flammable vapors and liquids. 7· Do not obstruct the flow of gas and ventilation air. 8· Keep the ventilation opening(s) of the cylinder enclosure free and clear from debris.
-
Page 16: Warranty
of the pots. 4. Never place an empty aluminum or stainless steel pot on a lit cooker. A hole will be burned in the bottom of the pot. Discoloration, scratching,and dimpling may occur with the use of pots on outdoor cookers.This does not affect the performance of the pot. -
Page 17: Scope Of Warranty
Scope of Warranty 1.We guarantee that VEVOR products are produced in accordance with iso 9001 Quality Management procedures and are free of manufacturing defects tor the period of warranty. 2.This warranty covers faults in the products due to manufacturing defects within 1 year from date of purchase.After inspection by sales representative,... - Page 18 Technical Support and E-Warranty Certificate www.vevor.com/support...
Need help?
Do you have a question about the FCKIT-14 and is the answer not in the manual?
Questions and answers