Table of Contents
Advertisement
Advertisement
Table of Contents

Related Manuals for RATTAN QUERCUS


Summary of Contents for RATTAN QUERCUS
- Page 1 RATTAN QUERCUS Owner's Manual www.rattanebike.com...
- Page 3 Congratulation on your purchase of a new Rattan Ebike! Thanks for your Quercus Ebike purchase! This user manual will help you assemble and operate your new electric bike. Be sure to read all of the information in this manual before riding.
-
Page 4: Table Of Contents
Contents Safety Notice ..................03 Warning ..................03 Package Content ................05 Product Overview ................06 Specification ..................07 Assembly ..................08 Battery Use and Protection ............13 Display and Setting ................15 Connection App ................. 23 Troubleshooting ................. 24 FAQ ..................... -
Page 5: Safety Notice
Safety Notice 1. Always wear an approved bicycle helmet whenever riding a bike. Failure to wear a helmet when riding may result in serious injury or death. 2. Never operate a bike while under the influence of alcohol, drugs, or any substance or condition that could impair motor functions, judgement, or the ability to safely operate a bike or another vehicle. - Page 6 03. Abuse - We do not cover physical damage due to negligent care and extreme riding. 04. Whenever you ride the Rattan Electric Bike, you risk severe injury or even death from loss of control, collisions, and falls. Use caution and ride at your own risk.
-
Page 7: Package Content
Carefully check package contents, if anything is missing or damaged, please contact Rattan customer service for support: info@rattanebike. com Unpack the bike. Unbox the package and remove the small box that contains the display inside in case of any damage occurs. -
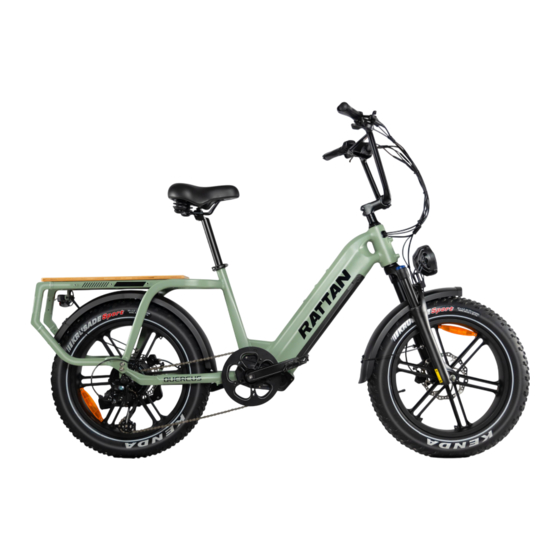
Page 8: Product Overview
Electric Bike*1 User Manual*1 Tool Kit*1 Tool Bag*1 Quick Release Front Wheel*1 Fender*2 Charger*1 Screw *1 Seat*1 Headlight*1 Display*1 Pedals*2 Product Overview Display Controls LCD Display Brake Lever Throttle Shifter Grip - 6 -... -
Page 9: Specification
Front Suspension Saddle Seat Post Front Light Rear Rack Battery Rear Light Pedal Crankset Wheel Chain Dis Brake Motor Specification ITEM SPECIFICATION Model Quercus Product Dimensions 168*71*128 CM Package Dimensions 146.5*32*78 CM Max Load 450 LBS - 7 -... -
Page 10: Assembly
ITEM SPECIFICATION Package Weight 101 LBS E-Bike Weight 81 LBS Max Speed 30 MPH 48V 20AH/4.5A Input 100-240V 50/60Hz Battery/Charger Output 54.6V 2.8A Pedal-Assist Mode 60-80 Miles Pure Electric Mode 40-60 Miles Max Angle of Climb 30 Degrees Charging Time 4~5 Hours Tire Pressure 25-29 PSI... - Page 11 Handlebar 1. Use the Allen wrench loose the cre- wand turn in to the front. Align the bolts and tighten. Adjust the screws and handlebar on the stem. Front Wheel Remove the plastic axle guard from the front wheel and unscrew the screws.
- Page 12 Remove the spacer and align the front wheel, make sure centralize the brake disc in the pads. Make sure the front wheel is wella- ligned and tighten the screws. Headlight & Fender 1. Loose the screws on the front fork, install the fender and headlight to- gether.
- Page 13 Notice: Install gently by hand without cross-threading or damaging the threads. Fix the fenders by tightening the screws each side on the front fork. Adjusting the Seat Untighten the quick release lever by swinging the lever open and outward fully. DO NOT raise the seat-post beyond the minimum insertion marked on the tube.
- Page 14 Pedals Indicators for the right pedal (R) and the left pedal (L) can be found at the bottom of the pedal threads. Rotating in the direction of the po- inter shown on the crank. Tighten the pedals with the wrench. Battery Battery Key Location (hung on the handlebar...
-
Page 15: Battery Use And Protection
Check the charger, charger cables, and battery for damage before each charge. The battery will be locked if the keys are lost and you will not be able to use, make sure you always have a copy of the key since Rattan does - 13 -... - Page 16 not have any copy of the keys. Always charge in a safe area that is cool, dry, indoors, away from direct sunlight, dirt, or debris, in a clear area away from potential to trip on the charging cords, or for damage to occur to the bike, bat- tery, or charging equipment while parked and/or charging.
-
Page 17: Display And Setting
Display and Setting Speed Light Battery Level Motor Watt Pedal Assist Mileage Level Battery Level Battery charge indicator . Motor Watt Current wattage / Wattage meter. Pedal Assist 0,1,2,3,4,5 Displays the current pedal assisted mode. Level Speed Current riding speed. Using the display for USB charging and the plug USB Charging symbol will appear on the display. - Page 18 Turn Right Signal "+" Button Turn Left Signal "-" Button On/Off Button "i" Button Turn on/off the Press and hold the button constantly till the bike display is on / off. Increase/Decrease Press "+" or "-" button to increase or decrease the PAS Level the PAS Level.
- Page 19 Display Setting Select the setting via "+" / "-" and press "i" to enter the corre- sponding setup or confirm setting. 1. Turn On/Off The Display Press the power button for 2~4s, turn on the display and power system connection. Press the power button for 2~4s, turn off the display and the power system connection is disconnected.
- Page 20 3. Walk Mode Turn on the display, press the "-" for 2s and the bike will start in walk mode. " " will show on the screen and it will drive at a uniform speed of less than 6kmh. Release the "-" button, will stop the electric power assisted mode.
- Page 21 5. Display Setting Turn on the display, press " + " and " - " 2s simultaneously to access. * Do not change the setting when riding for safety first. 6. Backlight Brightness Adjustment Enter the display setting, choose Brightness, adjust the backlight brightness by "...
- Page 22 7. Pedal Assist Level Enter the display setting, choose advanced. Enter advanced settings and select power set. 8 levels to choose from 0-3, 1-3, 0-5,1-5,0-7,1-7, 0-9, 1-9. 8. Set Units Choose unit, Press and release the Up Arrow or Down Arrow to toggle between imperial units (miles &...
- Page 23 9. Auto Shut-off The display will be auto-turned off when the bike is not operated for a time. Enter the setting interface, choose dormancy. The auto turn-off time can be set from 0~9 minutes. The default auto shut-off time is 5 minutes. * 0 minutes shows that the auto shut-off is closed.
- Page 24 11. TRIP Reset Enter display settings,choose trip reset, the default setting is no. Choose " yes " will reset trip odometer. Error Code Definition Current Abnormality Throttle Abnormality Motor Phase Abnormality Motor Hall Signal Abnormality Brake Abnormality Communication Abnormality 12. Slow Start Enter Advanced Settings, choose Slow Start.
-
Page 25: Connection App
Connection App Please download the Key-Disp Turn on the Bluetooth on your App from Google play store or phone first. Use your email to IOS store. register an account for the first use and log in. - 23 -... -
Page 26: Troubleshooting
After login, click the add device Find your device, click connect, button to enter the search page. then click confirm to bind your bike. Troubleshooting Problems Most Common Solutions 1. Use a multimeter to check if the battery still have voltage. 2. -
Page 27: Faq
Q1: What if the e-bike arrived missing accessory or broken part? A1: Please take a photo and send to Rattan ebike Support Team by sending e-mail: info@rattanebike.com and Rattan ebike Support Team will reply you soon and send correct accessory or part replacement. -
Page 28: Limited Warranty
Be Met: 1. A Return Merchandise Authorization (MA) must be requested from Rattan ebike within 15 days from the date of receipt of shipment. To requestan MA, contact Rattan Service Team at info@rattanebike.com. 2. The cost of return shipping will be paid by the customer. - Page 29 5. All accessories originally included with your purchase must be included with your return. 6. If you return a product to Rattan ebike, (a) without an RMA from Rattan ebike (b) without all parts included in the original package, Rattan ebike retains the right to refuse delivery of such return.
-
Page 30: Contact Us
For the avoidance of doubt, Rattan ebike will not be liable and/or responsible for any damage, failure or loss caused by any unauthorized service or use of unauthorized parts. - Page 31 Rattan ebike will always be by your side! info@rattanebike.com Contact us directly by e-mail to (562) 488-5588 call Rattan ebike phone support: Unboxing Videos FaceBook Group Facebook Page...
Need help?
Do you have a question about the QUERCUS and is the answer not in the manual?
Questions and answers