Table of Contents
Advertisement
Advertisement
Table of Contents

Related Manuals for RATTAN Pathfinder


Summary of Contents for RATTAN Pathfinder
- Page 1 EBIKE USER MANUAL Pathfinder/Pathfinder ST...
- Page 3 Please feel free to contact us if there are any questions about the bike. Congratulation on your purchase of a new Rattan Ebike! The bike comes 85% assembled and here is the guide that helps you get familiar with your new bike in unboxing.
-
Page 4: Table Of Contents
CONTENTS Using this manual ..................01 General information ................... 02 Assembly instructions for Patfhfinder series .......... 02 Adjustment for comfort and safety ............06 Riding guidance ..................09 Display ......................11 Operating safety ..................22 Troubleshooting ..................24 Disclaimer ....................26 Limited warranty ..................27... -
Page 5: Using This Manual
Rattan E-bike assumes no liability for any harm, injury, or death of the rider. Because it is impossible to anticipate every situation or condition that will occur while riding, this manual makes no representations about the safe use of bikes under all conditions. -
Page 6: General Information
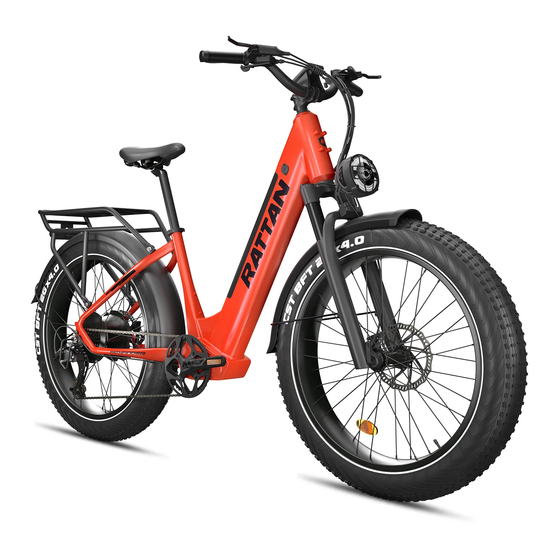
GENERAL INFORMATION Fully assembled Pathfinder Fully assembled Pathfinder Please note that your Pathfinder may include components that look different from those in the illustrations above and elsewhere in this manual. Such changes help ensure uninterrupted shipping. Our engineers rigorously test each component to guarantee quality and compatibility. - Page 7 2. Front Fork 1. Loosen the hub quick release to make enough space for the fork. 2. In case of the spring drops from the quick release, here are the or- iginal position images of both sides of the hub quick release. 3.
- Page 8 4. Front fender Fix the fender to the front fork with the screws on each side as the pic shown. 5. Headlight 1. Unscrew the screw for headlight. 2. Connect the front fender, the connecter of the front fork, and the headlight at the right position as the pic shown, then tighten the screw.
- Page 9 1. “ L” indicates the left side, “ R ” indicates the right side. 2. Make sure to tighten the screws connecting the pedals and cranks. 3. Twist to left when install the left side and twist to right when ins- talling the right one.
-
Page 10: Adjustment For Comfort And Safety
1. Fix the cable to the frame with the binder as the pic shown. 2. Connect the cable connector according to the direction of the arrow on the two sides connector. Connect all the connections following the color and the arrow direction like this. - Page 11 while their legs are almost fully extended, with the knee slightly bent. The seat should never be so high that the rider must rock side to side or fully straighten their legs while pedaling. And the seat must never be pulled out so far that the minimum insertion point is above the seat tube (see illustration).
- Page 12 3. Loosen screw 1 and 2 to make the derailleur move slightly away from the rim in case of the chain rubs the tire. 4. Tighten the screw when the shifter can`t switch to the highest gear. PREPARING TO RIDE Checklist 01.
-
Page 13: Riding Guidance
WARNING Incorrect assembly, maintenance, or use of your ebike can cause com- ponent or performance failure, loss of control, serious injury, or death. If you are not sure you could correctly perform all assembly steps in the manual, consult a local, certified, reputable bike mechanic. RIDING GUIDANCE Three Modes •... - Page 14 assistance (0-5)(0-4) that the rider has selected. Notice Accelerate slowly and use the pedal assist at the beginning of riding. When riding against the wind or climbing the hill, avoid using the pedal assist to protect the battery. • Throttle Mode The throttle is located on the right side of the handlebar.
-
Page 15: Display
DISPLAY • Display Interface — 11 —... - Page 16 1. Press the “i” button to display different information. (1) Miles (2) Total miles (3) Maximum traveled traveled speed (4) Average (5) Total traveled speed time — 12 —...
- Page 17 2. Driving Mode Switching. Eco Mode Activates at a slow speeds providing low acceleration (Low energy consumption). Normal Mode Activates at a normal speeds providing normal acceleration(Normal Xenergy consumption). Sport Mode Activates at a high speeds providing high acceleration (Higher Xenergy consumption).
- Page 18 4. Assistance Level Selection (1) Press "+" or "-" button to switch the E-bike system assistance level to change the motor output power. (2) The default assistance level ranges from level“0”to level“5”. (3) The output power is zero on Level “0”. Level “1” is the minimum power.
- Page 19 2. Key-Disp App Guide (1) Download Download from apple store/google store by key words “Key-Disp”. App logo is as follow: (2) Sign Up & Log In Fill in the required information according to pictures below to sign up and log in. —...
- Page 20 (3) App Connection App must connect with the ebike system to realize all its functions. When display is on, Add Device > Add > “+” Button > Done. — 16 —...
- Page 21 (4) App Operation & Indication Info Bluetooth connection icon, battery power, speed, trip distance, riding time and ODO. The app can be operated to control the headlight status of the whole bike and switch the assist levels on the display. (5) Fast operations: unit set (metric vs imperial), speed limit set, wheel size set Remarks: if display complies with new EN standard, wheel size and...
- Page 22 (6) Map Navigation, Ebike Check-Up (7) Riding Record If single trip distance is > 0.1km, the riding record will be saved. — 18 —...
- Page 23 (8) Help & Guide Click the icon to view FAQ and feedback. (9) Bluetooth Connection & Disconnection After the first time of connection, Bluetooth it will automatically connect to the app when you turn it on. — 19 —...
- Page 24 Note: mobile network must be connected for Bluetooth connection. *Solution for: app unable to search Bluetooth device When the device is powered on, press and hold the "i" and "-” for 2s at the same time, or make the display reset to factory settings. •...
- Page 25 • Ruise Control(CRU) 1. Cruise Control is to ride your bike at a constant speed. 2. Press the throttle at a constant speed you want for 5s. The bike will then maintain this speed at constant speed after releasing the throttle, which can help minimize the energy consumption of the motor.
-
Page 26: Operating Safety
OPERATING SAFETY WARNING Ride Rattan by taking the sensible measures outlined in this section to maximize your safety. Bicycling is an exciting, delightful, and practical way to get around, but like any sport, it involves risk of injury and death. By choosing to ride a bike, you assume respon-- sibility for those risks. - Page 27 Your Pathfinder/Pathfinder ST is probably heavier than other bikes you’ve ridden, and it will handle quite differently from lighter bikes, especially when you’re accelerating or decelerating. Learn to maintain a comfortable stopping distance from all other objects, riders, and vehicles at different speeds, conditions, and with varying payloads.
-
Page 28: Troubleshooting
Obey All Relevant Local Laws It is your responsibility to research and understand relevant laws where you ride your bike. Such laws may cover required helmets and safety gears, required lights and reflectors, required hand signals, where you can legally ride a bike ( bikes and ebikes may have different restric- tions ), how fast you can go, what ( if any ) cargo or passengers you can carry, the rider age, and more. - Page 29 Problems Most Common Solutions The brakes make abnormal Adjust the brake pads or brake discs, noise as we noted in the picture above. Lift the rear wheel off the ground and press the throttle to see if the rear Motor makes abnormal noise works.
-
Page 30: Disclaimer
Damage caused by failing to adhere to instructions and warnings issued by Rattan Ebike is not covered under warranty. We will replace any parts deemed to have been damaged during shipping. -
Page 31: Limited Warranty
Rattan Ebike is not responsible for repair or replacement of da- maged bikes or parts. Rattan Ebike reserves the right to change the warranty at any time and without notice. Under no circumstances is Rattan Ebike responsible for any damage resulting from damaged, defective, or improperly secured parts. - Page 32 amazonsupport@rattanebike.com Contact us for more owner benefit. — 28 —...
Need help?
Do you have a question about the Pathfinder and is the answer not in the manual?
Questions and answers