Table of Contents
Advertisement
Advertisement
Table of Contents

Related Manuals for RATTAN CHANLLENGER PRO Version


Summary of Contents for RATTAN CHANLLENGER PRO Version
- Page 1 PRODUCT INSTRUCTION...
- Page 2 About US Rattan was founded on the belief that the company does not have to compromise to create great products at great prices. We are a team specialized in the manufacture of electric bicycles for more than 10 years, and the goal of Ratan is to develop the latest technology and affordable electric bicycle for all our friends.
- Page 3 What is I·PAS? Intelligent power assist system (I·PAS) is patented technology of Rattan. Featured with energy conservation and rechargeable.
- Page 5 CONTENTS : PART 1 Introduce of the Product (page 1-31) PART 2 RIDING POSITION (page 32-35) PART 3 Assembly instructions (page 36) PART 4 Riding instructions (page 37-39) PART 5 After selling and Warranty (page 40-43)
-
Page 6: Specification
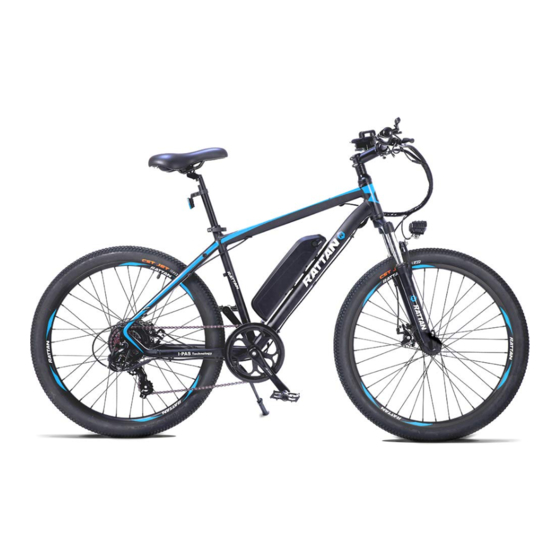
PART 1 Introduce of the Product 1. Specification Brand RATTAN Fork Suspension Fork Model CHANLLENGER 26inch Frame Aluminum 18inch Transmission Shimano 7speed Motor 36V 350W Tire CST 26*2.10 Mode PAS/Throttle Weight 25KG PRO Version PLUS Version Motor Eco motor Intelligent motor... -
Page 9: Frontal View
2. Display instruction MODEL: LCD-M5 Instructions for operating the manual control panel (PRO Version) (1).LSD display Size and Material LSD display , material is [ABS] Liquid crystal transparent window material is high hardness acrylic. Frontal view lateral view 31.8mm stent is available 22.2mm、25.4mm、28.6mm Transfer Ring Selection [throttle]. - Page 10 Frontal view lateral View (2) Function of bike components 1- Function of LCD Display; Speed display. Power level display. Power indicator. Failure warning. Total mileage. Individual mileage. Headlight display. Single driving time display. 2.Control, setting up functions ...
- Page 11 Bike Components 3.1 Headlight The instrument can be manually turned on. Battery power display Multi-functional display area Total mileage ODO. Single mileage TRIP A. Single mileage TRIP B. Battery current voltage VOL. Current operating current CUR. ...
- Page 12 Walk boost mode. Cruise: constant speed Cruise mode. PAS: Power file position: 0 ~ 9 ajustable 3.5 Speed display area Maximum speed MAX. Average speed AVG Unit MPH. KM/H [The meter will calculate the true speed based on the wheel diameter and signal data] Vehicle Status Display Area ...
- Page 13 5.6 Protocol Vehicle Status Code Meaning: Status Code(Decimal) State Meaning Remarks Current anomaly Turn the anomaly Motor phase deficiency Motor Hall anomaly Brake anomaly. Communication anomaly Install 3.7. P01:Backlight brightness, the darkest level 1, the brightest level 3; P02: mileage unit, 0: KM; 1: MILE; P03: Voltage level: 24V, 36V, 48V, 60V, 64V default 36V;...
- Page 14 Error: ± 1km/h; (The speed limit for power and turning is equal). Note: The value here is based on kilometers. When the unit setting is converted from kilometers to miles, the speed value of the display interface automatically converts to the correct mile value, but the speed limit value data set at this menu under the mile interface is not converted.
- Page 15 Introduction: (4)Key The specific combination of keys is as follows Press the button to use the brief, Key operation is divided into short press, long press, and combination key length press Short press is used for rapid/frequent operations, such as the specific key combination position as follows When riding, if you want to modify the power/speed state that through short pressing to Toggle display data for multi-function areas during cycling, short click...
-
Page 16: Long Press
Toggle speed display Long press, Toggle speed display Set / Disable 6Km/h Cruise, Switch Headlight, ODO Clear Zero Static state of vehicles,long press will enter 6KM/h cruise mode. Let go of cruise mode; long press Turn the lights on and off. - Page 17 Set Parameters Long press will enter the parameter-setting interface. Parameters that can be set include, Wheel diameter (in: inches), number of magnetic steel, liquid crystal brightness, low pressure points, etc.(see settings: P01-P20) Under Settings Interface,Can be short press Set the value to perform a minimum- ,...
- Page 18 Intelligent LCD display (PLUS Version) Model: RT918 Specifications Power Supply 24V/36V/48V Rated working current: 10mA The maximum working current: 30mA leakage of current: <1uA The supply controller working current ; 50mA Operating temperature: -20℃~ 60℃ ...
-
Page 19: General Operation
A summary explaining the components of the bike RT918 can provide many functions to fit the User’s needs. The indicating contents are as below: Battery and battery percentage indication. Motor Power indication Assistance-level indication Pedaling frequency indication(optional) ... - Page 20 Switch the display inte rface Switch the display inte rface Switch the display interface Switching Push-assistance Mode On/Off To activate the push-assistance function, hold the button always after 2 s. E-bike drive is activated at a uniform speed of 6 Km/h. While the screen displays. ...
- Page 21 Push-assistance Mode; Push-assistance function may only be used when pushing the E-bike. Danger of injury when the wheels of the E-bike do not have ground contact while use the push-assistance function. Switching the Lighting On/Off. To switch on the headlight, hold the button for 2s. The backlight brightness is To switch on the headlight, hold the button for 2s.
- Page 22 Battery Indicator The 0-100% represent the capacity of the battery. The 100% bright when the battery is in high voltage. When the battery is in low voltage, battery frame will flash at the frequency of 1HZ to notice that the battery needs to be recharged immediately.
-
Page 23: General Settings
The components of the E-bike system are continuously and automatically monitored. When an error is detected, the respective error code is indicated in text indication area. Here is the detail message of the error code in Attached list 1. ... - Page 24 Determine the trip distance Clear Trip represents trip distance clearance setting. To clear trip distance, press the “+” button or the “-” button to select the Yes or No. Yes, represents clearing a single ride distance. No represents not clearing a single ride distance.
- Page 25 Wheel Diameter Settings Wheel Diameter represents wheel diameter settings. To change basic settings, press the “+” or the “-” button to increase or decrease until the desired value is displayed. The default value is 26 inch. To store a changed setting, press the “i”...
- Page 26 Battery Power Bar Settings Set Voltage represents voltage settings. Each bar represents a voltage value. 5 bars voltage values must be entered one by one. For example, VOL 1 is first bar voltage value. The default value is 31.5V. ...
- Page 27 PAS Ratio Settings To modify the value of PAS ratio, press the "+" button or "-" button to choose the desired value, and then press the "i" button to confirm For example, the range is “50 percent” of “1” level, bottom value can be modified ...
- Page 28 Power Assistant Sensor Settings [PAS] Assistant num represents the sensitivity of PAS settings. The sensitivity value is “5” to“ 24”. To store a changed setting, press the “i” button and then access the general settings. To change the sensitivity of PAS settings, press the “+” or the “-” button to select sensitivity value. Speed Sensor (optional) ...
- Page 29 Backlight Contrast Settings LCD Luminance represents backlight contrast settings. Level “0” is the low brightness, Level “100%” is high brightness. The default level is “100%”. To modify the backlight brightness, press the “+” button or the “-” button to choose the desired setting item.
-
Page 30: Password Modify
Password Disable/Enable/Change To change power-on password enable/disable settings, press the “+” or the “-” button to select. Disable means not require a power-on password. Enable means a power-on password is required. If select Enable,press the “i” button and then access power-on password modify interface, otherwise exit the power-on password settings interface. -
Page 31: Exit Settings
Exit Settings In the settings state, press the “i” button (short than 2s) is to confirm the input. Hold the “i” button (for more than 2s) is to store the settings, and then exit the current settings. Hold the “-”... -
Page 32: Part 2 Riding Position
PART 2 RIDING POSITION Seat Height In order to obtain the most comfortable riding position and offer the best possible pedaling efficiency, the seat height should be set correctly in relation to the rider’s led length. The correct saddle height should not allow leg strain from over extension, and the hips should not rock from side to side when pedaling. - Page 33 Check that the headset locking mechanism is properly adjusted and tightened. If the bicycle is fitted with handlebar end extension, ensure they are properly positioned and tightened. 4. Chain Ensure chain is oiled, clean and runs smoothly. ...
- Page 34 Although the electrical components are water resistant and there is risk Of electric shock from wet weather, you should exercise caution and strongly consider not riding in such conditions, especially heavy rain. In wet weather, you need to take extra care. ...
-
Page 35: General Notice
Always lock your bicycle to an immovable object if it is left unattended. General Notice 1. In winter or cold area, the battery performance will be down; the mile range will be shorter than above 20 degree. 2. Do not use other company charger for charging our bicycle battery. 3. -
Page 36: Part 3 Assembly Instructions
PART 3 Assembly instruction 1. Put the fork stem into head tube. 2. Put the spacer as the photo, step1 plastic spacer step2 silver spacer step3 alloy cover 3. Note: put the step1 plastic spacer inside the gap; make sure the fork tube cannot move 4. -
Page 37: Part 4 Riding Instructions
PART 4 Riding instructions Before riding the bike [some notes about the battery] Please check the battery status before you ride the bike, make sure the battery full charged, do not use the battery in low energy, it will kill the battery. ... - Page 38 Our supporting charger is specially designed for the characteristics of the battery groups, which can efficiently ensure the performance, exband the life span of the battery. The undesignated battery charger will cause damage or etc to the batter groups. ...
- Page 39 1. When you cannot eliminate the failures In case of the above Others according to the above instructions or conditions, please turn to cannot distinguish the failures. the designated store or 2. When the motor wheel, controller, sales dealer for help, and charger and the battery groups exist remember not to open inside damages.
-
Page 40: Part 5 After Selling And Warranty
After selling and Warranty After selling Dear customer, thank you for choosing Rattan Ebike for your green travel solution, lets ride together to keep our earth and home green. Any question of our product and more newest information’s, please contact us or follow us: www.rattanebike.com... -
Page 41: Warranty
Warranty The main parts of the warranty provisions Component Warranty Depreciation Performance failure Remark period rate /day Frame fork 2year 0.2% Except human Natural sealing off. handle bar destroy Fracture key parts crack. Fork fracture. Internal gear break. Motor 2year 0.2%... - Page 42 Common part warranty Component Warranty period Depreciation Performance Remark rate/day failure Switch 1year 0.1% Not work Freewheel ,chain 1year 0.1% Skid ,fracture freewheel stagnation Crank 1year 0.1% Not work Expansion brake 1year 0.1% Not work Throttle 1year 0.1% Not work Front and middle 1year 0.1%...
- Page 43 Anti-rust layer damage caused by abnormal use,which leads to the corrosion and fracture of the parts. Riding on the abnormal road conditions. Commercial rental use. Irresistible natural disasters. Warranty principle The service outside of warranty will be paid. Customer maintenance records Model: Frame number:...
Need help?
Do you have a question about the CHANLLENGER PRO Version and is the answer not in the manual?
Questions and answers