
Related Manuals for RainPoint HGS-Z238


Summary of Contents for RainPoint HGS-Z238
- Page 1 User Manual Model: HGS-Z238 Indoor Hydroponic Garden Kit (13 Pods) Web: www.rainpointonline.com...
-
Page 3: Important Safety Instructions
IMPORTANT SAFETY INSTRUCTIONS When using this RAINPOINT electrical products, basic precautions should always be followed, including the following: Read all instructions before using this RAINPOINT electrical product. DANGER–to reduce risk of electric shock: 1.To reduce the risk of electric shock, the garden kit has a specific plug. Do not change the plug in any way. -
Page 4: Packing List
PRODUCT INTRODUCTION Packing List Product Name : Model NO : Color : Indoor Hydroponic Garden Kit HGS-Z238 Black-Silver or Black-Wood Plant Food 13 x Planting 13 x Planting 1 x A Solid 1 x Adapter Basket Sponge Nutrients Plant Food... -
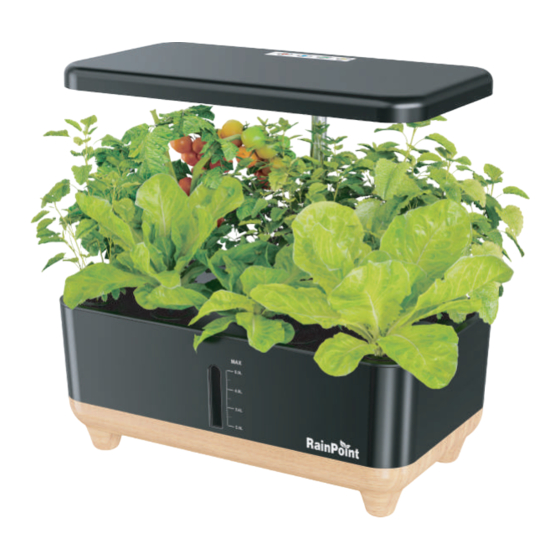
Page 5: Product Overview
Product Overview 5.0L 4.0L 3.0L 2.0L Control Panel Lifting Rod (Max height 14 inches) Grow Deck Water Level Window LED Light Board Planting hole Water Inlet Water Tank... -
Page 6: Specification
Specification Power Adapter 100V-240V~50/60Hz Input 12V 2A Operating Voltage Pump Input DC12V 0.08A±10%A Standby Current <30uA Pump Flow 150±10%L/H Light Panel NOT Waterproof Water Tank Capacity Working Temperature 15℃ - 30℃/59℉- 86℉ Material Product Weight 1.8kg/3.96lb Product Size 35*20*17~52cm / 11.8*7.8*6.7~20.5 inches Support telescopic height 36CM/14 inches... - Page 7 3-STEP EASY INSTALLATION securely seated Make sure that water tank is securely seated in base and that grow deck is properly aligned on water tank. Make sure that lifting rod is securely plugged in the back of the water tank (no gaps). Plug the pump and adapter pump power cord power cords into the...
- Page 8 TIPS: Plants love light! Keep the light board 3~4 inches away from the top of the plant. When planting new seeds, adjust the light board down, then up as the plant grows, and trim the plant to keep 3~4 inches from the top of all plants.
-
Page 9: Add Water
PLANTING YOUR INDOOR GARDEN 01.Prepare seeds & sponges The indoor garden kit does not include seeds. Please select local seeds of a well-known brand. Soak the seeds in water for 5-6 hours in advance. Soak the planting sponges to be planted in water for 5 minutes. - Page 10 03.Add Nutrient Solution Full fill the A solid nutrition bottle and the B solid nutrition bottle with room temperature tap water or bottled distilled water and shake well until well mixed. Then you can get A nutrient solution and B nutrient solution.
- Page 11 Usually, the nutrient solution needs to be added once every 1~2 weeks. According to the amount of water in the water tank, add the nutrient solution in proportion. It is recommended to top up the water tank before adding nutrient solution. When planted in an environment with high temperature, the water evaporates faster and the concentration of the nutrient solution will be higher.
- Page 12 04.Add Plant Basket Put a planting sponge pre-soaked for 5 minutes into a planting basket. Use a pair of tweezers to put 3-4 seeds pre-soaked for 5-6 hours into the bottom of the wet planting sponge hole. Attach a blackout sticker to the top of the planting basket. Place a grow dome on each planting basket to help the seeds germinate.
- Page 13 DO NOT remove the grow dome on the planting basket until the plants germinate.Once the plant germinates, remove the grow dome immediately to avoid leggy seedlings. Grow domes can be reused/recycled. "Leggy Seedlings" are seedlings with tall, thin, slender stems that become top-heavy, unable to support themselves, and grow weaker and prone to fall over.
-
Page 14: Control Panel Settings
CONTROL PANEL SETTINGS Power: Once the device is plugged in, the power light will turn red. Press the power button to turn it on, and the power light will turn green. Press the power button to turn it off completely (it will not turn on automatically), and the power light will turn red. - Page 15 A.Vegetables Mode: Press the Vegetable button (the button light is on), and the LED light will switch to a spectrum (red+blue+white) suitable for vegetable growth. It will run on a 16-hours on/8-hours off cycle. Press the Vegetable button again (the button light goes off), the LED light of this mode will turn off, and after 10 hours, it will run the cycle of 16 hours on/8 hours off again.
- Page 16 GARDENING TIPS FOR THE BEST HARVEST GERMINATION: Plants have seasonal, period, and regional characteristics. Temperature, light and atmospheric humidity all affect plant growth. Planting seeds that are suitable for the local season is highly recommended. Please learn more about the seed information, optimal temperature and days to germinate before planting.
- Page 17 PRUNING: Prune your plants (Diagram A) instead of raising the light board. Pruning faster-growing plants (like Basil) above new leaves and keeping light low will ensure that slow-growing plants in the garden get all the light they need to thrive. Prune often to keep your garden healthy, but never prune more than 1/3 of each plant at a time.
- Page 18 POLLINATING: When fruiting plants (tomatoes, peppers, strawberries, eggplants, cucumbers, etc.) begin to bloom, we recommend that you hand pollinate them to help your plants increase crop yields. When pollinating, according to the condition of the plant, use one or more of the following methods: Place a fan near the plant, and the flowing air will pollinate the plant.
-
Page 19: Device Maintenance
DEVICE MAINTENANCE CHANGING WATER: There is a drain hole at the bottom of the tank. Remove the rubber plug and let the water flow out. If the ambient temperature is too high and the water evaporates quickly, please change the water every 1~2 weeks to avoid excessive concentration of the nutrient solution. - Page 20 Why do only a few plants germinate and then wither quickly? Buying the right seeds is very important. For best results, purchase seeds from a reliable manufacturer and avoid purchasing seeds that are not suitable for hydroponic equipment. Make sure to use the correct ratio of nutrient solution and water. Use the lights properly and keep the light panels 1-2 inches from the top of the plants.
- Page 21 Why don't the seeds germinate? May be affected by temperature. Try planting it in soil to rule out the possibility of a problem with the seeds. Why plants don't bloom or set fruit? To ensure adequate nutrients, top up the water level frequently and add liquid nutrients in the proper proportions.
-
Page 22: Limited Warranty
WhatsApp: +1 626-780-5952 RAINPOINT COMMUNITY Share your life & usage & joy & ideas with RAINPOINT on social media and @rainpoint or post a hashtag #rainpoint, we will repost and send you planting sponges to you as a gift. And you may have the chance to be our brand ambassador! To get the newest products for free and building greatest things with us. -
Page 23: Fcc Statement
FCC STATEMENT This device complies with part 15 of the FCC Rules. Operation is subject to the following two conditions: (1) This device may not cause harmful interference, and (2) this device must accept any interference received, including interfer- ence that may cause undesired operation. Warning: changes or modifications not expressly approved by the party responsible for compliance could void the user’s authority to operate the equipment. - Page 24 Model: HGS-Z238 Scan the QR code to get fast support +1 833-381-5659 (EN) US TEL: (Mon-Fri: 09:30 AM-5:30 PM PST) Email: service@rainpointonline.com WhatsApp: +1 626-780-5952 Manufacturer: BALDR TECHNOLOGY CO.,LTD ADDRESS: 322 Paseo,Walnut,CA 91789,United States Email:service@rainpointonline.com Made in China...
Need help?
Do you have a question about the HGS-Z238 and is the answer not in the manual?
Questions and answers