
Related Manuals for Avision AP33Q Series


Summary of Contents for Avision AP33Q Series
- Page 1 A4 Printer User's Guide Regulatory model no.: AP33Q、AP33Qs、 AP33、AP3320n、AP3321n、AP3322n、AP3320ns、 AP3321ns、AP3322ns、AP3320w、AP3321w、AP3322w、AP3320ws、AP3321ws、 AP3322ws、AP33 Series、AP33Q Series Avision Inc.
-
Page 2: Copyrights And Trademarks
User’s Guide Copyrights and Trademarks Ethernet is a registered trademark of Xerox Corporation. Windows 7, 8, 10, 11 are registered trademarks of Microsoft Corporation in the United States and/or other countries. Other product names used herein are for identification purposes only and may be trademarks of their respective companies. -
Page 3: Federal Communications Commission (Fcc) Compliance Information Statement
Federal Communications Commission (FCC) compliance information statement Part 15 This equipment has been tested and found to comply with the limits for a Class B digital device, pursuant to Part 15 of the FCC Rules. These limits are designed to provide reasonable protection against harmful interference in a residential installation. -
Page 4: Safety Information
User’s Guide Safety Information When using this equipment, the following safety precautions should always be followed. Safety During Operation In this manual, the following important symbols are used: WARNING: Indicates potentially hazardous situations, which if instructions are not followed, could result in death or serious injury. CAUTION: Indicates a potentially hazardous situation which, if instructions are not followed, may result in minor or moderate injury or damage to property. - Page 5 The following symbols indicate that the related section includes information on actions which must be performed. Specifics of the required action are indicated inside the symbol. [Alert of required action] [Remove the power plug from the outlet] Installation and the Operating Environment Warning Do not install the equipment near direct sun light, heating or air conditioning Direct sunlight or high temperature may damage the machine.
- Page 6 User’s Guide Caution Place the device in an independent, well-ventilated area. Place the device in a place with good environmental conditions. Operating the machine beyond the recommended temperature and humidity may cause an electrical fire. Do not place heavy objects on the unit. It may cause unbalance and the device may fall down.
- Page 7 Do not attempt to remove the covers and panels which have been fixed to the product. Some products have a high-voltage part or a LSU beam source inside that could cause an electrical shock or blindness. Do not modify this product, as a fire, electrical shock, or breakdown could result. If the product employs a LSU printhead, the LSU beam source could cause blindness.
- Page 8 User’s Guide About the Consumables Warning Do not unpack the consumables and store the machine’s consumables in any of these locations: Outdoors Near excessive dirt or dust, water, or heat sources In locations subject to shocks, vibrations, high temperature or humidity, ...
- Page 9 Do not store the cables in the following locations: Outdoors Near excessive dirt or dust, water, or heat sources In locations subject to shocks, vibrations, high temperature or humidity, direct sunlight, strong light sources, or rapid changes in temperature or humidity Keep the supplied USB cable, etc., in a location that is out of reach of children to avoid the risk of injury.
- Page 10 1. Overview Introduction Thank you for choosing Avision’s state-of-the-art printer which can be used for local and network printing up to A4 size. Through the clear LCD display and control panel, operation becomes simple and easy. Features This product provides the following features to make your print out more efficient and effective.
- Page 11 Print Multiple Pages on a Single Sheet: Prints two or four pages of the original on a single sheet of paper. A maximum of 16 pages can be printed on a single sheet of paper. Print Watermark: Print text such as confidential, important content or image in the background.
-
Page 12: External View
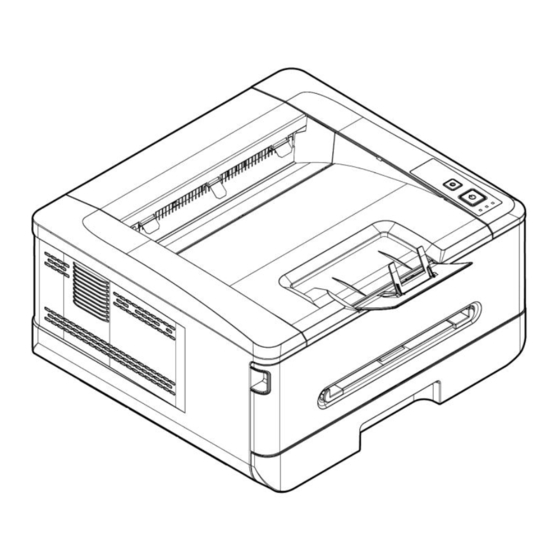
External View The Front View 1. Output Tray 4. Front Cover 2. Handle of the Front Cover 5. Paper Stopper 3. Main Paper Tray 6. Control Panel... -
Page 13: The Rear View
The Rear View 1. USB Port (Type B, to PC) 4. Rear cover 2. LAN Port 5. Handle of the Rear Cover 3. Power Receptacle... -
Page 14: Package Contents
Package Contents Software CD (*Printer Driver, Main unit User Manual) Power Cable USB Cable * You may also download the driver and manual at www.avision.com/download. -
Page 15: The Control Panel
The Control Panel Cancel Button: Press to cancel a printing job. Press 3 seconds to Print the usage Power button: report. Short press to turn on the printer. Long press to turn off the printer. Alert LED: Turn flashing to Power/Ready LED: indicate an error. -
Page 16: Installation
Installation 2. Installation Operation Space Please reserve the following operation space. 单位: mm Machine dimension: 404 x 380 x 204 mm (WxDxH) Removing the Tapes Remove the packing material and tapes of the product. - Page 17 User’s Guide Remove the Spacers Open the rear cover. Remove the spacers on both sides of paper path as shown. The spacers are designed to protect the printer during transportation.
- Page 18 Installation Removing the Tapes, Protective Sheet, and Seal on the Drum and Toner Cartridge Assembly WARNING! Be careful not to inhale toner. To avoid print quality problems, DO NOT touch the toner rollers. If toner gets on your clothing or other fabric, wipe off the toner with ...
- Page 19 User’s Guide Remove all the tapes, protective sheets on the drum and toner cartridge assembly. DO NOT touch the drum surface. Important! DO NOT touch the drum surface since the fingerprints or other marks may affect the print quality. DO NOT expose the drum unit under light for a few minutes.
- Page 20 Installation Push the latch in the middle of the toner cartridge forward in the direction of the arrow to separate the toner cartridge from the drum. Pull out the protective seal of the toner cartridge until it is completely removed. Install the toner cartridge to the drum unit until you hear it lock into place.
- Page 21 User’s Guide Press down the handle of the toner cartridge to fix the toner cartridge. Close the front cover.
- Page 22 Installation Lifting Up the Paper Stopper Gently lift the paper stopper and its extension to collect the paper. Paper Stopper...
- Page 23 User’s Guide Loading Paper into The Main Tray To insert paper to the main paper tray, Fan your paper first to ensure that the pages do not stick together. Align the edges of the documents by tapping the bottom of the stack against the table top.
- Page 24 Installation Push the width guide tab ( ), and move the width guide ( )to the correct position for the paper size being loaded. Push the length guide ( ), and slide the guide ( ) to the correct position for the paper size being loaded.
- Page 25 User’s Guide To move the tray back to the original A4 length, press down the second length adjustment latch , and at the same time slide the manual tray to the left ...
- Page 26 Installation Printing Side Facing Down Load the paper stack with the as illustrated. Insert the tray to the printer.
- Page 27 User’s Guide Paper sizes and weights used for Main paper tray Paper capacity 250 pages(70 g/m² plain paper) Paper size A4 (210 x 297 mm) A6 (105 x 148 mm) B6 (JIS) (125 x 176 mm) B5 (JIS) (176 x 250 mm) Letter (216 x 279 mm) Legal (216 x 356 mm) 76 x 152 mm...
- Page 28 Installation Important: To avoid the chance of miss-fed, make sure the length guide tab and length slider are installed in their proper positions. Make sure the end of your paper slightly touch the length guide as indicated in below. Length Guide Tab Make sure the length slider is installed in the specified location in either...
- Page 29 User’s Guide Loading the Manual Tray To insert paper to the manual tray, facing up Insert the paper with the printing side Slide the paper guides so that they lightly touch the paper.
- Page 30 Installation Paper size and weights used for Manual Tray 1 page(70 g/m² plain paper) Paper capacity A4 (210 x 297 mm) Paper size A6 (105 x 148 mm) A5 (148 x 210 mm) B6 (JIS) (125 x 176 mm) B5 (JIS) (176 x 250 mm) Letter (216 x 279 mm) Legal (216 x 356 mm) Custom Size: 76 x 127 mm ~ 216 x 356 mm...
-
Page 31: Connecting To Power
User’s Guide Connecting to Power Connect the of the power cable to the power jack of your product. Connect the other end to an appropriate power outlet. Turning On The Printer To turn on the PRINTER, press the power button located on the control panel. Ready LED will be lit. -
Page 32: Connecting To The Network
Installation Connecting to the Network Connect the PRINTER to the network to use the network printing function. Connect one end of your network cable to an available port of your Ethernet Hub Connect the other end to the LAN port at the back of the product as shown. -
Page 33: Installing The Driver (Windows)
For USB Interface Users Please follow these steps to install the PRINTER driver if this machine is connected to your computer via a USB cable. *You may also download the driver and manual at www.avision.com/download. Important! DO NOT connect the USB cable before installing the PRINTER’s driver. -
Page 34: Uninstalling The Printer Driver
When the Finish dialog box appears, click Finish to complete. If you have successfully installed the driver, you will find “Avision AP33XX Printer” has been added in the “Printers and Faxes” option from the Control Panel. -
Page 35: For Network Interface Users
Please follow these steps to install the scanner, printer drivers if this machine is connected to your computer via a network. You may also download the driver and manual at our web site www.avision.com. Insert the supplied CD into your CD-ROM drive. The installation menu wil be displayed. - Page 36 When the Finish dialog box appears, choose 「Finish」to complete. If you have successfully installed the printer’s driver, you will find「Avision AP33XX NetWork」 , has been added in the 「Printers and Faxes」 option from the Control Panel.
- Page 37 Make sure the product is connected to your computer via a USB cable. Start Network Setup Tool by choosing the Start button and then select All Programs>Avision AP33XX Printer>Network Setup Tool in succession. The following Network Setup Tool screen will be prompted.
- Page 38 Installation Check [Obtain an IP address automatically] to obtain the IP address directly from the DHCP server or you may enter your static IP on the [IP Address], [Subnet Mask], and [Gateway] field respectively. If you have assigned a specific IP, enter your domain name server and WINS server as well and then click [Update Setting] to update the IP information to the product.
- Page 39 Make sure the product is connected to your computer via a USB cable. Start the Network Setup Tool by choosing the Start button and then select All Programs>Avision AP33XX Printer>Network Setup Tool in succession. The following Network Setup Tool screen will be prompted.
- Page 40 Installation Check [Obtain an IP address automatically] to obtain the IP address directly from the DHCP server or you may enter your static IP on the [IP Address], [Subnet Mask], and [Gateway] field respectively. Click [Join a Wi-Fi network] and the currently connected wireless networks will be displayed.
-
Page 41: Uninstalling The Driver
User’s Guide Uninstalling the Driver From the 「Start」 menu, select 「All Programs」 , 「Avision AP33XX Printer」 , and then 「Uninstall Driver」. Or from the 「Start」menu, select 「Control Panel」, 「Add or Remove Programs」, 「Avision AP33XX Printer」, and then 「Remove」. Follow the instructions on the screen to complete removing the scanner driver... - Page 42 3. Customizing the Product’s Settings This chapter is specifically targeted to the persons who are responsible for the administration of the product. It is recommended that the administrator read this chapter before installing the machine. Note: When installing the product for the first time, it is recommended that the Administrator retain the default system settings.
- Page 43 User’s Guide Setting Items to be Customized on the webpage Status Displays the status and basic information of the product. *Factory Default Item Description Information Display the following basic information of the product. Machine Status Displays the machine status. Host Name Displays the host name.
- Page 44 Customizing the Product’s Settings System Settings *Factory Default Item Description Option The language displayed on the web Language The displayed language page. varies depending on your operating system Choose if you wish to enter energy Sleep Mode saving mode and how long to enter mode/5Min/*15Min/30M the energy saving mode after your in/1Hr...
- Page 45 User’s Guide Network Displays the network information of the product. *Factory Default Item Description Option Host Name Host Name Dipslay the host name for the product. Ethernet Settings Obtain an IP address *Off/On automatically IP Address: Set up an IP Input the IP address of the product.
- Page 46 Update the firmware of the product. Before updating the product’s firmware, you need to first download the latest firmware from our web site at w ww.avision.com onto your computer. On the webpage, choose [Browse] to find the firmware file on your computer and then choose [Update] to begin updating the firmware to the product.
-
Page 47: Configuring The Printer Driver
4. Configuring the Printer Driver Displaying the Printer Driver Properties Dialog Box (Windows) To display the Printer Driver Properties dialog box, Click Start on the system tray and choose Printers and Faxes. Right-click the product’s printer name and choose Printing Preferences. The Printing Preferences dialog box. -
Page 48: Configuring Printer Driver Settings
Configuring the Printer’s Driver Configuring Printer Driver Settings The Printing Preferences dialog box consists of the Basic tab, the Paper tab, the Layout tab, the Watermark tab, the Duplex tab, and the More tab. The contents of each tab will be explained in the following sections. The Basic Tab The Basic tab contains settings for Orientation, Copies, Effect, Density, Toner Save, and Invert. - Page 49 User’s Guide Copies Choose the number of copies to be printed. You can enter up to 999. Collated: Click to print your document in the page order such as 1/2/3, 1/2/3, 1/2/3. N to 1: Click to reverse the printing order of your document. As a result, the last page of your document will be printed first and vice versa.
- Page 50 Configuring the Printer’s Driver The Paper Tab The Paper tab contains settings for Original Size, Tray, and Media Type. Paper Original Size: Choose the size of paper loaded in the designated tray. Choice: *A4, A5, A6, B5 (JIS), B6 (JIS), Legal, Letter, User Define Click [Add/New] to create up to 20 sets of custom size.
- Page 51 User’s Guide The Layout Tab The Layout tab contains settings for N-up, and Output Paper Size. Layout N-up: Choose number of pages to be printed on a single sheet of paper. Choice: *Off, 2up(2-in-1), 4-up(4-in-1), 9-up(9-in-1), 16-up(16-in-1) Border: Choose if you wish to add border around each page when printing more than one page on a single sheet of paper.
- Page 52 Configuring the Printer’s Driver N-up Choose the style you want when printing multi-page Style: document on a single sheet. Choice: *Right, then Down/Down, then Right/Left, then Down/Down, then Left Right, then Down Down, then Left Down, then Right Left, then Down Output Paper Size User Define You can reduce or enlarge your printed image using...
- Page 53 User’s Guide The Watermark Tab The Watermark tab allows you to add some text or image (such as CONFIDENTIAL, IMPORTANT, DRAFT, etc) for your document. First Page only Check to print watermark only on the first page. Clear the check box will print watermark on all pages.
- Page 54 Configuring the Printer’s Driver Adding a new watermark text To add a new watermark text, Choose Text and then click the Add/New button. The following Watermark dialog box appears. Name Name your watermark text. This name will be shown in the Watermark text list.
- Page 55 User’s Guide Angle Specify the angle of the watermark text from 0° to 360° Size Specify the size of your watermark text from 1 to 288. Shading Specify a relative density for the watermark text. Choice: Lightest, Light, Medium, Dark, Darkest. Click the OK button to save the settings.
- Page 56 Configuring the Printer’s Driver Adding a new watermark image To add a new watermark image, Choose Image and then click the Add/New button. The following Watermark dialog box appears. Name Name your watermark image. This name will be shown in the Watermark image list.
- Page 57 User’s Guide Editing a current watermark image To edit a current watermark image, Choose the watermark name that you wish to edit from the Image list. Click the Edit button. The Watermark Edit dialog box appears. Change your settings for the selected watermark image and choose OK to complete.
- Page 58 Configuring the Printer’s Driver The Duplex Tab The Duplex tab allows you to print your document on two sides of the paper. When using Two-Sided printing, you can select whether to bind copies on the long-edge or short-edge. Long Edge Long-Edge binding (Portrait) will print the pages so that (Binding) you flip them like you would do on a book.
- Page 59 User’s Guide The More Tab On the More tab, a Wait Timeout option is provided to set the amount of time the MFP waits for data to come from computer during a job. If the data stream pauses for longer than the specified number of seconds, the job is cancelled. Permitted timeout values: 60~1800 seconds, default timeout values: 300 seconds Clean Mode: If unwanted image appears in the blank space, you can check “Clean Mode”...
- Page 60 Printing Documents from a Mobile Device For the model comes with a Wi-Fi module, the product can be converted into a wireless device and your mobile device is able to print emails and documents by simply tapping Print from the menu. (The availability of Wi-Fi function varied according to your model name.) Making Preparation To connect the product to a wireless LAN, prepare the followings:...
- Page 61 User’s Guide Print via Software Application (depending on your mobile phone) You can also turn on Wi-Fi on your mobile phone, connect it directly to the printer, then open the document on the mobile phone, use the software that opens the document and select the printer to print it out.
- Page 62 Printing Document from A Mobile Device Launch the program by clicking the Start>All Programs>Avision AP33XX Printer>Network Setup Tool. The main window appears. AP33XX Printer On the [General] page, check [Wi-Fi (Station)]. Click the [Wi-Fi (Station)] tab to prompt the [Wi-Fi (Station)] page.
- Page 63 User’s Guide Click [Connect] to start connecting the SSID (wireless network name) and then update the IP information to the product. If update is successfully, an [Update Device Successfully] message will be displayed and the Network Setup Tool will be automatically closed.
- Page 64 Printing Document from A Mobile Device Printing Your File from a Android Mobile Device Make sure that the Mopria Print Service (Print App) has been installed on your Android mobile device. The Mopria Print App can be purchased for free from an application store such as Google Play.
- Page 65 User’s Guide Select your PRINTER. Select [XXX at XXX] from the PRINTER list. (XXX=Modellnummer) xxx at xxx Mopria Print Service Open the file which you want to print. Open the file you want to print. Choose [Print] from the menu and select your PRINTER. xxx at xxx Mopria Print Service...
- Page 66 Printing Document from A Mobile Device Choose print settings and print. If you do not need to change xxx at xxx Mopria Print print options, tap Print to Service send the print job. If you need to change print ...
- Page 67 User’s Guide Printing Your File from a iOS Mobile Device Turn on your mobile devices such as iPhone or iPad. Tap 「Settings」 and then open Wi-Fi. Select the network same with your PRINTER. Open the picture or the document that you want to print. Tape the Share icon ) and then the print icon ( 4.
-
Page 68: Troubleshooting
Troubleshooting 6. Troubleshooting Monitoring Your Printer Using Printer Status Monitor The PRINTER Status Monitor allows you to monitor your PRINTER’s status, get information on consumable parts, and alerts you when PRINTER errors occur. PRINTER Status Monitor is available when the PRINTER is connected directly to a host computer via the USB port or a network port. -
Page 69: Getting Printer Status Details
User’s Guide Getting Printer Status Details You can monitor printer status and get information on consumable products using the Printer Status Monitor dialog box. a Port Name Port name for the specified printer. b Progress Bar The progress bar to access the latest data of the specified printer. -
Page 70: Setting Monitoring Preferences
Troubleshooting Setting Monitoring Preferences To make specific monitoring settings, click the Setting tab on the Avision Status Monitor window. Displays the language of the window. Language Status Alert Update Time Define the interval to refresh the printer error status. Choice: 1, 5, 10 (minute), Custom (1 ~ 86400) second Show pop-up window –... - Page 71 User’s Guide Clearing A Warning or An Error If a problem occurs during operation, the Error LED will be flashing to indicate a warning or an error status. To solve the problem, please refer the following table for more detailed information. Warning Message Message Description or Solution...
- Page 72 Troubleshooting Temperature inside the product is too high. Wait until Auto temp. the temperature rises to the required degrees. adjustment (200004) Please replace toner cartridge from the original Toner cartridge manufacturer. error. (200036, 201505, 201515 Error Message Possible Causes or Solution Error Message and Codes System error Restart PRINTER.
- Page 73 User’s Guide Close the scan module and then restart the Scanner lamp error (940305) PRINTER. If the error persists, call service personnel for help. Restart the PRINTER. If the error persists, AFE R/W error (940306) call service personnel for help. Please load paper in manual tray Paper empty in the manual tray.
- Page 74 Troubleshooting The Full page feature does not support N in 1 Full page not support N in 1 (2 in 1 or 4 in 1). The Custom Zoom feature does not support Custom zoom not support N in 1 N in 1 (2 in 1 or 4 in 1). Paper Jam ADF paper jam (002013).
- Page 75 User’s Guide Locations of the Jammed Paper Front Cover: Open the front cover Rear Cover: Open the rear cover by by pulling the handles of the front pulling the handle of the rear cover as cover on both sides as illustrated. shown.
- Page 76 Troubleshooting Fuser: The area around the fuser is hot. To avoid a burn injury, be careful not to touch the fuser until it cools down and follow these steps to remove the jammed paper: Open the Front Cover and the Pull down the Fuser Path as Rear Cover.
- Page 77 User’s Guide Possible Causes or Solution Error Message and Codes Runtime error Restart PRINTER. If this error persists, call service personnel Error (Number). for help. Write Data Smaller Error -Engine 201516 Black LPH Type Error 201631 Red LPH Type Error 201632 PRINTER LPH Error,LPH cable connection fails.
- Page 78 Troubleshooting 300202 PRINTER FLASH_CHIP_ERASE_FAILED 300203 PRINTER FLASH_PROGRAM_FAILED 302651 Network_INIT_FAIL , network initialization fails. Image Problem Troubleshooting Problem Image Example Solution Use paper of standard weight: If you are using thin paper, try to use paper of standard weight (70 Use paper with less moisture: Load Paper curls the paper to the paper tray immediately after removing them...
- Page 79 User’s Guide Vertical white lines Call the service personnel for help. Vertical black Please clean the EP charger according to lines the procedure described in this manual (p. 102). Dirty Check if toner is not leaked from the background(pa toner cartridge. If so, replace the toner rtial page) cartridge.
- Page 80 Troubleshooting Defective image Use a clean and soft cloth to wipe of regular the off the dust or particle on the interval drum unit. (See page 98) If the error occurs again, contact the service personnel. If you have observed a rougher texture on one side of your paper, try printing on the Loose toner...
-
Page 81: Technical Support
No. 20, Creation Road I, Science-Based Industrial Park, Hsinchu 300, Taiwan, ROC TEL: +886 (3) 578-2388 FAX: +886 (3) 577-7017 E-MAIL: service@avision.com.tw Web Site: http://www.avision.com.tw US and Canada Area Avision Labs, Inc. 6815 Mowry Ave., Newark CA 94560, USA TEL: +1 (510) 739-2369 FAX: +1 (510) 739-6060 E-MAIL: support@avision-labs.com... -
Page 82: Maintaining The Product
Maintaining the Product 7. Maintaining the Product Cleaning the Paper Path Refer to the preceding section to remove the Toner Cartridge. Check if there is paper dust on the Paper Path. If so, remove the dust. Paper Path... - Page 83 User’s Guide Cleaning the IR Sensors If too much paper dust or dust accumulates on the IR sensors, it may cause the misjudgment of paper jam. For example, there is error code of paper jam occurs yet in fact no jammed paper found inside the PRINTER. In this case, please clean the IR sensor according to the following steps.
- Page 84 Maintaining the Product Cleaning the Paper-In Sensors If too much paper dust or dust accumulates on the Paper-in sensors, it may cause the misjudgment of paper jam. For example, there is error code of paper jam occurs yet in fact no jammed paper found inside the PRINTER. In this case, please clean the Paper-in sensor according to the following steps.
-
Page 85: Cleaning The Pad In The Cassette
User’s Guide Cleaning the Pad in the Cassette If the Pad in the Cassette is smeared with paper powder or dirt or every 30K copies, paper may not feed smoothly or noise occurs during paper feeding. Follow the procedure below to clean the Pad in the Cassette. You need to prepare: cotton swab Remove all paper in the cassette. -
Page 86: Cleaning The Drum Unit
Maintaining the Product Cleaning the Drum Unit If the drum unit is smeared with paper powder or dirt, the print out may appear defective image of regular interval. Follow the procedure below to clean the drum unit. Turn off the power and remove the power cord from the power outlet. Open the front cover by pulling the handles on both sides as shown. - Page 87 User’s Guide Remove the toner cartridge from the drum unit as shown. Drum unit Toner Cartridge Clean the drum unit with a clean and soft cloth. Clean this area.
-
Page 88: Replacing The Toner Cartridge
3,000 pages. When the toner cartridge is running low, you will be prompted with a [Toner Low] message through the PRINTER monitoring program – [Avision Status Monitor]. Buy a new toner cartridge and have it ready before you receive [Replace Toner] message. - Page 89 User’s Guide Lift the handle of the drum unit and toner cartridge assembly and gently remove the assembly. Remove the toner cartridge from the drum unit as shown. Drum Toner Cartridge Protective Cover Important! Do not dispose of the toner cartridge. Put the used toner cartridge into the bundled plastic bag, and then return it to a dealer or service representative.
- Page 90 Maintaining the Product Installing the Toner Cartridge Unpack the new toner cartridge、and remove the protective cover. Tilt the new toner cartridge up and down and then right and left 10 times to distribute the toner evenly inside the toner cartridge. Pull out the protective seal of the toner cartridge until it is completely removed.
- Page 91 User’s Guide Clean the corona wire inside the drum unit by gently sliding the tab from left to right and right to left for several times. (After the toner cartridge has been used for a period of time, some amounts of toner may remain on the corona wire.) Note: Be sure to return the tab to the Home position (▲).
-
Page 92: Replacing The Drum Unit
30,000 pages. When the drum unit is running low, you will be prompted with a [Drum Unit Low] message through the PRINTER monitoring program – [Avision Status Monitor]. Buy a new toner cartridge and have it ready before you receive [Replace Drum Unit] message. - Page 93 User’s Guide Remove the toner cartridge from the drum unit as shown. Drum unit Toner Cartridge Installing the Drum Unit Remove the protective film and the label in the center of the drum unit. Be sure not to touch the drum during unpacking. Your finger print may affect the print quality.
- Page 94 Maintaining the Product Hold the handle of the toner cartridge and insert the toner cartridge to its original place. Press the handle to fix it firmly in place. Note: If toner gets on your clothing or other fabric, wipe off the toner ...
-
Page 95: Specifications
User’s Guide 8. Specifications All specifications are subject to change without notice. General Max media size Legal size Resolution 1200 × 1200 dpi Printing speed 33 ppm (A4 SEF) 1 page(70 g/m² plain paper) Paper capacity Manual A4, A5, A6, B5 (JIS), B6 (JIS), Letter, Legal, Paper size customized size:76 x 127 ~ 216 x 356 mm tray... - Page 96 Specifications Power consumption < 1.02kw 10°C~32°C Operation Temperature 15%~80% (no dew) Environment Humidity Product Lifecycle Printer life 5 year or 60,000 pages 1,500/3,000** pages Toner Cartridge Drum Unit *30,000 pages Fuser 60,000 pages *Drum yield is based on 3 pages per job [letter/A4 simplex]. The number of pages maybe affected due to the media type or paper size.
- Page 97 User’s Guide Wi-Fi Spec. Model: CF-WU810N Main Chipset RTL8188EUS Host interface USB 2.0 Frequency Range 2.412~2.484 GHz IEEE 802.11b Wi-Fi Standard IEEE 802.11g IEEE 802.11n 11b: 1/2/5.5/11 Mbps Transmit Speed 11g: 6/9/12/24/36/48/54 Mbps 11n: 150 Mbps Transmit Power Max. 18 dBm WPA-PSK/WPA2-PSK Security WPA/WPA2...
Need help?
Do you have a question about the AP33Q Series and is the answer not in the manual?
Questions and answers