Advertisement
Quick Links
Advertisement

Related Manuals for VALKYRIE Vind SL125


Summary of Contents for VALKYRIE Vind SL125
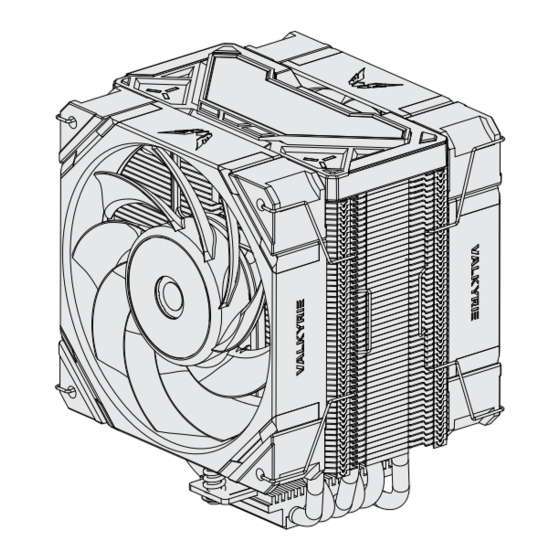
- Page 1 INSTALLATION GUIDE Valkyrie Vind SL125 / DL125 VIND www.my-valkyrie.com...
- Page 4 List of Parts SL125 1x Air Cooling Unit 1x Forward Curved Fan 1x Extension Cord 1x Backward Curved Fan 4x Cable Clips...
- Page 5 1x Intel Backplate 4x Intel / AMD Bolts 4x Nuts 4x LGA2011 Bolts 1x Nut Socket 2x Intel Brackets 2x AMD Brackets 1x Patented Magnetic Logo 1x Thermally conductive silicone grease *Please check the received goods to make sure the parts are complete.
- Page 6 List of Parts DL125 1x Air Cooling Unit 2x Forward Curved Fan 1x Exstension Cord 4x Cable Clips...
- Page 7 1x Intel Backplate 4x Intel / AMD Bolts 4x Nuts 4x LGA2011 Bolts 1x Nut Socket 2x Intel Brackets 2x AMD Brackets 2x Patented Magnetic Logo 1x Thermally conductive silicone grease *Please check the received goods to make sure the parts are complete.
-
Page 8: Air Cooling
AIR COOLING... - Page 9 Intel LGA1200/1700 Installation We have marked the parts required for installing the Intel LGA1200/1700 platform for you. 1x Intel Backplate 4x Intel / AMD Bolts 4x Nuts 1x Nut Socket 1x Exstension Cord 2x Intel Brackets 4x Fan Cable Clips 2x Fan SL125 1x Forward Curved Fan...
- Page 10 Step 1: Install bracket 1. Align the backplate to the corresponding platform holes. 2. Install the backplate onto the back of the motherboard. * You may slide it to adjust for alignment with the corresponding platform holes. * Use the inner mounting hole position for 1200 (115X) and the outer mounting hole position for 1700.
-
Page 11: Step 3: Install Brackets
Step 3: Install brackets Put the brackets onto the bolts and tighten them with nuts using a nut socket. Step 4: Remove the protective cover Take off the protective cover from the coldplate. -
Page 12: Step 6: Complete Installation
Step 5: Install the cooler Align the cooler to the holes and screw it onto the brackets. *Use caution. DO NOT touch the thermally conductive silicone grease pre-applied on the bottom. Step 6: Complete installation Please refer to the Install Fan and Wiring for installing and connecting fans to the cooler. - Page 14 Intel LGA2011/2066 Installation We have marked the parts required for installing the Intel LGA2011/2066 platform for you. 2x Intel Brackets 4x LGA2011 Bolts 4x Nuts 1x Nut Socket 1x Extension Cord 2x Fan 4x Fan Cable Clips SL125 1x Forward Curved Fan 1x Backward Curved Fan DL125 2x Forward Curved Fan...
- Page 15 Step 2: Install brackets Put the brackets onto the bolts and tighten them with nuts using nut socket. Step 4: Remove the protective cover Take off the protective cover from the coldplate.
- Page 16 Step 5: Install the cooler Align the cooler to the holes and screw it onto the brackets. *Use caution. DO NOT touch the thermally conductive silicone grease pre-applied on the bottom. Step 6: Complete installation Please refer to the Install Fan and Wiring for installing and connecting fans to the cooler.
- Page 18 AMD AM4/AM5 Installation We have marked the parts required for installing the AMD/AM4 platform for you. 2x AMD Brackets 4x Intel/AMD Bolts 4x Nuts 1x Nut Socket 1x Extension Cord 2x Fan 4x Fan Cable Clips SL125 1x Forward Curved Fan 1x Backward Curved Fan DL125 2x Forward Curved Fan...
- Page 19 Step 2: Install Screws Install INTEL/AMD bolts to the backplate. *The larger end of the screw faces down. Step 3: Install brackets Put the brackets onto the bolts and tighten them with a nuts using nut socket.
- Page 20 Step 4: Remove the protective cover Take off the protective cover from the coldplate.
- Page 21 Step 5: Install the cooler Align the cooler to the holes and screw it onto the brackets. *Use caution. DO NOT touch the thermally conductive silicone grease pre-applied on the bottom. Step 6: Complete installation Please refer to the Install Fan and Wiring for installing and connecting fans to the cooler.
- Page 22 SL 125 FAN INSTALL...
- Page 23 SL 125 Fan installation Use the cable clips to secure the fan to the cooler. *SL1255 is a forward/backwards curved fan setup. Please pay attention to the fan’ s direction. *The fan logo (wing LOGO) should be as shown in the figure below.
- Page 24 DL 125 FAN INSTALL...
- Page 25 DL 125 Fan installation Use the cable clips to secure the fan to the cooler. DL125 is dual forward curved fan setup. Please pay attention to the fan’ s direction. *The fan logo (wing LOGO) should be as shown in the figure below.
- Page 26 WIRING...
-
Page 27: Fan Wiring
Fan Wiring 1. Use the cables to connect the 4PIN fan cable to the CPU_FAN header on the motherboard. 2. Please connect the A-RGB connector of the fans and main body to the 5V 3PIN A-RGB header on the motherboard as shown in the figure. MOTHERBOARD CPU_FAN CPU_FAN CPU_FAN... - Page 28 TIPS...
- Page 29 Method of replacing of the upper cover The cover can be removed and replaced with your favourite style. *Make sure you start from the middle.
- Page 30 HW Gaming Solution Ltd 28 Oktovriou 261, View point Tower, 3035 Limassol, Cyprus info@my-valkyrie.com www.my-valkyrie.com VV_2.2_14042023...
Need help?
Do you have a question about the Vind SL125 and is the answer not in the manual?
Questions and answers