Husqvarna VIKING Designer Epic 3 User Manual
Hide thumbs
Also See for VIKING Designer Epic 3:
- User instructions (2 pages) ,
- User instructions (2 pages)
Table of Contents
Advertisement
Quick Links
Advertisement
Table of Contents

Related Manuals for Husqvarna VIKING Designer Epic 3


Summary of Contents for Husqvarna VIKING Designer Epic 3
- Page 1 User’s Guide K E E P I N G T H E WO R L D S E W I N G ™...
- Page 2 IMPORTANT SAFETY INSTRUCTIONS Read all instructions before using this sewing machine. When using an electrical appliance, basic safety precautions should always be followed, including the following: Keep the instructions at a suitable place close to the machine. Make sure to hand them over if the machine is given to a third party.
- Page 3 If the cord is damaged or lost, make sure to replace it with the same type of cord, available at an authorized HUSQVARNA® VIKING® Dealer. • If the cord connected with the foot control is damaged, it must be replaced by the manufacturer or its service agent or a similarly qualified person, in order to avoid a hazard.
- Page 4 • Connect the equipment into an outlet on a circuit different from that to which the receiver is connected. • Consult the authorized HUSQVARNA® VIKING® retailer or an experienced radio/TV technician for help. The included interface cable should be used in order to ensure compliance with the limits for a Class B digital device.
- Page 5 CE Declaration of Conformity VSM Group AB Soldattorpsgatan 3, SE-554 74 Jonkoping, Sweden declare that the product: Household Sewing Machine HUSQVARNA® VIKING® DESIGNER EPIC™ 3 complies fully with following EU directives: • 2014/53/EU RED Directive and that the relevant harmonized standards are applied as listed: •...
-
Page 6: Table Of Contents
TABLE OF CONTENTS Introduction ..........11 Attaching the Sensor One-Step Buttonhole Learn More............12 Foot...............44 Machine Overview ........12 Attaching the Sensor Q-Foot......44 Front ............12 Changing the Needle Plate ......45 Needle Area ..........13 Storing a Needle Plate ........45 Left Side............13 Getting Started with WiFi and mySewnet Right Side ............ - Page 7 Free mySewnet Embroidery Software (PC Seam and Overcast ........83 and MAC)............ 62 Baste............83 Apps............62 Blind Hem ........... 84 Hem ............84 Home Screen ..........63 Buttonholes ..........85 Home Screen— Overview......64 Programmable Button Sew On ......86 Tapering Stitches...........
- Page 8 Mirroring............105 Center Position ..........125 Move into Hoop ..........105 Exact Position ..........126 Undo/Redo ..........105 Zoom Options ..........126 Pan ............105 Set Cursor Point ..........126 Zoom Options ..........106 Exact Position Exercise.........126 Hoop Options ..........106 Projection in Embroidery Stitch-Out ...127 Select Hoop ..........106 Save Current State/Restore Current Scan Hoop..........107 State ............128 Background..........107...
- Page 9 Customize Your Workspace ......143 Lock Screen ..........143 Show Demo Mode ........143 Play Feature Videos as Screensaver....143 WiFi Settings..........144 mySewnet Settings........145 Camera and Projection Settings....146 Presser Foot Recognition.......146 Adjust Camera..........146 Adjust Projection .........146 Machine Information........147 13 File Manager ..........149 File Manager – Overview......150 File Formats ..........151 Browse File Manager........151 Open a File or Folder........151...
-
Page 11: Introduction
1 Introduction... -
Page 12: Learn More
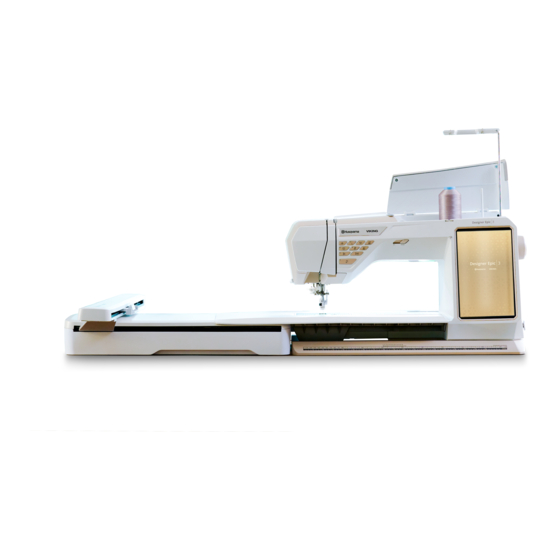
Learn More Machine Overview Front 1. Lid 9. Thread cutter 17. Speed control slider 2. Pre-tension thread guide 10. LED lights 18. Hand wheel 3. Threading slot 11. Bobbin cover release button 19. Bobbin winding thread guides 4. Thread tension discs 12. -
Page 13: Needle Area
Needle Area 1. Automatic needle threader 2. Needle holder with needle clamp screw 3. Needle thread guide 4. Integrated Dual Feed (IDF) System 5. Presser foot 6. Presser foot ankle 7. Presser foot bar Left Side 1. Integrated Dual Feed (IDF) System 2. -
Page 14: Accessory Tray
Accessory Tray The accessory tray features special compartments for presser feet and bobbins, plus space for needles and other accessories. Store the accessories in the tray so they are easily accessible. 1. Space for accessories 2. Hook for storing the Sensor One-Step Buttonhole Foot 3. -
Page 15: Function Buttons
Function Buttons 1. Stop 2. Cut 3. Reverse 4. Start/Stop 5. Presser foot down and pivot 6. Needle stop up/down 7. Presser foot up and extra lift 8. Stitch restart 9. Immediate tie-off 10. Automatic needle threader Stop Press the stop button when sewing to conclude a stitch or stitch program. Your machine fixes the thread and stops automatically when the stitch or stitch program has been completed. - Page 16 Needle Stop Up/Down Press needle stop up/down to set the position of the needle when you stop sewing. The needle will move up or down when you press the button. The indicator light is on when needle stop down is set. Tip: You can also tap the foot control to raise or lower the needle once you stop sewing.
-
Page 17: Accessories
Accessories Included Accessories 1. Thread net (4) 2. Universal tool 3. Seam ripper 4. Brush 5. Bobbins (9) 6. Edge/Quilting guide (to use insert into the presser foot ankle) 7. Multipurpose tool 8. Thread cone holder (2) 9. Spool cap, small (2) 10. -
Page 18: Presser Feet
Presser Feet Note: For the best sewing results, use only presser feet designed for and compatible with your DESIGNER EPIC™ 3 machine. Utility Foot A for IDF System Snapped onto the machine upon delivery. Used mainly for straight stitching and zigzag stitching with a stitch length longer than 1.0mm. - Page 19 Side-Motion Foot S Used for side-motion/omnimotion stitches. Sensor One-Step Buttonhole Foot Plug into the machine then enter the desired buttonhole length to sew sensor one-step buttonholes. The middle guideline measures ½″ (12mm) from the needle position. The two tunnels on the underside of the foot ensure smooth feeding over the buttonhole columns. The finger on the back of the foot holds cording for corded buttonholes.
-
Page 20: Stitch Overview
Stitch Overview The Utility stitches are divided into several sub categories. See a selection of the stitches and descriptions below. Utility Stitches 1, Basic Stitches Name Description Stitch № Presser foot Straight stitch, left needle For all types of sewing. position Straight stitch, center For all types of sewing. -
Page 21: Utility Stitches 2, Appliqué & Mending
Stitch № Presser Name Description foot Zigzag basting To baste, press the foot control and the machine will make two stitches, stop and raise the foot. When the presser foot lifts, move the fabric to the next baste position and press the foot control. -
Page 22: Utility Stitches 3, Buttonholes
Stitch № Presser Name Description foot A2:6 Hand-look Appliqué To sew appliqués with a hand-look stitch. Stitch A2:7 Bartack stitch Reinforce pockets, shirt openings, belt loops as well as at lower end of a zipper. A2:8 Bartack, manual Reinforce pockets, shirt openings, belt loops as well as at lower end of a zipper. - Page 23 Stitch № Presser Name Description foot Sensor A3:9 Heavy duty buttonhole With reinforced bartacks Buttonhole foot/C A3:10 Sensor Heavy reinforced For utility and heavy fabrics. Buttonhole buttonhole foot/C A3:11 Medium/heavy For medium and heavy fabrics. reinforced buttonhole A3:12 Medium reinforced For medium fabrics.
-
Page 24: Stitch Menu Overview
Stitch Menu Overview There are several different stitch menus with stitches for all purposes. For detailed description of a stitch, use the quick help function, see Quick Help. Stitch Menu Name Description A — Utility Stitches Stitches for garment sewing and mending. There is also a menu with 4–way stitches that for example can be used when sewing patches. -
Page 25: Preparations
2 Preparations... -
Page 26: Unpacking Machine And Embroidery Unit
No other cord can be used. If the cord is damaged or lost, make sure to replace it with the same type of cord, available at an authorized HUSQVARNA® VIKING® Dealer. • Pull out the cord (E) from the foot control. Connect the foot control cord to the socket (1) on the bottom right side of the machine. -
Page 27: Packing Away After Sewing
Packing Away After Sewing Long press the power button (about 2 seconds) to turn off the machine. Note: If the button is released within 2 seconds, the machine will remain with power on. Unplug the cord from the wall socket and then from the machine. -
Page 28: Manual Thread Cutter
Manual Thread Cutter There are three manual thread cutters on your machine. The first one (A) is close to the bobbin winder spindle for cutting the thread before and after winding. The second one (B) is on the left side of the machine for manually cutting top and bobbin thread. -
Page 29: Spool Pins
Spool Pins Your machine has two spool pins; a main spool pin and an auxiliary spool pin. The spool pins are designed for all types of thread. Use the main spool pin (A) when threading the upper thread and for bobbin winding through the needle. For regular sewing and embroidery thread, use the main spool pin in vertical position. - Page 30 Embroidery Thread Embroidery thread is made from a variety of fibers: rayon, polyester, acrylic or metallic. These threads create a smooth glossy appearance for embroidery and other decorative stitching. Embroidery thread is not typically used in the bobbin unless both sides of the project will be seen. A light weight, embroidery bobbin thread is often used in the bobbin instead.
-
Page 31: Needles
Needles The sewing machine needle plays an important role in successful sewing. Use only quality needles. We recommend needles of system 130/705H. The needle package included with your machine contains needles of the most frequently used sizes. The Needle Guide, available in JoyOS ADVISOR™, let you learn more about different needles and the color coding used to define what type and size they are. -
Page 32: Changing The Needle
Changing the Needle 1. Use the hole in the multipurpose tool to hold the needle. 2. Loosen the needle screw with the universal tool. 3. Remove the needle. 4. Insert the new needle using the multipurpose tool. Push the new needle upwards with the flat side away from you until it will go no further. -
Page 33: Threading
Threading Make sure that the presser foot and needle are in the up position. Note: When using thread cones, place a cone holder on the spool pin before placing the thread cone. This prevents the thread cone from wobbling. Tip: When removing the thread cone from the spool pin, the cone holder might become stuck inside the thread cone. - Page 34 4. Pull the thread between the thread tension discs (D). Thread down through the right threading slot and then upwards through the left threading slot. Bring the thread from the right into the take-up lever (E) until it clicks into place (F), and down in the left threading slot to the last thread guide (G) just above the needle.
-
Page 35: Automatic Needle Threader
Automatic Needle Threader Using the Automatic Needle Threader The needle threader allows you to thread the needle automatically by simply touching a button. Make sure that the needle is inserted correctly and pushed up all the way into the needle clamp before using the automatic needle threader. - Page 36 • normal cotton or polyester sewing thread 80/12 • rayon embroidery thread Note: Specialty fabrics and threads may require a special needle for best stitch results. Refer to your HUSQVARNA® VIKING® retailer for more information on needle types and sizes for your sewing needs. 2 Preparations...
-
Page 37: Threading For Twin Needle
Threading for Twin Needle Replace the sewing needle with a twin needle. Make sure that the presser foot and needle are in the up position. Note: When using large thread cones on the auxiliary spool pin, place the large spool holder with the flat side up and a cone holder on the spool pin before adding the thread cone. - Page 38 3. Pull the threads between the thread tension discs (E). Make sure that you place one thread to the left and one to the right side of the tension discs. Thread down through the right threading slot and then upwards through the left threading slot. Bring the threads from the right into the take-up lever (F) until they click into place (G), and down in the left threading slot.
-
Page 39: Threading Tips And Hints
Threading Tips and Hints There are many threads on the market today developed for different purposes. The quality and structure of the thread as well as the shape and size of the thread spool can affect the behavior of the thread. Threads can also behave differently if the spool is full or nearly empty. -
Page 40: Bobbin Winding
The bobbins included are designed especially for your DESIGNER EPIC™ 3 machine. Only use HUSQVARNA® VIKING® category 8 bobbins. Wind a few turns of thread clockwise around the bobbin and cut excess thread with the thread cutter (H). -
Page 41: Winding Through The Needle
Winding Through the Needle When using the same thread in the needle and bobbin, it is convenient to wind a new bobbin directly through the needle without having to unthread/re-thread your machine. We do not recommend winding speciality threads such as invisible or other stretchy threads, metallic or flat metallic threads through the needle. -
Page 42: Inserting The Bobbin
Note: If you experience difficulty winding a bobbin through the needle and you are using a large thread cone, move the cone to the auxiliary spool pin and use the right clip on the telescopic thread guide instead. Place the large spool holder with the flat side up and a cone holder on the auxiliary spool pin before adding the thread cone. -
Page 43: Integrated Dual Feed (Idf) System
Integrated Dual Feed (IDF) System When sewing with multiple layers or more challenging fabrics you need an even feed from the top and the bottom and your machine has the ideal solution: the Integrated Dual Feed (IDF) System. The IDF System feeds the fabric from the top and bottom at the same time. -
Page 44: Attaching The Sensor One-Step Buttonhole Foot
Attaching the Sensor One-Step Buttonhole Foot 1. Snap on the Sensor One-Step Buttonhole Foot. 2. Insert the plug, with the three dots facing out, into the accessory socket at the back of the sewing head. Before using the automatic needle threader with the Sensor One-Step Buttonhole Foot attached, lift the wheel of the foot up to avoid damage to the needle threader and foot. -
Page 45: Changing The Needle Plate
Changing the Needle Plate The Straight Stitch Plate is recommended for embroidery. It may also be used for certain techniques in sewing mode, such as quilt piecing. The smaller hole in the Straight Stitch Plate supports the fabric closer to the needle and helps prevent the fabric from being pulled down into the bobbin area, especially at the beginning and/or end of a seam. -
Page 46: Getting Started With Wifi And Mysewnet Cloud
Getting Started with WiFi and mySewnet Cloud Connect to a Network with WiFi Touch the WiFi button. Select from the list of available networks. If your network is password protected, you will be prompted to enter the password to connect. WiFi icon For more information, see WiFi Introduction. -
Page 47: Embroidery Preparations
3 Embroidery Preparations... -
Page 48: Embroidery Unit Overview
Embroidery Unit Overview (type EU 22) 1. Embroidery arm 2. Embroidery hoop release button 3. Embroidery hoop attachment 4. Handle to use for carrying or wall storage 5. Embroidery unit connector (underside) 6. Slot for embroidery unit extension 7. Grip to use when connecting the embroidery unit Embroidery Unit Extension Overview 1. -
Page 49: Sensor Q-Foot
The Straight Stitch Plate is recommended for hoop embroidery. See Changing the Needle Plate, page 45. Embroidery Designs On the HUSQVARNA® VIKING® website you can look through the DESIGNER EPIC™ 3 sampler book for designs and fonts. All included designs are pictured with information about... -
Page 50: Connecting The Embroidery Unit
Connecting the Embroidery Unit When embroidering always place your sewing machine and embroidery unit on a single, flat, and sturdy surface. Make sure there is enough space around your machine as the embroidery arm and hoop will move and take up a lot of room. -
Page 51: Removing The Embroidery Unit
Removing the Embroidery Unit To store the embroidery unit in the embroidery case, move the embroidery arm to park position. See park position . Remove the embroidery unit by lifting it off the embroidery unit connector. Always use both hands to lift it off. Store the embroidery unit in the original styrofoam packing material, placed in the carrying bag. -
Page 52: Attach The Large Hoop Support
Attach the Large Hoop Support There are two large hoop supports, one for the front and one for the back of the embroidery unit extension. One side of the hoop supports is slightly more angled than the other, the more angled side should be placed to the left. 1. -
Page 53: Hooping The Fabric
Hooping the Fabric For the best embroidery results, place a layer of stabilizer beneath the fabric. When hooping stabilizer and fabric make sure that they are smooth and securely hooped. 1. Open the quick release (A) on the outer hoop and loosen the retaining screw (B). -
Page 54: Attaching And Removing The Hoop
Attaching and Removing the Hoop The hoop attachment is positioned on the embroidery arm. Place the hoop in the hoop attachment and carefully push the hoop down until it clicks in place. To remove the hoop, press the release button towards the embroidery arm. -
Page 55: The Multi-Touch Screen
4 The Multi-Touch Screen... -
Page 56: Main Functions
Main Functions Home The home screen is shown every time you start your DESIGNER EPIC™ 3 machine. The home screen is always accessible through the home button. mySewnet services When you’re logged in to your mySewnet account you will have access to the cloud storage. In mySewnet blog you can view the latest product news, sewing instructions and get inspiration. -
Page 57: Quick Help
Quick Help On almost every function and icon on screen, you can get a short description by using the quick help function. Touch the question mark icon. Then touch an icon or an area on the screen you want information about. Some quick helps will refer to the user’s guide for more information. -
Page 58: Top Bar
Top Bar Several functions are accessible on the top bar, for example 1 2 3 4 6 7 8 9 10 mySewnet, home button, quick help, settings and the sewing/ embroidery mode toggle. 09:45 Note: All functions may not always be available at the same time. Sewing/ mySewnet Quick help... -
Page 59: Wifi & Mysewnet Services
5 WiFi & mySewnet Services... -
Page 60: Wifi Introduction
WiFi Introduction Your DESIGNER EPIC™ 3 machine features WiFi, which makes it possible to connect your machine wireless to the mySewnet services. Getting Started With WiFi Touch the WiFi button and activate WiFi. Select a network from the list of available networks. If your network is password protected, you will be prompted to enter the password to be able to connect. -
Page 61: Firmware Update Using A Usb Device
Firmware Update Using a USB Device Visit the HUSQVARNA® VIKING® website at www.husqvarnaviking.com and find your machine. Here you will find the available updates. 1. Download the update firmware zip file. Unzip the file and copy the file (.clo) to a USB device. -
Page 62: Project Creator
Project Creator mySewnet Project Creator is a tool, where you can turn your favorite sewing or embroidery projects into shareable step- by-step instructions. Free mySewnet Embroidery Software (PC and MAC) A computer software package is available for your machine. It adds the following features: •... -
Page 63: Home Screen
6 Home Screen... -
Page 64: Home Screen- Overview
Home Screen— Overview The home screen is filled with guidance, inspiration and help, making sure that you get the assistance you need in order to utilize your machine’s full potential. Here you'll find the JoyOS ADVISOR™ feature, which includes a large amount of different tutorials to choose from. JoyOS ADVISOR™... -
Page 65: Edit Machine Nickname
Edit Machine Nickname On your home screen you can see the name of your machine. This can be useful when owning more than one machine to distinguish one machine from another. The name will be shown on the screensaver. You can change your machine’s nickname in settings. User Profile When you are signed in to your mySewnet account, your user name will be shown. -
Page 66: Joyos Advisor
JoyOS ADVISOR™ You have a large amount of different tutorials to choose from, Select your fabric type and choose from a wide selection of which step-by-step will guide you through text, illustrations available sewing techniques. The JoyOS ADVISOR™ feature and animations. will instantly set the best stitch, stitch width, stitch length, thread tension/portioning, and presser foot pressure for the You can learn a lot of different techniques within sewing,... -
Page 67: Sewing
Sewing When loading a sewing technique the machine will select the best stitch and settings for your chosen fabric and project. Depending on which choices you make, your JoyOS ADVISOR™ feature will recommend the most suitable sewing techniques. Fabric Selection Start your sewing by selecting the fabric that you will use. -
Page 68: Quilting
All tutorials in this category will walk you through all of these features included in your machine. Accessories There is a wide assortment of HUSQVARNA® VIKING® accessories that are compatible with your machine. The tutorials in this category will show how to use accessories both for sewing, embroidery and quilting. -
Page 69: Stabilizers
Stabilizers When embroidering, the use of a stabilizer is necessary. HUSQVARNA® VIKING® offers a selection of different types of stabilizers, depending on your need. In this category you can find information about all available stabilizers in our assortment and when they are recommended to be used. -
Page 70: Project Viewer
Project Viewer When loading a tutorial from the JoyOS ADVISOR™ feature it will be shown in the project viewer. In the project viewer you can change the fabric that you will use. The stitches loaded through the project are set to fit your selected fabric. -
Page 71: Sewing
7 Sewing... -
Page 72: Sewing Mode - Overview
Sewing Mode – Overview In sewing mode you can select stitches, adjust and sew them. Your selected stitch will be shown in actual size in the stitch field. Use the Stitch Creator™ feature and sequence to create your own stitches and sequences. You will see active features and be given recommendations based on selected stitch. -
Page 73: Load A Stitch
Load a Stitch Touch the stitch menu and select the desired stitch. Available Load Stitich (1/9) Sti tches stitch categories are listed horizontally, swipe to see more A. Utility C. Lorem ipsum categories. All categories have sub categories. When you B. -
Page 74: Projection Options
Projection Options If you want the machine to light up the sewing area projection in a special color, you can change the background color. You can also adjust the level of brightness of the projection. Background color Brightness Stitch Preview The stitch is shown in actual size and projected on your fabric in relation to the needle. -
Page 75: Grid
Grid For a maximum visibility against your chosen fabric, you can change the grid color. The grid can also be moved and angled. Grid color Angle Grid size Preset angles Position Reset grid Stitch Guidelines For maximum visibility against your chosen fabric, you can change the color of the guidelines. -
Page 76: Information And Sewing Recommendations
Presser Foot Recognition The presser foot recognition feature can recognize the majority of HUSQVARNA® VIKING® original presser feet. The presser foot recognition system will detect which presser foot is attached to the machine. If the presser foot that is A. -
Page 77: Stitch Width
Stitch Width Increase or decrease the stitch width using – and + in the control. The number shows stitch width in mm/inch. Changed stitch position may limit the stitch width adjustments. Stitch Positioning On certain stitches with a width less than 9 mm it is possible to change the stitch position. -
Page 78: Button Stitch Repetition
Button Stitch Repetition When sewing a button, you can set the number of stitch repeats. Use the – or + in the control to decrease or increase the number of stitch repeats. deLuxe™ Stitch System The deLuxe™ stitch system has two ways to control the upper thread: thread portioning and thread tension. -
Page 79: Presser Foot Pressure
Presser Foot Pressure Touch + to increase or - to decrease the pressure of the presser foot on the fabric. EXCLUSIVE SENSOR SYSTEM™ Thanks to the EXCLUSIVE SENSOR SYSTEM™ feature, the presser foot automatically and continuously senses and adjusts as you sew any thickness of fabric for perfect even feeding. -
Page 80: Tie-Off Options
Free Motion Floating Select free motion floating to use floating feet, e.g. the R- Foot. The feed teeth will lower automatically. When sewing at low speed the presser foot will raise and lower with each stitch to hold the fabric on the needle plate while the stitch is being formed. -
Page 81: Save Stitch
Sewing with Tie-Off Options selected • The tie-off beginning will be performed as soon as you start to sew. • Press the reverse button to perform tie-off end. The Tie-off beginning/tie-off end action indicator lamp will be lit to indicate that the machine will finish the stitch and do the tie-off. -
Page 82: Patchwork Program
Patchwork Program The patchwork program makes it possible for you to Stitch Repeat program an exact stitch length that can be sewn repeatedly. Patchwork Program Single Stitch Program This is very useful when quilting. REPETITIONS To program a seam length, touch stitch repeat and select patchwork program. -
Page 83: Sewing Techniques
Sewing Techniques In JoyOS ADVISOR™ you can find all tutorials for the sewing techniques mentioned below. In basic sewing techniques you will find the most commonly used sewing techniques. When you choose one of the basic sewing techniques, the recommended stitch for the chosen fabric is automatically loaded. -
Page 84: Blind Hem
Blind Hem The blind hem creates an invisible hem on garments. There are two types of blind hems; one is recommended for medium to heavy fabrics, the other for stretch. The blind hem is not suggested for light weight fabric, leather and vinyl. The hem technique on your JoyOS ADVISOR™... -
Page 85: Buttonholes
Buttonholes The JoyOS ADVISOR™ feature will select the best buttonhole and stitch settings for your chosen fabric. Fabric should be interfaced and/or stabilized where buttonholes are to be sewn. Tip: In your accessory tray there is a special hook where you can hang your Sensor One-Step Buttonhole Foot. -
Page 86: Programmable Button Sew On
Programmable Button Sew On Sew buttons, snaps, hooks and eyes quickly with your machine. Select sew on button in the JoyOS ADVISOR™ feature. Note: Place the thin end of the multipurpose tool under the button when sewing on light fabrics. Use the thick end for heavier fabrics. Hold in place on the fabric with transparent tape. -
Page 87: 4-Way Stitches
4-Way Stitches The 4-way stitch allows you to sew several sturdy stitches in four different directions. You will have different 4-way stitches to choose from. This is especially helpful when patching trouser legs on a free arm. The 4-way stitches are programmed at a fixed length and stitch width. -
Page 88: Theme Stitches
Theme Stitches Theme stitches are beautiful combined stitches, in a group of four, designed to be sewn out together in a random combination. Touch the reverse button on the front of your machine or the reverse button on the screen to change to the next stitch in the group. -
Page 89: Embellished Stitches
Embellished Stitches Embellished stitches are decorative stitches where you can change the appearance of the stitch after it is sewn for a special effect. These stitches can be decorated with crystals or cut for a tassel effect. Tassel stitches are sewn with many threads on top of each other. - Page 90 Bobbin Thread Low Check Upper Thread When the bobbin thread is running low, a pop-up message The machine stops automatically if the upper thread runs out appears giving you notice that you will soon need to replace or breaks. Re-thread the upper thread, close the pop-up the bobbin.
-
Page 91: Stitch Creator™ Feature
8 Stitch Creator™ Feature... -
Page 92: Stitch Creator™ Feature - Overview
Stitch Creator™ Feature – Overview In Stitch Creator™, you can create completely new stitches and adjust every single stitch point. You can create a stitch all on your own or alter already built–in stitches or letters. The width of the stitch field is 9mm and maximum stitch length is 5mm. The grid and the vertical center line will help you to create your stitch. -
Page 93: Getting Started With Stitch Creator
Getting Started with Stitch Creator™ Definition of a Stitch Point A stitch point is the point where the needle goes through the fabric. Stitches are connected by stitch points. Each stitch point is indicated by a dot (A). A marked stitch point is indicated by a filled square (B). -
Page 94: Edit Stitch In Stitch Creator
Edit Stitch in Stitch Creator™ Zoom Options When using the zoom slider, the focus will be on the marked stitch point. The distance between the grid lines at 100% zoom, equals 1mm on the fabric. If you zoom in on the stitch field, the distance between the grid lines will change. -
Page 95: Add A Stitch Or Stitch Point
Add a Stitch or Stitch Point You can also add an existing stitch from the stitch selection shortcut in the menu bar or the selection menu. Touch the icon to insert one single stitch point. The two New Stitch stitch points will create a new stitch. Pop-up Messages in Stitch Creator™... -
Page 97: Embroidery Edit
9 Embroidery Edit... -
Page 98: Embroidery Edit - Overview
Embroidery Edit — Overview In embroidery edit you can adjust, combine, save and delete designs, stitches and fonts. You can edit your design combinations without having the embroidery unit connected to your machine. The loaded design(s) are shown in the embroidery area. 07:48 100% 240 X 150... -
Page 99: Load A Design
Load a Design Touch the design menu and select a design. Available design categories are listed horizontally, swipe to see more categories. All available designs within the same category are listed vertically, swipe to see more designs. Touch & hold on a design to load it to embroidery edit and place it where you like. -
Page 100: Load A Stitch
Load a Stitch Touch load stitch to open the stitch menu and select a stitch. Available stitch categories are listed horizontally, swipe to see more categories. All available stitches within the same category are listed vertically, swipe to see more stitches. Touch &... -
Page 101: Color Edit
Color Edit To change the thread color on more than one color block at a time, touch the select multiple icon, then touch the color blocks to select the ones you want to change. Colors Touch the select all icon to make changes to all color blocks at one time. -
Page 102: Change Color
Change Color You can edit the colors in your design. Each color block is represented in a color block list next to the design thumbnail Change Color Thread Library image. Touch the color that corresponds to the color block that you want to change . You can either choose to quick select directly from your favorites or touch change color. -
Page 103: Select Designs/Change Stitch-Out Order
Select Designs/Change Stitch-Out Order The designs in layers window are numbered. By default, the designs will be stitched out in the order they are loaded to the embroidery area. To change stitch-out order, touch & hold on the layer and then drag and drop it at another place in the list. -
Page 104: Move
Move Touch and move a selected design with your finger to position it anywhere in the embroidery area. You can also touch the move icon and use the arrows to Move/move to center adjust the position of the selected design(s). The numbers above the arrows show the horizontal and vertical distance from the center of the hoop for the selected design(s). -
Page 105: Delete/Delete All
Delete/Delete All Touch the delete icon, and the selected design(s) will be deleted from the embroidery area. If more than one design is selected, a pop-up message will appear. Touch OK to confirm to delete selected designs. If you touch & hold on the delete icon a pop-up will appear to ask if you want to delete all loaded designs from the embroidery area. -
Page 106: Zoom Options
Scan Hoop Design Placement A list is shown with hoop choices, including hoops that are Start Hoop Scan available to purchase from your authorized HUSQVARNA® Current / New Favorites (18/20) VIKING® retailer. Touch one of the hoops in the hoop size list to select the correct hoop size. -
Page 107: Scan Hoop
Scan Hoop You can use your fabric as a background in embroidery edit. Make sure the embroidery unit is attached and then touch scan hoop. The embroidery arm will need to calibrate. When the calibration is complete, attach the hoop you want to use. The scanning process will start when the hoop is attached and you have given approval for the next step. -
Page 108: Edit Stitch
Edit Stitch Touch edit stitch to open the control window for adjusting selected stitch. Note: The default setting is always shown in white numbers. Read about adjusting your stitch in Edit Stitch. Resize Resize can reduce or increase an embroidery design. The machine recalculates the number of stitches in the design so the original stitch density remains. - Page 109 Important Resize Information Since designs are digitized for a specific design size, it is important to consider the following information about resize. Always embroider a test sample of your resized design before embroidering on a project. • Resize is always proportional. If you reduce a design 30%, it will be 30% smaller in both length and width. If the design is very detailed, some of it may be lost or distorted, and/or it can become very dense.
-
Page 110: Embroidery Text
Embroidery Text To create a text, start by selecting an embroidery font. Use the keyboard to write your text and touch OK when finished to close the keyboard. If you want to adjust an existing text in Input text embroidery edit, select the text design, touch & hold on the embroidery text to open the smart toolbox and select edit embroidery text. - Page 111 Select Spacing Touch the select spacing icon to open options for spacing your text along the shape line: evenly spaced, left justified, centered or right justified. Evenly spaced will place the text evenly along the shape line with an equal distance between all letters.
-
Page 112: Create Shape
Create Shape Creating shapes is a unique way to take your creativity to another level. Use your beautiful stitch sequences or embroidery designs to form one of several shapes. The stitches/designs will be placed along the baseline in the order that they are loaded. Create Shape 100% 120 X 120... -
Page 113: Set Number Of Designs/Stitches
Repeat Combination/Duplicate Last Design Add more designs onto your shape in two different ways. When using repeat combination, the designs will be added to the shape in the same order as the ones already loaded. When using the duplicate last design, only the last added design in the shape will be added. -
Page 114: Create Appliqué
Create Appliqué You can add an appliqué to your quilt or garment easily using this feature. In your DESIGNER EPIC™ 3 machine there are many different autofill stitches to choose from when creating the appliqué. You can also choose decorative stitches or mini designs to cover the raw edges of the appliqué. -
Page 115: Load Autofill Stitch
Stitch Out an Appliqué The first color block will sew a straight stitch outline on the base fabric to show where the appliqué will be sewn. Place your appliqué fabric over the outline stitch on the base fabric. Make sure that your appliqué fabric covers the outline. The second color block will sew another straight stitch to secure the appliqué... -
Page 116: Fixed Design Angle
Fixed Design Angle You can select design angle to align all the designs in a fixed, vertical rotation on the shape line. Deselect to keep the current angle along the shape line. Control Points A control point is a point affecting the selected shape. Each shape is built by several control points. - Page 117 Embroidery Combination is too Complex Exceeded Maximum Number of Stitches This pop-up message appears e.g. for one of the following The design combination you are trying to make contains too reasons: many stitches. Your design combination can have a maximum of approximately 500,000 stitches.
-
Page 119: 10 Embroidery Stitch-Out
10 Embroidery Stitch-Out... -
Page 120: Embroidery Stitch-Out - Overview
Embroidery Stitch-Out – Overview 07:48 Embroidery Sti tch-Out 100% 240 X 150 14890 / 53 min Stitch-Out Progress GO TO STITCH THREAD PORTIONING 1:1 RARA 40 2233 CURRENT COLOR BLOCK TOTAL CORNER CHECK 725/1850 14165/14890 Stitch-Out Hoop Exact Progress Position Position 1. -
Page 121: Review The Embroidery Stitch-Out Settings
Review the Embroidery Stitch-Out Settings Before starting to embroider, review the embroidery stitch- Embroidery Stitch-Out Settings out settings to check that everything is set as you desire. You Review the settings below before you proceed. can select to skip this screen in future embroideries. Attached Needle Plate For best result in embroidery, use the straight stitch plate. - Page 122 deLuxe™ Stitch System When the deLuxe™ Stitch System feature is selected, your machine will automatically choose the best way to control the upper thread, by thread portioning or thread tension, based on your selected stitch and settings. Thread portioning automatically and continuously measures the fabric thickness to meter the correct amount of thread for the selected stitch.
-
Page 123: Color Block List
Color Block List All colors in the loaded design(s) are shown in the order they will be embroidered. Each listed color shows the design number and color block order. Also shown are the thread manufacturer, thread weight and thread color number. The size of each color block gives an indication of how many stitches the color block contains. -
Page 124: One Color
One Color Select to activate one color embroidery. All designs are shown in a grey color and the machine will not stop for color block changes. To deactivate one color embroidery, deselect one color option in the stitch-out settings. Note: If the automatic thread cutter and automatic jump stitch trim function is selected in settings, the jump stitches will still be trimmed between the color blocks. -
Page 125: Deluxe™ Stitch System
deLuxe™ Stitch System The control visible in embroidery stitch-out will change depending on whether the deLuxe™ Stitch System is active or not in the embroidery settings. Use the controls to adjust the balance between upper thread and bobbin thread, e.g. when embroidering with specialty thread. -
Page 126: Exact Position
Exact Position Use exact position to place a design on an exact location on your fabric without re-hooping. It can also be useful when you want to embroider a design to Set Position exactly match a specific spot on your project or next to a previously embroidered design. -
Page 127: Projection In Embroidery Stitch-Out
2. Move Locked Point on Fabric The cursor will be locked to the design. It will change color with a ring around the center of the locking point. Touch and move with your finger on the screen to position your design exactly where you want it to match on the fabric or to the previously stitched design. -
Page 128: Save Current State/Restore Current State
Save Current State/Restore Current State If you want to stop embroidering and save your current position, touch start/stop to stop the embroidery. Then touch the save icon. There you have the option to save current state. You can now turn your machine off. When saving current state, all your adjustments are stored and you can continue the embroidery later by touching “continue from saved state”... -
Page 129: Pop-Up Messages In Embroidery Stitch-Out
Pop-up Messages in Embroidery Stitch-Out To make your experience as convenient as possible, your machine sometimes communicate with you using pop-up messages. Those messages can contain warnings, recommendations, information or prompt you to perform an action. Below, some of the messages that can appear are listed and explained. The Embroidery Arm Needs to Calibrate Attach Hoop When the embroidery unit is attached, a pop-up message will... -
Page 131: 11 Sequence
11 Sequence... -
Page 132: Sequence - Overview
Sequence – Overview In sequence, you can create and adjust a sequence of stitches. Combine various 9mm stitches, side–motion stitches and stitch fonts from the machine, the mySewnet cloud or from a USB device. Stitches made in IDF System feature can also be Touch to open Sequence inserted in a sequence. -
Page 133: Getting Started With Sequence
Getting Started with Sequence To start creating a sequence, select a desired stitch and/or letter and add it to the sequence. The active position is marked by a cursor and the selected stitch or letter will be highlighted. Only the selected stitch/stitches can be adjusted. Inserted stitches will be placed at the cursor position. -
Page 134: Edit And Adjust Your Sequence
Edit and Adjust Your Sequence Adjust Stitch Settings You can adjust the length and width of the stitch or change the density or position of the selected stitch. The adjustments work just like in sewing mode. Duplicate To duplicate a stitch, move the cursor to the stitch you want to duplicate. -
Page 135: Saving A Sequence
Saving a Sequence To save your file, touch save. You can choose to save the file to the mySewnet cloud folder or to a USB device. Previously saved designs, stitches, sequences and/or fonts are shown. Save button Learn how to organize your saved files in File Manager. Sew or Embroider Your Sequence To sew your stitch sequence, load it to sewing mode by touching OK in sequence. -
Page 137: 12 Settings
12 Settings... -
Page 138: Sewing Settings
Sewing Settings deLuxe™ Stitch System When the deLuxe™ Stitch System is selected your machine will automatically choose the best way to control the upper thread, by thread portioning or thread tension, based on your selected stitch and settings. Thread portioning automatically and continuously measures the fabric thickness to meter the correct amount of thread for the selected stitch. -
Page 139: Stitch Limiting Options
Stitch Limiting Options Set the machine to stitch width safety or select the size of the twin needle to limit the stitch width and stitch positioning. This will minimize the risk of breaking a needle when sewing with accessories that do not allow the use of the entire stitch width. -
Page 140: Embroidery Settings
Embroidery Settings deLuxe™ Stitch System 07:48 When the deLuxe™ Stitch System is selected your machine Embroidery Settings will automatically choose the best way to control the upper thread, by thread portioning or thread tension, based on your deLuxe ™ Sti tch System selected stitch and settings. -
Page 141: Thread Cut Options
Thread Cut Options Choose between three thread cut options: no thread cuts, automatic thread cut and a combination of automatic thread cut and automatic jump stitch trim. Presser Foot Height Embroidery When using the Embroidery/Darning Foot R, the presser foot height can be adjusted for improved performance when using different weights of material and/or embroidery threads. -
Page 142: Display & Audio Settings
Display & Audio Settings All settings made in the machine settings will be saved, even when turning your machine off. Language Select your desired language. All texts in your machine will be changed after restart. Time Format Set if your clock show a 12– or a –24 hour format. Time Zone This is where you set your time zone. -
Page 143: Personalize Settings
Personalize Settings Machine Nickname 07:48 Touch to select a nickname for your machine. This can be Personalize Settings Back useful when owning more than one machine, to distinguish one machine from another when working in mySewnet. The Machine Nickname Designer Epic 3 name will be shown on the screensaver. -
Page 144: Wifi Settings
WiFi Settings In WiFi settings you can activate/deactivate WiFi on your machine, search for available networks and connect. If connected to a network with internet access the latest firmware update will always be available. When WiFi is connected and you have logged in to the mySewnet cloud, all your saved files in the machine will synchronize with the mySewnet cloud. -
Page 145: Mysewnet Settings
mySewnet Settings In mySewnet settings you can sign in to your mySewnet account. With a mySewnet account you will be able to access all of the mySewnet services. 12 Settings... -
Page 146: Camera And Projection Settings
Camera and Projection Settings Presser Foot Recognition The presser foot recognition feature is using the camera and artificial intelligence (AI), with a neural network that makes predictions, so that your machine can recognize which presser foot is attached. If the presser foot predicted to be attached differs from the one recommended for the selected stitch, this will be indicated in the information area. -
Page 147: Machine Information
Machine Information Machine information contains technical machine information such as: machine serial number, machine MAC address and current firmware. In machine information you can clear user account and files. 12 Settings... -
Page 149: 13 File Manager
13 File Manager... -
Page 150: File Manager - Overview
File Manager – Overview Touch the folder icon in the Menu Panel to open File Manager. File Manager is used to open design files, font files and stitch files. Store your saved files in the mySewnet cloud folder or to a USB device connected to your DESIGNER EPIC™... -
Page 151: File Formats
File Formats Your DESIGNER EPIC™ 3 machine can load the following file formats: • .VP4, VP3, .SHV, .DHV, .VIP, .HUS, .PEC, .PES, .PCS, . XXX, .SEW, .JEF, .EXP, .10* and .DST (embroidery files) • .SPX (stitch file) • .VF3 (embroidery font file) •... -
Page 152: Usb Device
USB Device The USB Device menu is only active when a USB device is connected to the machine. Touch the USB Device menu to display all of the connected devices. Touch a USB Device to explore it. The files visible in the USB section is listed in File Formats. Note: If you choose Delete All while in USB, it will delete all the files on your USB, even the ones not visible on the machine. -
Page 153: Move A File Or Folder
Move a File or Folder Use cut and paste to move file(s) or folder(s) to another location. Select the file(s) or folder(s) and then touch the cut icon. Open the folder where you want to place the selection. Touch the paste icon. The file(s) or folder(s) is removed from its original location and now stored in the new folder. -
Page 154: Pop-Up Messages In File Manager
Pop-up Messages in File Manager To make your experience as convenient as possible, your machine sometimes communicate with you using pop-up messages. Those messages can contain warnings, recommendations, information or prompt you to perform an action. Below, some of the messages that can appear are listed and explained. Do You Want to Delete? Folder Already Exists When deleting a file or folder, you will need to confirm the... -
Page 155: 14 Maintenance
14 Maintenance... -
Page 156: Cleaning The Machine Exterior
Cleaning the Machine Exterior To keep your sewing machine operating well, clean it often. No lubrication (oiling) is needed. Wipe the exterior surface of your machine with a soft cloth to remove any dust or lint built up. Wipe the screen with a clean, soft and slightly damp microfiber cloth. Removing the Needle Plate and Cleaning the Bobbin Area Lower the feed teeth by touching the presser foot up and extra... -
Page 157: Troubleshooting
Troubleshooting In this troubleshooting guide you will find solutions to the problems you may have with your machine. For further information please contact your local authorized HUSQVARNA® VIKING® retailer who will be happy to help you. General Problems Clean lint from bobbin area and use only the original Bobbin alarm does not work HUSQVARNA®... - Page 158 Once the thread is removed, touch OK. Pop-up message: The automatic needle threader is not in its Contact your authorized HUSQVARNA® VIKING® home position. Further sewing is disabled to prevent damage retailer for service.
- Page 159 Change to a new high quality thread purchased from an become dry? authorized HUSQVARNA® VIKING® retailer. If using a spool cap on top of the spool, is it too small so the Attach a spool cap slightly larger than the actual thread spool.
- Page 160 Thread Loops are Forming on the Underside of the Embroidery Design Has the embroidery built up too much to move freely under Attach the Sensor Q Foot (page 44). the presser foot? If using the Embroidery/Darning Foot R, increase the embroidery pivot height in settings menu in small increments until the problem is solved.
-
Page 161: Service
The Machine Cannot Synchronize with the mySewnet Cloud The machine cannot synchronize files with the mySewnet Make sure that you have a working WiFi connection. cloud Make sure that you have signed in to your mySewnet account. New mySewnet accounts are registered at husqvarnaviking.mysewnet.com Make sure that there is available space on the mySewnet cloud. -
Page 163: Index
Index 1. Select a Locking Point on Screen .......126 Bobbin Winding ............40 2. Move Locked Point on Fabric ........127 Bobbin winding lever........... 13 3. Set Matching Point on Screen........127 Bobbin winding thread guides ........12 4-Way Stitches ............87 Bobbins.............. - Page 164 Delete a File or Folder ..........153 File Formats..............151 Delete a Letter............110 File manager............112, 114 Delete Selected Stitch Point .......... 94 File Manager .............149 Delete/Delete All............105 Firmware Update Using a USB Device ......61 deLuxe™ Stitch System....... 78, 122, 125, 138, 140 Firmware Update Using WiFi........
- Page 165 Information and Sewing Recommendations..... 76 mySewnet Folder ............151 Inner hoop..............48 mySewnet Library ............99 Inserting the Bobbin............ 42 mySewnet Services ............61 Integrated Dual Feed (IDF) System ........ 13 mySewnet Settings............145 JoyOS ADVISOR™............ 56 Needle Area ............... 13 Needle Combination............ 36 Needle holder with needle clamp screw......
- Page 166 Presser Foot Pressure..........79, 139 Select Hoop ..............106 Presser Foot Recognition..........146 Select Line Positioning ..........115 Presser foot up and extra lift ......... 15 Select Multiple ..........93, 103, 151 Programmable Button Sew On ........86 Select Side Positioning ..........115 Project Creator ............62 Select Spacing.............
- Page 167 Stitch restart............... 15 Triple Stitch ............... 94 Stitch Settings............. 76 Troubleshooting ............157 Stitch Width ............... 77 Turnable Hoop Options – Side Sort ......122 Stitch-Out Progress ............124 Twin Needle Options..........140 Stop................15 Storing a Needle Plate..........45 Straight Stitch Plate ..........17, 49 Stretch Fabrics............
- Page 169 Consult your local authorized HUSQVARNA® VIKING® retailer, and be sure to visit our website at www.husqvarnaviking.com for the latest updates of the firmware and the user’s guide.
- Page 170 www.husqvarnaviking.com...
Need help?
Do you have a question about the VIKING Designer Epic 3 and is the answer not in the manual?
Questions and answers
How do I add a 360 x 260 hoop to my Epic 3 Embroidery machine
To add a 360 x 260 hoop to the Husqvarna VIKING Designer Epic 3 embroidery machine:
1. Ensure Proper Setup: Place the sewing machine and embroidery unit on a flat, sturdy surface with enough space for movement.
2. Remove the Accessory Tray: Slide off the accessory tray and open the embroidery unit connector.
3. Attach the Embroidery Unit: Align the markings on the baseplate and embroidery unit. Ensure the pins and plugs match the corresponding holes and sockets.
4. Secure the Hoop:
- Position the hoop with the embroidery hoop connector aligned.
- Ensure the outer and inner hoop are correctly placed.
- Tighten with the retaining screw if necessary.
5. Use the Large Hoop Support: If needed, attach the large hoop support to the front and back for better stability.
6. Check for Stability: Ensure the hoop is securely attached and follows the embroidery area indications.
Once set up, you can proceed with embroidery following the machine’s instructions.
This answer is automatically generated
I somehow changed the color of the embroidery area screen and I can't change it back. I've tried settings, personalize settings, the projector, YouTube videos, and the user manual. Please tell me where this information is located. Thank you.