Advertisement
Product Overview
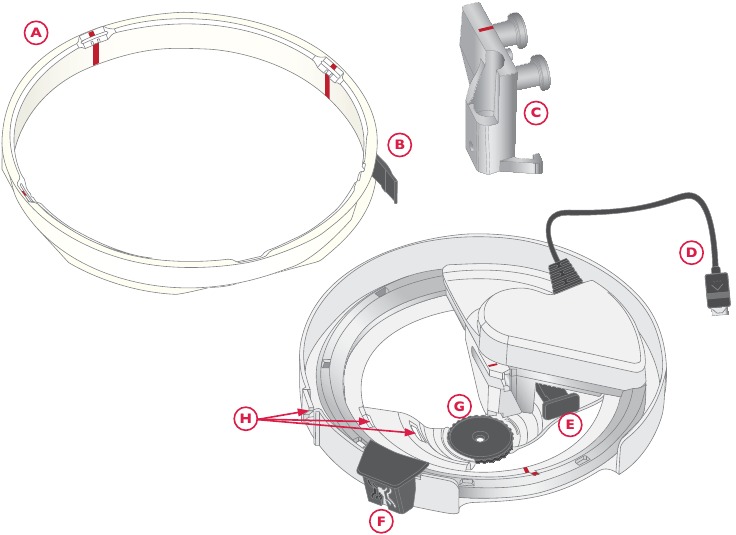
- Ribbon ring
- Ribbon clip
- Attachment holder
- Connection plug
- Release lever
- Ribbon ring holder
- Adjustable guide
- Ribbon guides
Introduction
Ribbon Embroidery Attachment gives you the possibility to embroider beautiful three-dimensional ribbon designs.
Embroider Ribbon Designs
Prepare your machine for embroidery. Select a ribbon design included with your machine.
When a ribbon design is loaded into the embroidery area, an extra frame will be visible. All ribbon designs must be placed inside this area, you will not be able to enter stitch-out otherwise.
When you're satisfied with the placement of your ribbon design, go to embroidery stitch out mode. Your machine will calibrate and the embroidery arm will move to the ready position. Slide on the hoop and start your embroidery.
When you reach the first ribbon block, it's time to prepare the Ribbon Embroidery Attachment and place it onto the machine. Your machine will guide you and tell when to cut your ribbon and attach/remove your Ribbon Embroidery Attachment.
If the next block in the design is a regular color block after a ribbon block, you will have to detach the Ribbon Embroidery Attachment before you continue to embroider.
Tip: If you have loaded several ribbon designs, use color sort. Then all ribbon blocks will be placed in the end of the color block list. Then you will not have to attach/detach the accessory in between the color blocks.
Prepare
Winding Ribbon
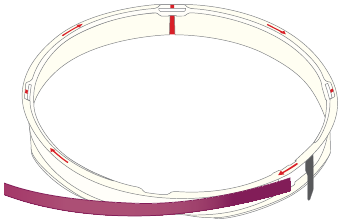
Secure the ribbon onto the ribbon ring by opening the clip, inserting the end of the ribbon and then close the clip again.
Note: If your ribbon has a right and wrong side, wind the ribbon with the right side out.
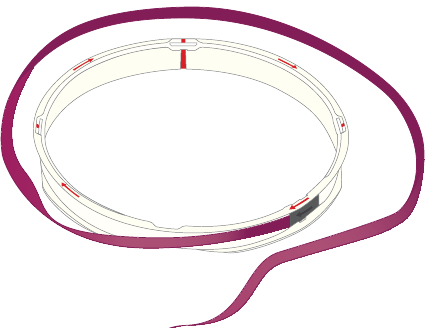
Wind your ribbon onto the ring, following the direction of the arrow markings (one turn is approx. (20'/ 50cm).
Tip: The amount of ribbon needed for a design is listed in the Quick Help available for each ribbon color block.
Place Ribbon Ring on to the Accessory
Pull up the ribbon ring holder. Place the ribbon ring, with arrow markings up, into the Ribbon Embroidery Attachment and pull the ribbon through the first guide (1). Lock by closing the ribbon ring holder, making sure it snaps into position.
Threading the Ribbon
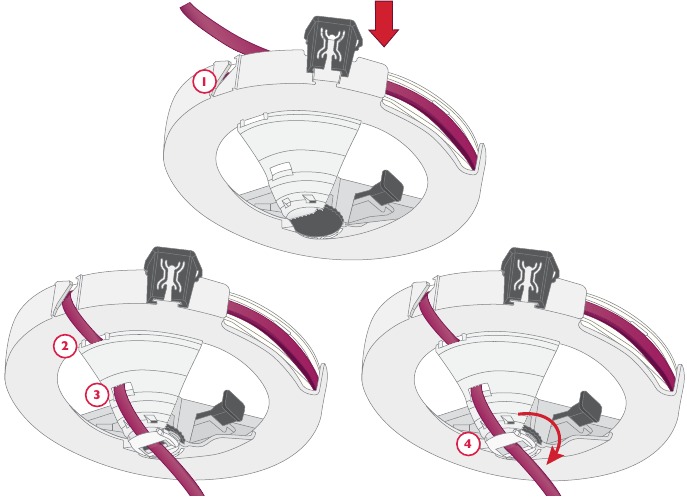
Continue to thread the ribbon as illustrated. While holding the ribbon in place rotate the wheel of the adjustable guide until the edges of the guide match the width of the ribbon. Do not tighten too hard, the ribbon should lay flat. Carefully pull out about 1½" (4 cm) of ribbon outside the Ribbon Embroidery Attachment.
Tip: It's easier to thread the ribbon if you first place the attachment upside down on a flat surface, then you can use both hands while threading.
Attach
Fastening the Attachment Holder
Using the universal tool, remove the presser foot ankle on the machine.
Position the Ribbon Embroidery Attachment holder onto the presser foot bar from below. Insert and tighten the screw using the universal tool.
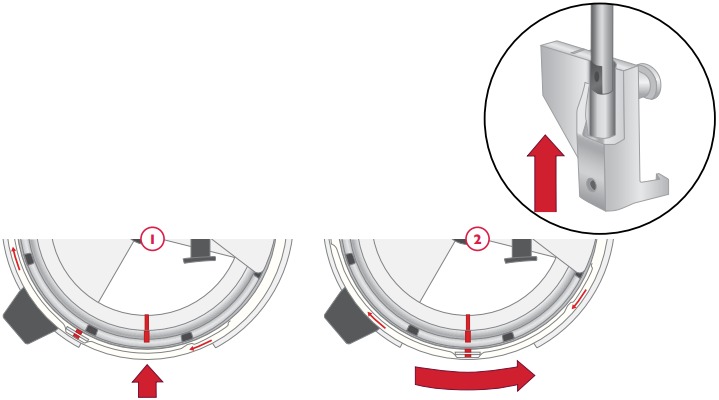
Align Markings of the Embroidery Ribbon Attachment
Before attaching the Ribbon Embroidery Attachment to the machine, make sure that the markings are correctly aligned. Three markings must match; the markings on the two inner parts of the Ribbon Embroidery Attachment and any of the four markings on the ribbon ring. If the inner markings don't match, hold the Ribbon Embroidery Attachment with one hand, turn the inner (metal) part with the other until the two red markings match (1). To align with a marking on the ribbon ring, carefully pull the loose end of the ribbon until one of the four markings align correctly (2). Be careful not to accidently pull the ribbon from the guides.
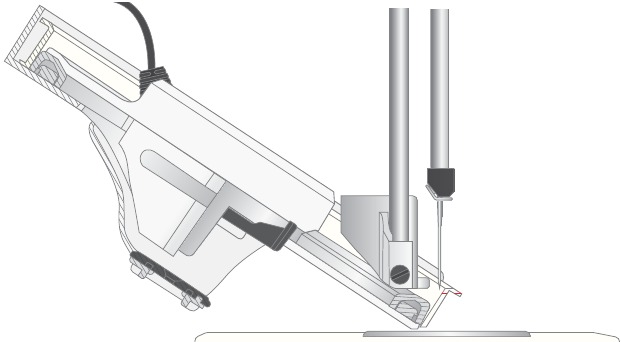
Attach onto Machine
When embroidering a ribbon block the presser foot and needle will automatically be set into correct position.
Make sure that the presser foot and the needle are in the up position.
Tilt the Ribbon Embroidery Attachment from behind and insert carefully. Make sure that the cut-out and all markings aligns with the needle. Push it towards you onto the holder until it snaps into in place.
You can now rewind the ribbon until you have only a few centimeters of the ribbon left.
Insert the plug into the accessory socket at the back of the sewing head.
When the Ribbon Embroidery Attachment is attached and plugged in, a pop-up message will appear and inform you that the Ribbon Embroidery Attachment needs to calibrate. Touch OK. The Ribbon Embroidery Attachment will calibrate and move to the ready position.
Tilting the Accessory
Tilting the Ribbon Embroidery Attachment can be useful if you for example need to re-thread without having to remove it first. In the tilted position, the easiest way to re-thread is by using a tweezer. Press the release lever and slide the Ribbon Embroidery Attachment backwards halfway until the marking line up (I), and it's possible to tilt.
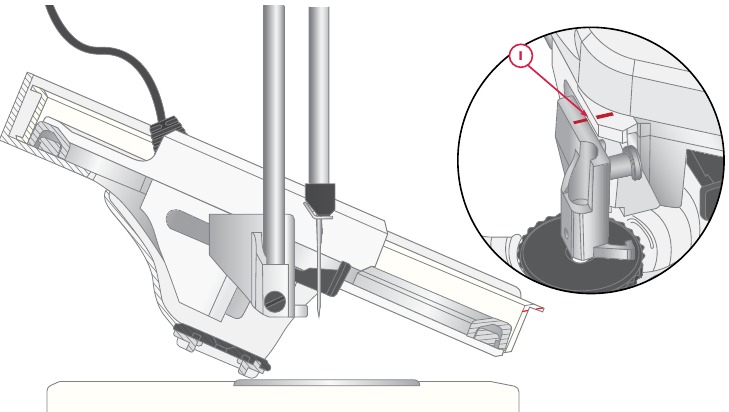
Detaching the Accessory From the Machine
When your ribbon embroidery is finished, cut your ribbon. Also, make sure the three red marks are aligned.
These marks should be aligned with the needle when removing the attachment. Pull out the plug from the accessory socket.
To remove the Ribbon Embroidery Attachment, push and hold the release button while you slide the attachment backwards until it's released from the holder. Tilt the edge of the attachment down so the red lines fit under the needle as you pull it backwards.
Tips & Hints
- For best results when embroidering ribbon designs, use ribbons with a minimum width of 5mm.
- Always thread your machine before attaching the Ribbon Embroidery Attachment.
- Make sure you have enough bobbin thread winded before attaching the accessory.
- When the Ribbon Embroidery Attachment is plugged in, you can adjust the pivot height in temporary embroidery settings.
| Ribbon Width (in mm) | Recommended Pivot Height |
| 8-12 | 7-9 |
| 5-7 | 4-7 |
| 3-4 | 1-4 |
Specifications
Supporting Hoops
240x150, 240x150 metal, 260x200,
360x200, 360x260, 200x200, 260x260
Compatible with Machines
DESIGNER EPIC 2
| Sewing Speed | 600 stitches/ minute maximum |
| Dimensions | Length: 203 mm Width: 85 mm Height: 66 mm |
| Consumption | 0,5A |
| Net Weight | 500 g |
The technical specification and this user's guide can be changed without prior notice.
IMPORTANT SAFETY INSTRUCTIONS
When using an electrical appliance, basic safety precautions should always be followed, including the following: Read all instructions before using this accessory. Keep the instructions at a suitable place close to the accessory. Make sure to hand them over if the accessory is given to a third party.
To reduce the risk of burns, fire, electric shock, or injury to person:
- Do not allow to be used as a toy. Close attention is necessary when the accessory is used with a machine or near children.
- Use this accessory only for its intended use as described in this manual.
- Never operate this accessory if it has a damaged cord or plug, if it is not working properly, if it has been dropped or damaged, or dropped into water.
- Do not use outdoors.
- Do not operate where aerosol (spray) products are being used or where oxygen is being administered.
- Never operate the appliance with any air openings blocked.
- Never drop or insert any object into any opening.
- Do not unplug by pulling on the cord. To unplug, grasp the plug, not the cord.
- Never place other objects on the accessory.
- Do not use the accessory if it is wet.
- If the cable is damaged, it must be replaced with an equivalent cable.
- For household use. Only use with sewing machine(s) recommended in this manual.
- Return the attachment to the nearest authorized dealer or service center for examination, repair, electrical or mechanical adjustment.
To reduce the risk of electric shock:
The accessory should never be left unattended when plugged in. Always unplug the accessory immediately after using and before cleaning it.
SAVE THESE INSTRUCTIONS
FOR CENELEC COUNTRIES:
This appliance can be used by children aged from 8 years and above and persons with reduced physical, sensory or mental capabilities or lack of experience and knowledge if they have been given supervision or instruction concerning use of the appliance in a safe way and understand the hazards involved. Children shall not play with the appliance. Cleaning and user maintenance shall not be made by children without supervision.
FOR NON CENELEC COUNTRIES:
This appliance is not intended for use by persons (including children) with reduced physical, sensory or mental capabilities, or lack of experience and knowledge, unless they have been given supervision or instruction concerning use of the appliance by a person responsible for their safety. Children should be supervised to ensure that they do not play with the appliance.
Documents / Resources
References
Download manual
Here you can download full pdf version of manual, it may contain additional safety instructions, warranty information, FCC rules, etc.
Advertisement


Need help?
Do you have a question about the VIKING and is the answer not in the manual?
Questions and answers