Braeburn 1025NC - Non-Programmable Thermostat Detailed User Guide
- Detailed user manual (12 pages)
Advertisement

Turn off power to the heating equipment before installation.
 Attention
For installation by experienced service technicians only.
Read all instructions before proceeding.
This thermostat requires 24 Volt AC Power or two (2) properly installed "AA" Alkaline batteries for proper operation. When connecting 24 Volt AC Power the batteries may be installed as a backup.
For use only as described in this manual. Any other use will void warranty.
Specifications
This thermostat is compatible with:
- Single stage heat only systems
- 250 – 750 millivolt heat only systems
- 2 or 3 wire hydronic zone systems
Electrical and control specifications:
- Electrical Rating: 24 Volt AC
- 1 amp maximum load per terminal
- AC Power: 18 – 30 Volts AC
- DC Power: 3.0 Volt DC (2 "AA" Alkaline Batteries Included)
- Control Range: 45° – 90°F (7° – 32°C)
- Temperature Accuracy: +/- 1°F (+/-.5°C)
Terminations
- 1025NC – R, G, W1, V3, C
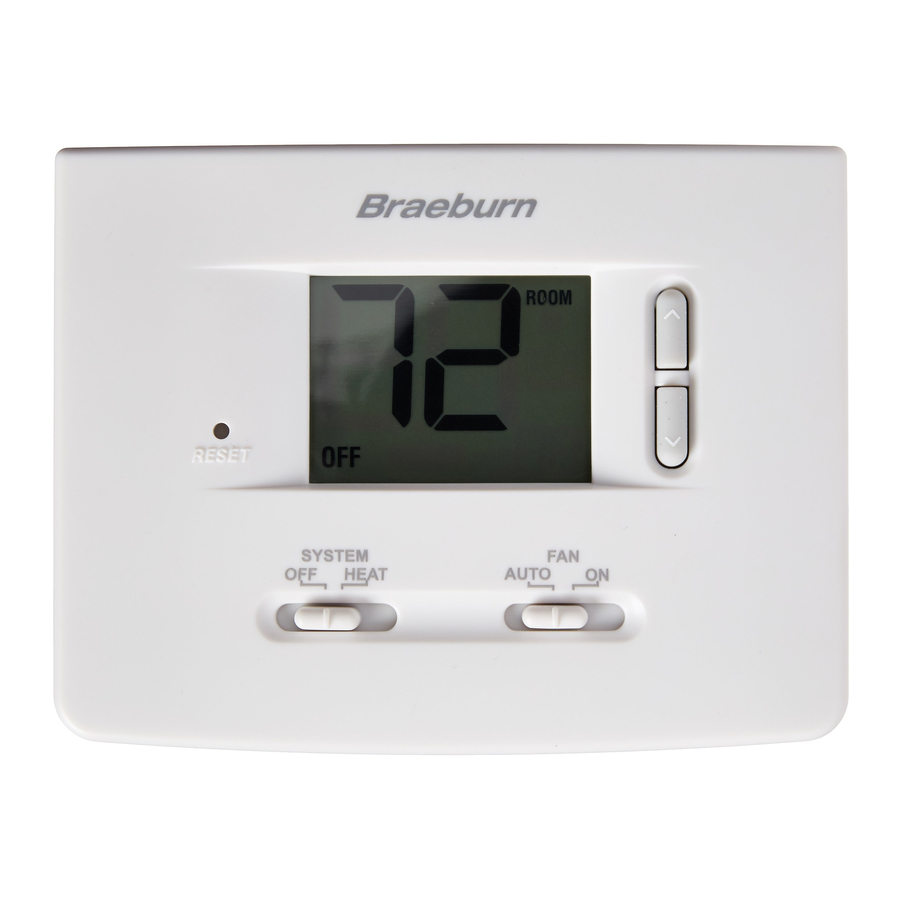
About Your Thermostat

- Room Temperature - Displays the current room temperature
- Reset Button - Resets thermostat back to factory defaults
- Low Battery Indicator - Indicates when the batteries need to be replaced
- System Switch - Selects heat on or off
- Quick Reference Instructions - Stored in slot at top of thermostat
- Fan Indicator - Indicates when the system fan is running
- System Status Indicator - Displays information about the status of the system
- Arrow Buttons - Used to increase or decrease settings
- Set Temperature - Displays the current set point temperature
- Fan Switch - Selects the system fan mode
Battery Compartment - Located in the back of the thermostat
Installation
Disconnect power before beginning installation.
Thermostat Location
Install the thermostat approximately 5 feet (1.5m) above the floor in an area that has a good amount of air circulation and maintains an average room temperature.
Avoid installation in locations where the thermostat can be affected by drafts, dead air spots, hot or cold air ducts, sunlight, appliances, concealed pipes, chimneys and outside walls.

Install your new Braeburn thermostat in 5 basic steps:
- Install the Sub-Base
- Provide Power
- Connect Your Wires
- Set Installer Switches
- Attach Thermostat to Sub-Base
Install the Sub-Base
- Remove the sub-base from the body of the thermostat.
- Mount the sub-base as shown below:


NOTE: After sub-base installation, you may insert the quick reference card into the slot on the top of the base.
Provide Power

- For 24 Volt AC power, you must connect the common side of the trans- former to the C terminal on the thermostat sub-base.
- For primary or back-up power, insert the 2 supplied "AA" type alkaline batteries into the battery compartment located in the rear housing of the thermostat. Make sure to position the Positive (+) and Negative (-) sides of the batteries correctly with the +/- symbols in the battery compartment.
Connect Your Wires
Wiring Terminations
| Terminal | Function | Description |
| R | Input | Power Connection (24 Volt AC Heating Transformer or Millivolt Power Source) |
| G | Output | Fan Control |
| W1 | Output | Conventional Heat Control |
| V3 | Output | Zone Valve Power Close |
| C | Input | 24 Volt AC Transformer Common |
Conventional Systems
Typical Wiring Configurations
Heat Only or Millivolt
| R | Power Connection |
| W1 | Heat Relay |
| G | Fan Control [note 3] |
| C | 24 Volt AC Transformer Common [note 2] |
3 Wire Hydronic Zone Valve
| R | Power Connection |
| W1 | Zone Valve Power Open |
| V3 | Zone Valve Power Close [note 1] |
| G | Fan Control [note 3] |
| C | 24 Volt AC Transformer Common [note 2] |
NOTES - Conventional Systems
- For a 2-wire zone valve you will not connect V3
- If batteries are installed, the 24 Volt AC common connection is optional
- If needed for system
Provide disconnect and overload protection as required.
Set Installer Switches
| Switch | Factory Default | Setting Options | Comments |
| F / C | F | F | Select for Fahrenheit temperature scale |
| C | Select for celsius temperature scale | ||
| HE / HG | HG | HG | Select for gas heat or hydronic systems without fan |
| HE | Select for electric heat or hydronic systems with fan |
NOTE: The reset button should be pressed after making any changes to the installer switches.
Attach Thermostat to Sub-Base

- Line up the thermostat body with the sub-base.
- Carefully push the thermostat body against the sub-base until it snaps into place.
- Insert quick reference card into slot on top of thermostat.
System Testing
Read Before Testing
- Do not short (or jumper) across terminals on the gas valve or at the system control board to test the thermostat installation. This could damage the thermostat and void the warranty.
- Move the SYSTEM switch to ON mode.
- Press
![]() to raise the set temperature a minimum of 3 degrees above the current room temperature. The system should start within a few seconds. With a gas heating system, the fan may not start right away.
to raise the set temperature a minimum of 3 degrees above the current room temperature. The system should start within a few seconds. With a gas heating system, the fan may not start right away. - Move the SYSTEM switch to the OFF mode. Allow the heating system to fully shut down.
- Move the FAN switch to the ON mode. The system fan should start (on systems where a fan is installed) within a few seconds.
- Move the FAN switch to the AUTO mode. Allow the system fan to turn off.
Setting User Options
Advanced User Options
User options allow you to customize some of your thermostats features.
The default user options are compatible with most applications, therefore it is not required that you adjust them.
To access the User Options menu, hold down both the ![]() and
and ![]() buttons for approximately 3 seconds until the screen changes and displays the User Option.
buttons for approximately 3 seconds until the screen changes and displays the User Option.
Press the ![]() or
or ![]() button to change the setting for the displayed User Option. After you have made your desired setting, press
button to change the setting for the displayed User Option. After you have made your desired setting, press ![]() and
and ![]() together to return to the normal mode.
together to return to the normal mode.
The thermostat will also return to normal mode after your last user option is made or after no keys have been pressed for 15 seconds.
Table of User Options
| No. | User Options | Factory Default | Setting Options | Comments |
| 1 | 1st stage differential | 0.5 | 0.5, 1.0 or 2.0 | Select a 1st stage temperature differential of.5˚, 1˚ or 2˚F (.25˚, 5˚ or 2˚C) |
Detailed Explanation of User Options
Temperature Differential
The differential setting is the temperature control range that your thermostat will provide. The smaller the setting, the tighter your range of temperature control and comfort will be.
Operating Your Thermostat
Setting the System Control Mode
The System Control has two modes of operation – OFF and HEAT. The mode can be selected by moving the SYSTEM switch to the appropriate position.

OFF - Heating system is off.
HEAT - Your heating system will operate.
Setting the Fan Control Mode
The Fan Control has 2 modes of operation – AUTO and ON. The mode can be selected by moving the FAN switch to the appropriate position.

AUTO - The fan will run when required by the system.
ON - The fan will run continually.
NOTE: Some system types do not have a fan control mode.
Temperature Adjustment
Press the  or
or  button to adjust the current set point temperature.
Status Indicators
Status indicators appear in the display to let you know if your system is on or off.

HEAT ON - Indicates your heating system is running.
Resetting the Thermostat
This thermostat provides you with a reset button that will erase all of your user settings.
To reset the thermostat, use a small object such as a tooth pick or paperclip and gently press the button located inside the small hole on the front of the thermostat housing labeled "reset".
Thermostat Maintenance
Changing the Batteries
Depending on your particular installation, this thermostat may be equipped with two (2) "AA" type alkaline batteries.
If batteries are installed and they become low, a low battery indicator will appear in the display. You should change your batteries immediately when you see the low battery signal by following these instructions.

NOTE: We recommend replacing the thermostat batteries annually or if the thermostat will be unattended for an extended period of time.
- Remove thermostat body by gently pulling it from base.
- Remove old batteries and replace with new batteries.
- Make sure to correctly position the (+) and (-) symbols.

- Gently push thermostat body back onto base.

Thermostat Cleaning
Never spray any liquid directly on the thermostat. Using a soft damp cloth wipe the outer body of the thermostat. Never use any abrasive cleansers to clean your thermostat.
For troubleshooting tips, visit braeburnonline.com.
Store this manual for future reference.
Braeburn Systems LLC
2215 Cornell Avenue • Montgomery, IL 60538
Technical Assistance: www.braeburnonline.com
Call us toll-free: 866-268-5599 (U.S.)
630-844-1968 (Outside the U.S.)

Documents / Resources
References
Download manual
Here you can download full pdf version of manual, it may contain additional safety instructions, warranty information, FCC rules, etc.
Download Braeburn 1025NC - Non-Programmable Thermostat Detailed User Guide
Advertisement


Need help?
Do you have a question about the 1025NC and is the answer not in the manual?
Questions and answers