Advertisement
PARTS & ACCESSORIES


1a & 1b. Sealing sponges
- Sealing strip
- Canister button
- Bag roll
- 11" wide x 16 ft. long
- 28 cm wide x 5 m long
- Cutter bar
6a & 6b. Cover fasteners
7a & 7b. Cover release buttons
- Removable drip tray
9a & 9b. Bag clips
- Bag cutter
- Heating strip
- Air intake
- Support card
- Power cord
- ON & OFF Switch
- Vacuum bottle stopper
- Canister hose
- 5 x 1 cup bags (5x7 in/12x20 cm)
- 5 x 1 qt bags (8x10 in/20x25 cm)
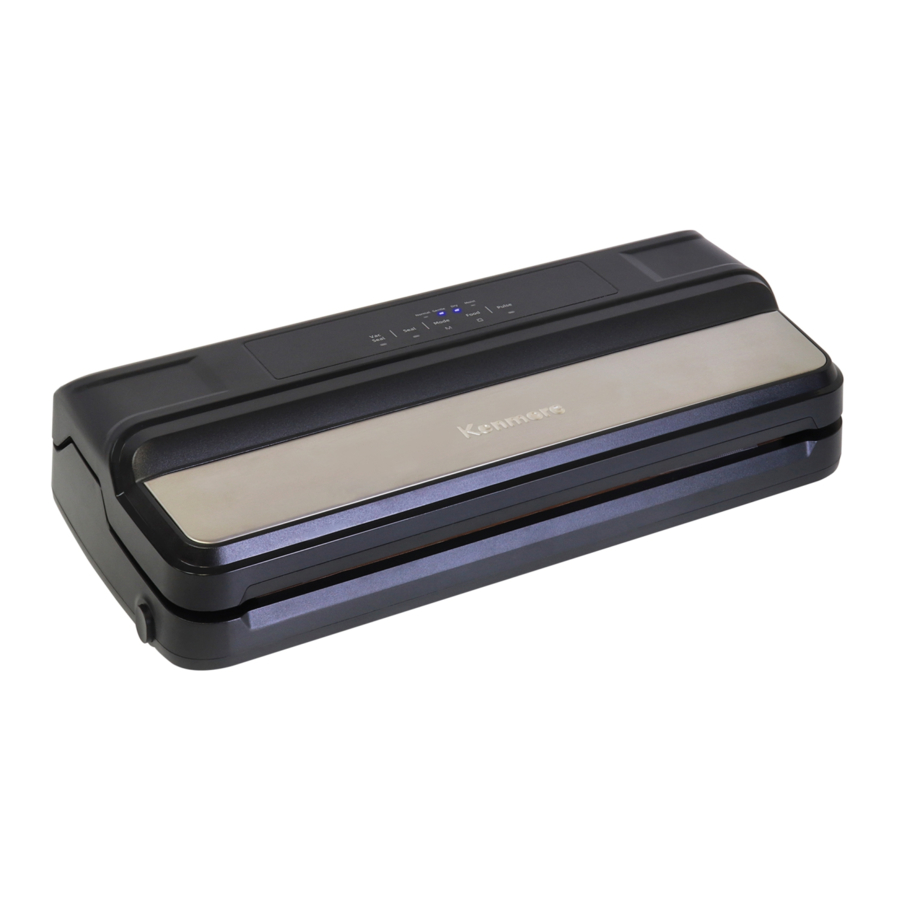
CONTROL PANEL

- VAC SEAL - The vacuum seal function draws all the air out of the plastic bag and heat-seals it closed when finished. Touch the VAC SEAL button once to start the operation. Touch the button again at any time to pause or cancel the operation.
- SEA - The single seal function heat-seals one end of a plastic bag, either to close off a bag without vacuuming or to create customized bags from a bag roll. Touch the SEAL button once to start the operation. Touch the button again at any time to pause or cancel the operation.
NOTE - Please wait at least 30 seconds before restarting a vacuum seal or single seal operation after pausing. - MODE - In Gentle mode the pump operates at a slower speed to extract the air from around delicate foods such as cakes or soft cheeses without damaging them. Normal (default) mode is suitable for most operations. Touch the MODE button to cycle between the two options.
- FOOD - Dry mode is suitable for most foods. Choose Moist mode when vacuum sealing wet or greasy foods that are mostly solid such as raw or cooked meat. In moist mode, any moisture drawn out by the pump is diverted into the removable drip tray (7) and the heating strip temperature is raised to ensure a secure seal. Touch the FOOD button to cycle between the two options.
- PULSE - The Pulse function lets you manually start and stop the vacuum for precision control to prevent crushing delicate foods like baked goods or potato chips. Touch and hold the pulse button to vacuum and release to stop.
- CANISTER - Canister mode lets you use the food sealer and canister hose to draw the air out of bottles sealed with the included bottle stopper and most brands of reusable vacuum sealing food storage containers (not included).
BEFORE FIRST USE
- Carefully unpack your Kenmore Food Sealer and check that all parts and accessories are present. Open the food sealer, remove the accessories and folded support card stored inside, and set them aside. Safely dispose of plastic bags or small pieces that could present a suffocation or choking hazard. DO NOT DISCARD THE SUPPORT CARD.
- Wipe the interior and exterior surfaces and accessories with a soft damp cloth to remove any dust or debris from the factory or packaging. Do not use abrasive cleansers or scouring pads that could scratch the appliance's surface.

To protect against electrical shock, always unplug the food sealer from the power source before cleaning. Do not immerse the food sealer body, power cord, or electrical plug in any liquid.
- Dry all parts thoroughly and then place the food sealer on a stable, level surface before plugging it in and powering it on.
OPERATING YOUR APPLIANCE
Always place the food sealer on a stable, level surface and remove the support card and any accessories stored inside (other than the bag roll) before operating it.
USING THE SINGLE SEAL FUNCTION
Use the single seal function to create custom-sized bags from a bag roll, to seal liquids for storage, or when using the Pulse function to vacuum seal delicate items.
NOTE - Only embossed (textured) bags should be used for vacuuming. Smooth (untextured) bags should be used for sealing only.
- Position the open end of the bag in the bag clips and smooth out any wrinkles or creases.
- Close the food sealer, pressing down firmly on both sides of the cover until you hear both fasteners lock.
- Touch the SEAL button. A few seconds after the indicator light turns on, you will hear the sound of the sealing operation start and stop. Wait for the indicator light to go out before pressing the fastener release buttons to open the food sealer.
MAKING BAGS FROM A BAG ROLL
- Lift the cutter bar, draw out your desired length of bag plus an additional 3 inches (8 cm), and lower the cutter bar over the bag.
- Holding the cutter bar firmly with one hand, slide the bag cutter smoothly across to the other side and remove the cut section.
- Use the single seal function to seal one end of the bag. You can now fill your custom bag and either vacuum or single-seal the open end.
USING THE VACUUM SEAL FUNCTION
- Place the food or items to be sealed in the embossed (textured) vacuum bag, leaving at least 3 inches between contents and the top of the bag.
- Position the open end of the bag in the bag clips and smooth out any creases.
![]()
- Close the food sealer, pressing down firmly on both sides of the cover until you hear both fasteners lock.
![]()
- Touch the MODE and FOOD buttons to change the settings as needed. Use the normal and dry settings for most items. Select gentle mode for delicate foods like cakes or soft cheeses and select moist for wet or greasy foods like raw or cooked meat.
![]()
- Touch the VAC SEAL button. The indicator light will turn on and you will hear the vacuum working and see the bag contracting around the contents.

- The pump will stop automatically when all the air has been removed. The SEAL indicator light will come on and you will hear the sealing operation start and stop.
- Wait for the VAC SEAL and SEAL indicator lights to go out before pressing the fastener release buttons to open the food sealer.


USING THE CANISTER VACUUM FUNCTION
- Place the food or items to be sealed in a reusable vacuum sealing food storage container (sold separately) and close the container lid.
- Insert one end of the canister hose in the air intake inside the food sealer and the other end in the port in the canister lid.
- DO NOT CLOSE THE FOOD SEALER. Press the canister button to start the operation. You will hear the vacuum working.

- When all the air has been removed from the canister the pump will stop automatically. Carefully remove the hose from the canister lid and store.
- Follow the same process with the vacuum bottle stopper to vacuum seal glass bottles of wine, vinegar, soda, etc

TIPS AND IDEAS
- EASY ICE PACKS - Fill a bag 2/3 of the way, seal the opening (do not vacuum), and freeze.
- PROTECT YOUR KEEPSAKES - Vacuum-pack non-food items such as photos, documents, stamps, books, jewelry, and cosmetics to protect them from oxidation, corrosion, and moisture.
- FAST MARINATING - Coat the food in marinade and vacuum seal to help meat, poultry, or fish absorb the flavors quickly and evenly.
- PREVENT PUNCTURES - When preparing food such as bone-in meat or fish filets for sealing, wrap any sharp protrusions with plastic film to avoid puncturing the bag.
CLEANING AND MAINTENANCE
CLEANING THE DEVICE
- Power off and unplug the food sealer and wait for the heating strip to cool down.
- Carefully lift out the removable drip tray, wash in warm soapy water or on the top rack of the dishwasher, and dry thoroughly before replacing it in the food sealer.
- Use a soft damp cloth to wipe away any drips or spills on the interior and exterior surfaces of the food sealer. Do not use abrasive cleansers or scouring pads and do not immerse the food sealer body, power cord, or electrical plug in any liquid.
- Dry all parts thoroughly before either storing or plugging the food sealer back in. If storing the food sealer, replace the support card between the bag clips and do not fasten the lid.
CLEANING THE VACUUM BAGS
Under normal circumstances, your vacuum bags can be washed and reused several times. To reuse the bags, turn them inside out and wash in warm, soapy water or on the top rack of the dishwasher. Let the bags dry completely and check for punctures or tears before reusing.

Do not reuse bags that have been used to store raw meat, sh, or poultry, or that have been boiled or microwaved.
FOOD STORAGE GUIDE
| FOOD | STORED IN | NORMAL SHELF LIFE | VACUUM STORAGE |
| Raw meat & poultry | Freezer | 3-6 months | 2-3 years |
| Refrigerator | 2-3 days | 8-9 days | |
| Ground meat & poultry | Freezer | 4 months | 1 year |
| Cooked meat & poultry | Refrigerator | 4-6 days | 10-14 days |
| Fish & seafood | Freezer | 3-6 months | 1-2 years |
| Refrigerator | 1-3 days | 4-5 days | |
| Hard-boiled eggs | Refrigerator | 1 week | 2-3 weeks |
| Cheese | Refrigerator | 1 month | 4-8 months |
| Vegetables | Freezer | 8 months | 2-3 years |
| Lettuce | Refrigerator | 3-6 days | 2 weeks |
| Fruit | Freezer | 6-12 months | 1-3 years |
| Refrigerator | 1-3 weeks | 1-2 months | |
| Berries | Freezer | 3-4 months | 6-8 months |
| Refrigerator | 1-6 days | 1-2 weeks | |
| Breads, cakes, muffins, cookies | Freezer | 6-12 months | 1-3 years |
| Cookie dough | Freezer | 3 months | 1 year |
| Flour & sugar | Pantry | 6 months | 1-2 years |
| Rice & pasta | Pantry | 6 months | 1-2 years |
| Dried beans & grains | Pantry | 6 months | 1-2 years |
| Nuts & seeds | Pantry | 6 months | 1-2 years |
| Whole spices | Pantry | 1-2 years | 2-3 years |
| Ground spices | Pantry | 6 months | 1-2 years |
| Whole coffee beans | Freezer | 1-3 months | 1 year |
| Pantry | 6-8 months | 2-3 years | |
| Ground coffee | Freezer | 4-6 months | 2 years |
| Pantry | 1-2 months | 5-6 months | |
| Tea (bags or looseleaf) | Pantry | 8-12 months | 1-2 years |
IMPORTANT SAFEGUARDS
When using your Kenmore Food Sealer, basic safety precautions should always be followed, including the following:
- READ ALL INSTRUCTIONS BEFORE USE
- Before using the appliance for the first time, remove any packaging material, promotional labels, and stickers. Safely dispose of plastic bags or small pieces that could present a suffocation or choking hazard to young children.
- Before using, check that the voltage of the wall outlet corresponds to the one shown on the rating plate of the appliance. Do not attempt to use the appliance with a voltage converter.
- Do not attempt to operate the appliance if there is damage to the cord or plug. Stop using it immediately and take it to a qualified service facility for examination and repair.
- Always unplug the appliance from the power source and let the heating strip cool down beforecleaning and storing. To unplug, grasp plug and pull it from the electrical outlet; never unplug it by pulling on the power cord.
![shock hazard]() To protect against electrical shock, do not immerse any parts of the food sealer, power cord, or electrical plug in water or any other liquid. If the appliance falls into or accidentally becomes immersed in water, immediately unplug it from the wall outlet. DO NOT REACH INTO THE WATER.
To protect against electrical shock, do not immerse any parts of the food sealer, power cord, or electrical plug in water or any other liquid. If the appliance falls into or accidentally becomes immersed in water, immediately unplug it from the wall outlet. DO NOT REACH INTO THE WATER.- Do not use the food sealer on wet or hot surfaces or near a heat source.
- This appliance is not intended for use by persons, including children, with reduced physical, sensory or mental capabilities, or lack of experience and knowledge, without supervision and instruction by a person responsible for their safety. Close supervision is necessary when any appliance is used by or near children to ensure that they do not play with the appliance.
- This appliance is recommended for indoor household use only. Using this appliance for anything other than its intended use will void your warranty.
![burn hazard]()
![shock hazard]()
Do not attempt to operate the appliance by any method other than as described in this manual. Do not use accessories or attachments other than those provided or recommended by the manufacturer. The use of aftermarket attachments or accessories not recommended by Kenmore will void your warranty and may cause fire, electrical shock, or injury.- Regularly clean the food sealer using the cleaning instructions in this manual. Do not use abrasive cleansers or scouring pads that could scratch the appliance's surface.
- To prevent distorting or damaging the sealing sponges, always place the support card back in the food sealer and leave the lid unlatched when it is not in use.
- This appliance is equipped with NTC intelligent temperature control. When the temperature of the heating strip exceeds the pre-set safety parameters, the food sealer will automatically enter safety protection mode. The indicator lights will flash and the controls will be temporarily disabled while the heating strip cools down. Once the heating strip has returned to a safe temperature (approximately 2 minutes), the indicator lights will stop flashing and the food sealer will resume its normal operating state.
- If you see that any part of a bag is melted after sealing, discontinue use and let the heating strip cool down for at least 90 seconds before using the food sealer again.
![]()
To reduce the risk of burns or other injuries, do not touch the heating strip during or after using the food sealer. Wait for it to cool down before cleaning or storing.- Always make a hole in the bag and/or release the air valve on a vacuum canister to vent steam before heating sealed or vacuumed bags or canisters in a microwave oven.
- Liquid foods are suitable for single sealing only; do not attempt to vacuum seal liquids. "Moist" mode should be used when vacuum-sealing wet or greasy foods that are mostly solid such as raw or cooked meat or fish.
- If the food sealer starts to malfunction during use, unplug it from the wall outlet. Do not use or attempt to repair a malfunctioning appliance. For any maintenance other than cleaning, call or email Koolatron Customer Assistance
 To protect against electrical shock, do not immerse any parts of the food sealer, power cord, or electrical plug in water or any other liquid. If the appliance falls into or accidentally becomes immersed in water, immediately unplug it from the wall outlet. DO NOT REACH INTO THE WATER.

SAVE THESE INSTRUCTIONS!
Customer Assistance
1-800-265-8456
www.koolatron.com

Documents / Resources
References

Download manual
Here you can download full pdf version of manual, it may contain additional safety instructions, warranty information, FCC rules, etc.
Advertisement


Need help?
Do you have a question about the KKFSDC and is the answer not in the manual?
Questions and answers