Table of Contents
Advertisement
Quick Links
Advertisement
Table of Contents

Related Manuals for AmScope SM745


Summary of Contents for AmScope SM745
-
Page 1: User's Manual
SM745 Manual User’s Manual... -
Page 2: Table Of Contents
SM745 Manual Table of Contents User’s Manual ............................... 1 Introduction ..............................3 Safety Precautions ............................4 SM745T ................................. 5 SM745B ................................ 7 Assembly ............................... 9 Setting Up ..............................10 Focusing ..............................11 Attaching a Camera ............................ 12 Adjusting Focusing Tension ........................13 Maintenance/Precautions .......................... -
Page 3: Introduction
Congratulations on the purchase of your new AmScope microscope head! This manual is designed for the SM745 series microscope heads (SM745B/T and SM745TP). The two base models of this series differ in that the -B models are binocular (two eyepiece ocular tubes), while the -T models are trinocular (two eyepiece ocular tubes with a third port on top for a microscope camera). -
Page 4: Safety Precautions
SM745 Manual Safety Precautions 1. As the microscope is a precision instrument, always handle it with care, avoiding impact or abrupt movement during transportation. Do not shake the package. 2. Do not place the microscope in direct sunlight or in high heat. Keep it indoors in a dry and clean place with temperatures between 32-100 degrees F (0-40 degrees C), and in maximum relative humidity of 85%. -
Page 5: Sm745T
SM745 Manual SM745T... - Page 6 SM745 Manual...
-
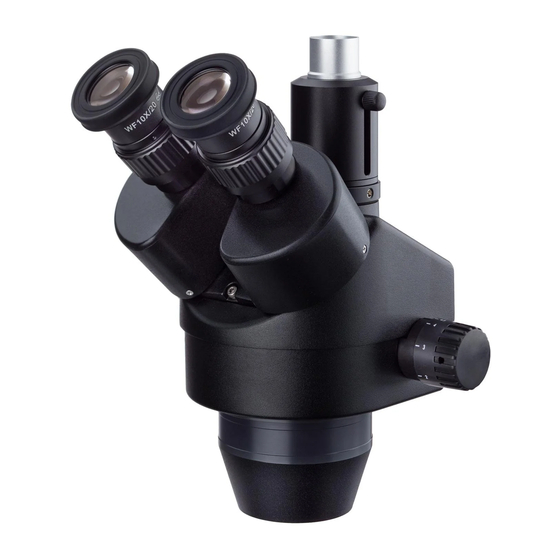
Page 7: Sm745B
SM745 Manual SM745B... - Page 8 SM745 Manual Definition of Parts Adjustable Trinocular Port Adjustable port at the top of the microscope used to attach digital or video cameras (-T and -TP models) Continuous Zoom A microscope head with a knob to change magnification through a range...
-
Page 9: Assembly
Secure the microscope head in place by tightening the thumb screw at the front of the focusing rack, if using an AmScope focusing rack. If using your own rack from another brand, secure the head with whatever mechanisms are available to you. -
Page 10: Setting Up
SM745 Manual Setting Up 1. Once you have placed your sample on the table or base below the objective, center the sample as best as possible. A slide is neither needed nor required for a stereo microscope, although they can be used if desired. If using a slide, use the stage clips to hold it in place. -
Page 11: Focusing
SM745 Manual Focusing 1. A stereo microscope’s focus differs from a compound microscope due to the lower magnification levels. Magnification and focal distance (working distance) are inversely related to each other, like a compound microscope, however the focal distance changes are far more drastic. -
Page 12: Attaching A Camera
30.5mm to 23.2mm adapter ring inserted into the ocular tube to resize it for your camera. Many of our Amscope brand 23.2mm sized cameras come with this ring, however, please check your packing list for your specific camera to see if yours comes with one or not. -
Page 13: Adjusting Focusing Tension
SM745 Manual Adjusting Focusing Tension 1. To adjust the tension of the focusing knobs, grab both sides of the focusing knob and twist them opposite of each other. 2. To decrease tension, rotate in the opposite direction of the above. Typically, adding... -
Page 14: Maintenance/Precautions
Doing so will void your warranty unless by advisement of one of our technicians to do so. - After use, cover the microscope with the provided dust cover. - Keep your AmScope microscope in a dry, clean location in order to prevent rust or other damages. -
Page 15: At A Glance Specifications List
SM745 Manual At a Glance Specifications List Head: 45 degree inclined 360 degree swiveling binocular/trinocular Eyepiece: 30mm extreme widefield focus-adjustable 10X/22 Objective: 0.7X-4.5X Diopter Adjustment: +/-5dp Interpupillary Distance: 2-0" - 2-15/16"(52-75mm) Working Distance (No Barlow Lens): 4" (100mm) Field of View: 1-1/4” (33mm) @ 7X total magnification Collar Mounting Size: 3”... -
Page 16: Technical Terms & Concepts
SM745 Manual Technical Terms & Concepts Total Magnification Total magnification of a microscope is calculated by the multiplication of the objective magnification, eyepiece magnification, and accessory magnification (Mobj x Meye x Macc). ‐Ex: (10x Eyepieces) x (4x Objective) x (0.5X Barlow Lens) = 20x Total Magnification... -
Page 17: Optional Accessories
SM745 Manual Optional Accessories Parts Description Model # Purpose Eyepieces EP20X30 For obtaining higher magnification powers EP25X30 For obtaining higher magnification powers 10x w/ Pointer EP10X30R For easier identifying of objects when teaching others 10x w/ Reticle EP10X30R For measuring objects Barlow Lens (Auxiliary 0.5x... - Page 18 SM745 Manual stand for viewing larger samples, or keeping the microscope out of the work area Double Arm Boom Basic double arm boom stand viewing larger samples, or keeping the microscope out of the work area Stands Articulating Arm w/...
-
Page 19: Troubleshooting
SM745 Manual Troubleshooting Symptom Cause Remedy OPTICAL ISSUES Obstructions are observed in the Stain, dust, or dirt has accumulated Clean any glass media or use a new field of view on the specimen specimen if sample is contaminated/destroyed Stain, dust, or dirt has accumulated Identify which lens has the dirt. - Page 20 SM745 Manual enough, or is set to too low of an intensity setting. Adjust the intensity setting to a higher position or replace the light source. Stains, dust, or dirt has Identify which lens has the dirt. If accumulated on objective,...
- Page 21 SM745 Manual edge of a raised surface to a lower sample. ELECTRICAL ISSUES (IF APPLICABLE) The bulb/light source flickers The bulb is close to burning out If a halogen or tungsten unit, change the bulb with a new one. If LED, file a warranty request for replacement.
Need help?
Do you have a question about the SM745 and is the answer not in the manual?
Questions and answers